Chapter: The Ichorian
Information relevant to the 6th chapter of The Mirror Breaks
watchtowers
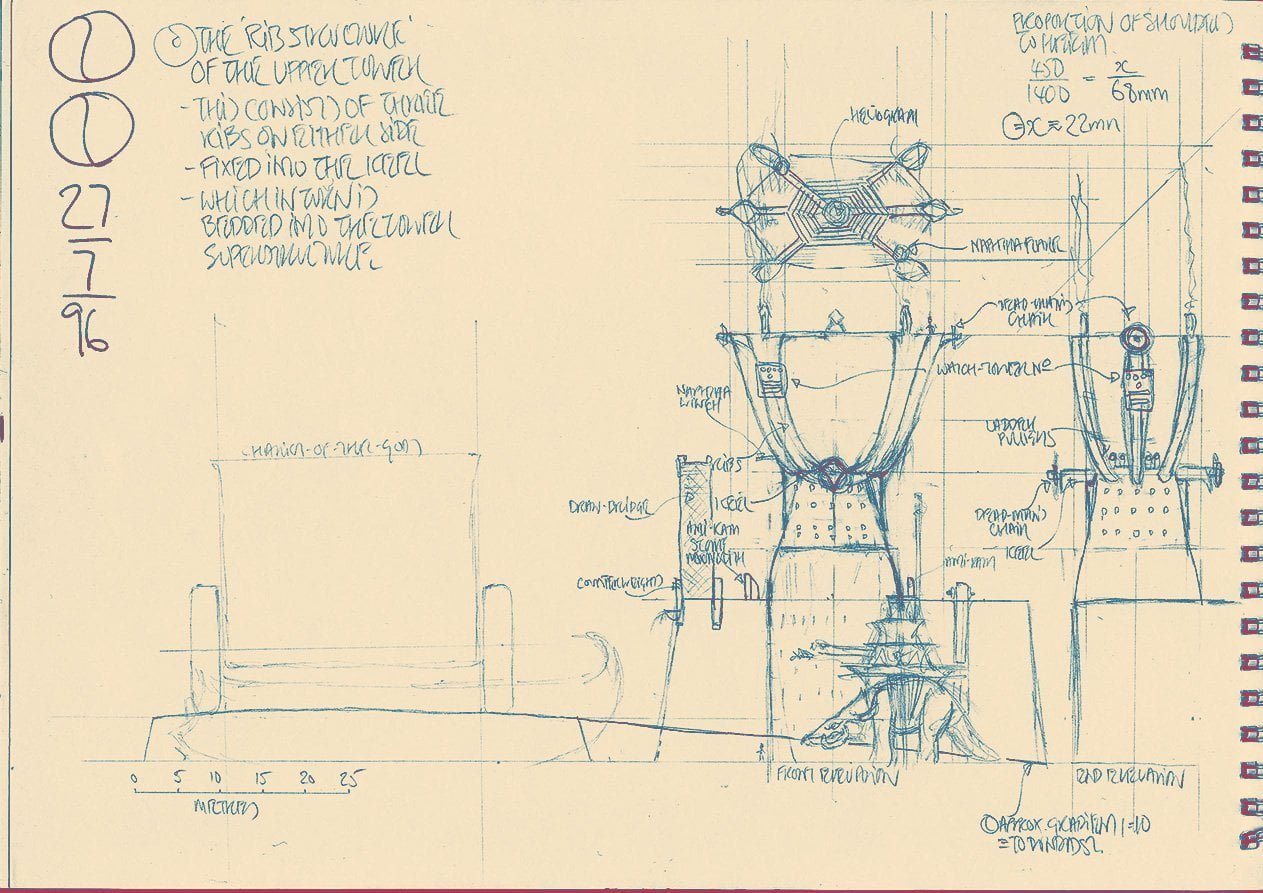
The diagram above shows side views and a view from above of a standard watchtower. Each such tower stands guard on a gate controlling passage from one province into another through the wall that carries a leftway. Note the drawbridge that carries the leftway over the gateway below
Watchtowers are set at regular intervals along the raised roads of the Guarded Land. These towers and the high road—the leftway—that runs under their gaze, form not only the primary communications systems of the Commonwealth, but also provide the Wise with a ‘sensory grid’ with which they ‘see’ much of what goes on in the Guarded Land. In addition, each tower is garrisoned with enough auxiliaries to defend the gate over which each tower stands guard
The communication system has two distinct aspects. Messages can be carried as sealed despatches at furious speed along the leftway by couriers who obtain fresh aquar at each tower. Couriers, and what they carry, are protected by stringent codicils of the Law-that-must-be-obeyed.
Shorter and more critical messages are jumped from tower to tower by means of the heliographs during the day or, more slowly, by naphtha flares at night
A watchtower is often at the centre of an extensive stopping place, where the throngs travelling on the road below can make camp for the night
Watchtowers play an important part in the Stone Dance, and it was because of this that I felt the need to understand their exteriors and interiors so well
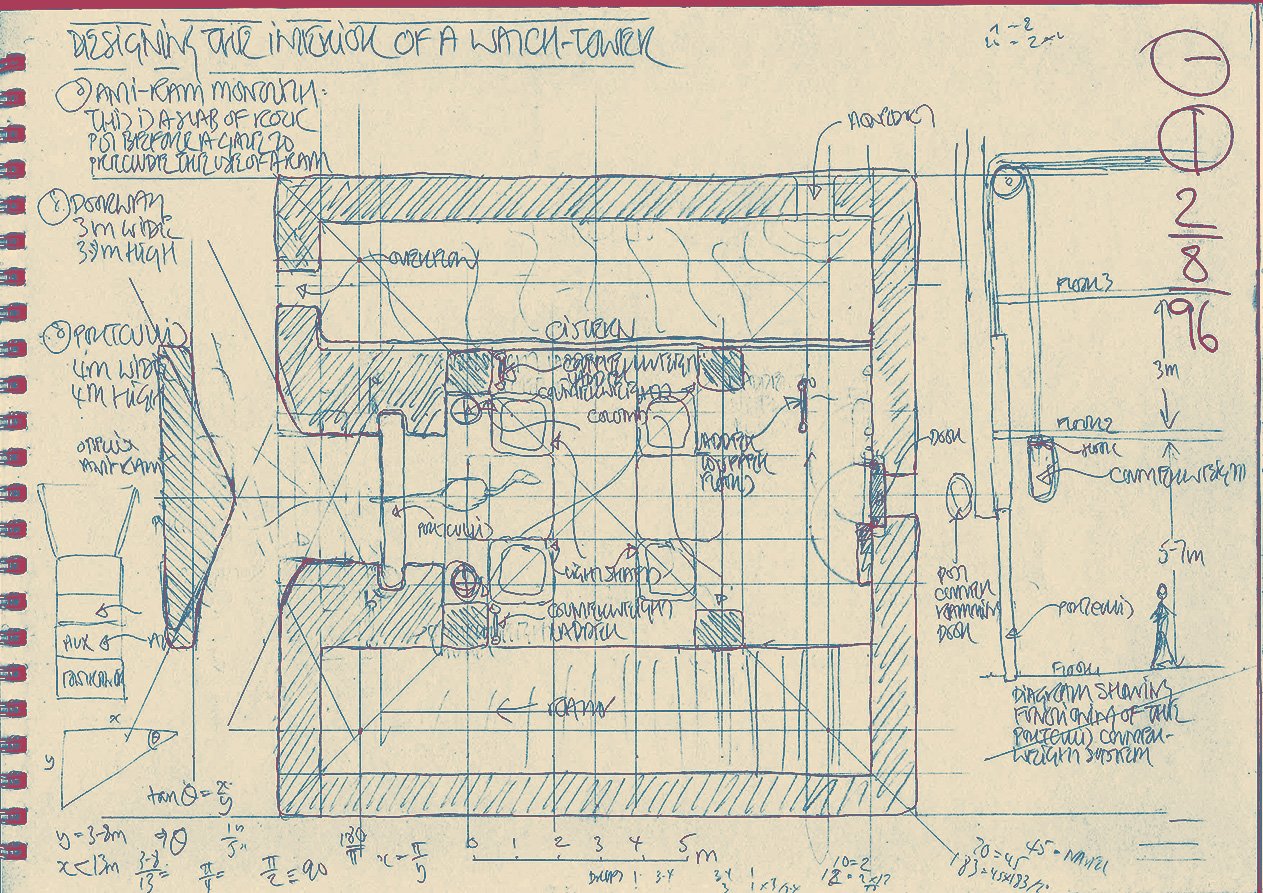
From the summit of a watchtower, six ribs curve up to hold aloft a platform at the centre of which is located a heliograph device. Naphtha, piped up the ribs, burns in flares to transmit signals at night when the heliograph cannot operate. The ribs branch up from either side of a keel beam. At the ends of the keel beam are two of the tower’s four deadman chairs: the other two hang from the upper ends of the middle ribs. Lookouts sitting in these chairs maintain an unsleeping scrutiny of the Guarded Land and the road below. The keel beam is embedded in the superstructure of the tower that consists of a number of floors: those above the level of the leftway are connected by ladders that can be raised by means of counterweights. Those below the level of the leftway are connected by ramps
Note the trapdoor in the roof that gives access down into the uppermost storey. Note also the staples climbing up the rib in the lower left (of the right hand plan) that gives access to a naphtha flare and to the heliograph platform. The left hand diagram shows the upper storey that provides accommodation for the staff of ammonites who operate the heliograph. It is these chambers that Carnelian, his father and the other Masters occupy each night on their journey to Osrakum
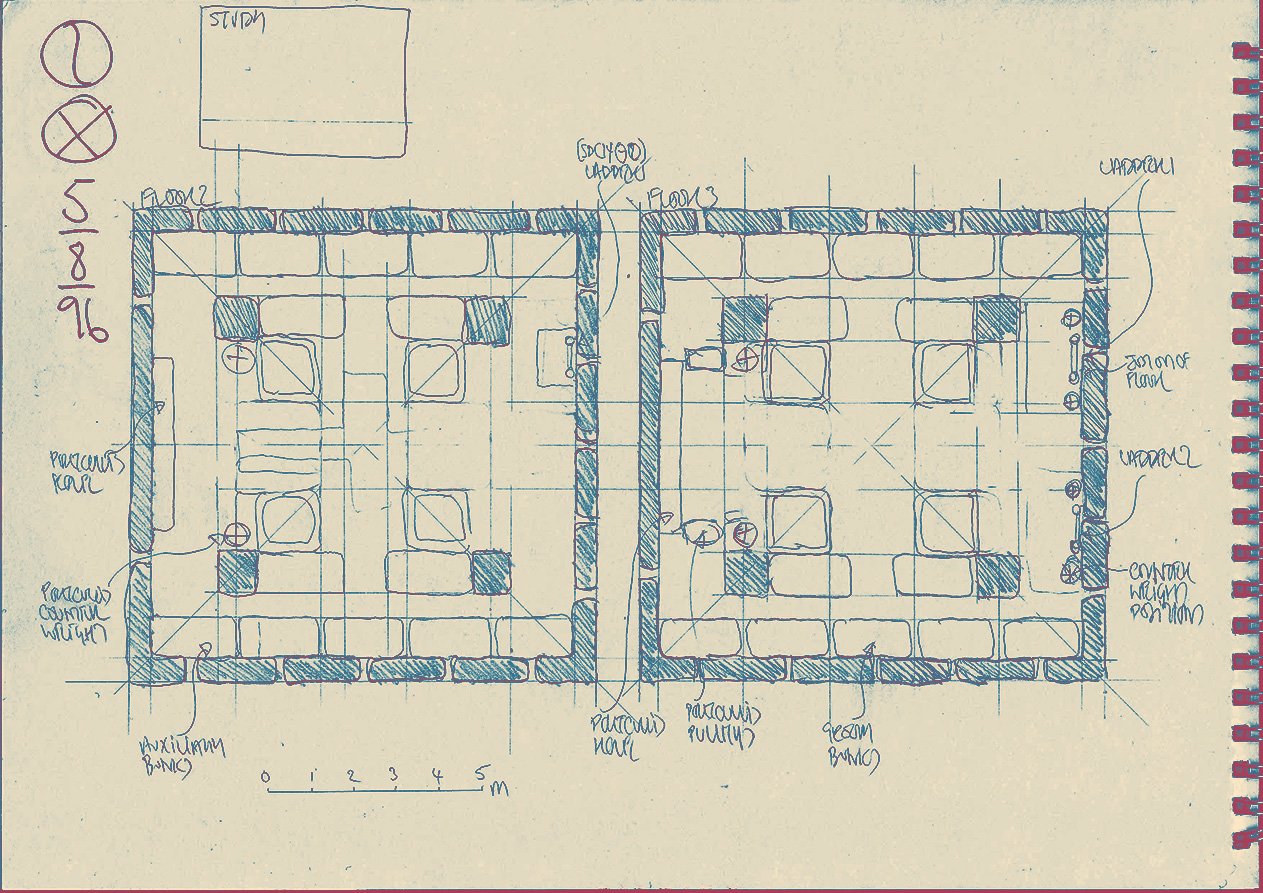
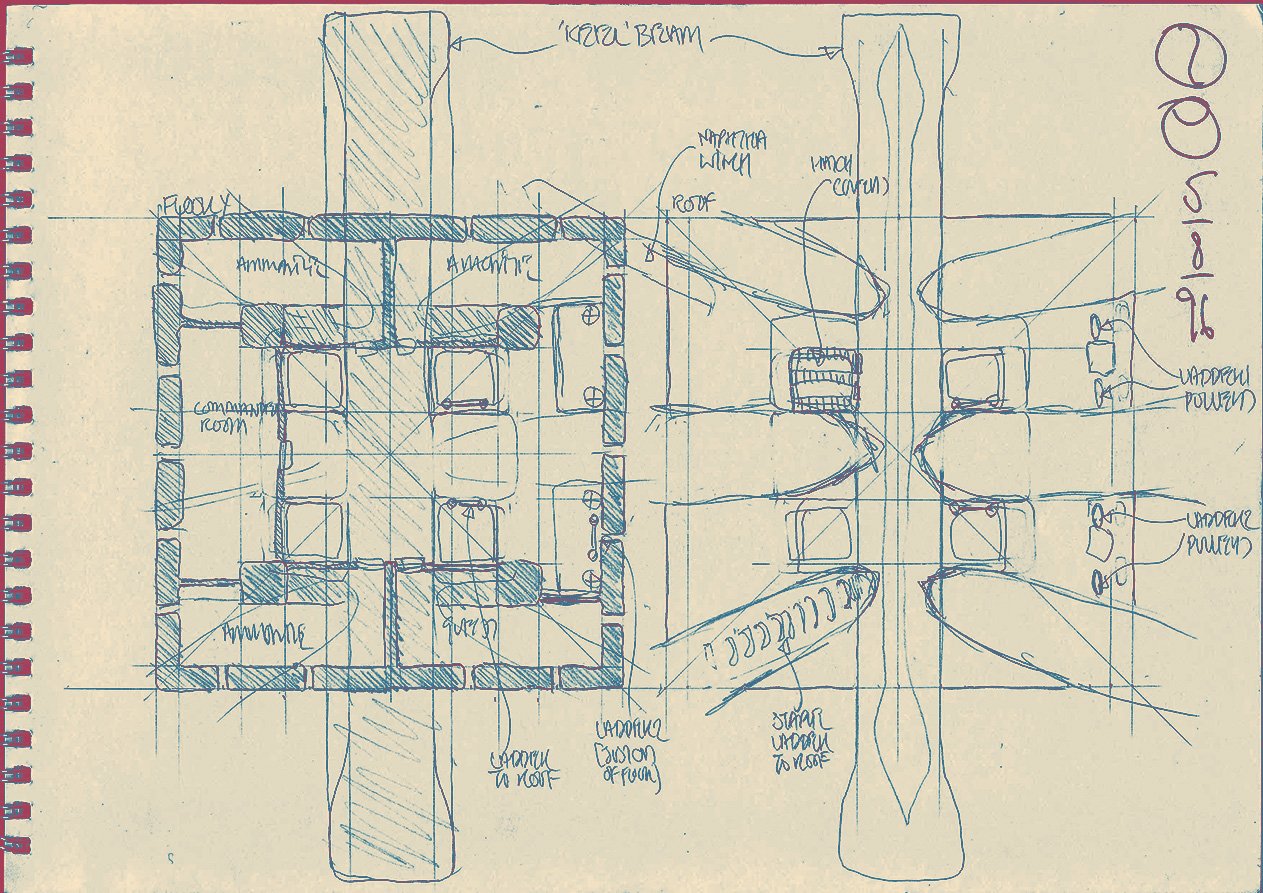
This second page of floor plans shows the two storeys that are the barracks of the tower garrison
The third page of floor plans shows the storey of the tower that is level with the leftway. In the upper part of the diagram is a cistern. Corresponding to this—in the lower part of the diagram—is the ramp that leads down into the stables. A portcullis seals the entry from the leftway. Standing before this entrance is a monolith, the purpose of which is to make it impossible to use a battering ram against the portcullis. To the right of the portcullis you might be able to make out the faint sketch of an aquar as seen from above. I put this in so as to be able to more easily imagine what it would be like leading an aquar into this space. A small diagram on the right hand side of this page is a side view showing how the portcullis and its counterweights work. It also includes measurements for the heights of some of the storeys.

The fourth and final page of floor plans shows two of the three stable levels that are linked by ramps to the upper entrance—from the leftway. Various other mechanisms are lodged here that have to do with the operation of the portcullis, etc in the levels above. The lowest level of all is the uppermost diagram. Note that it too has a portcullis and a monolith set facing it. This gives direct access to the main carriageway of the raised road that runs along the foot of the wall carrying the leftway
Osidian’s camp around Tower Sun Ninety-Three
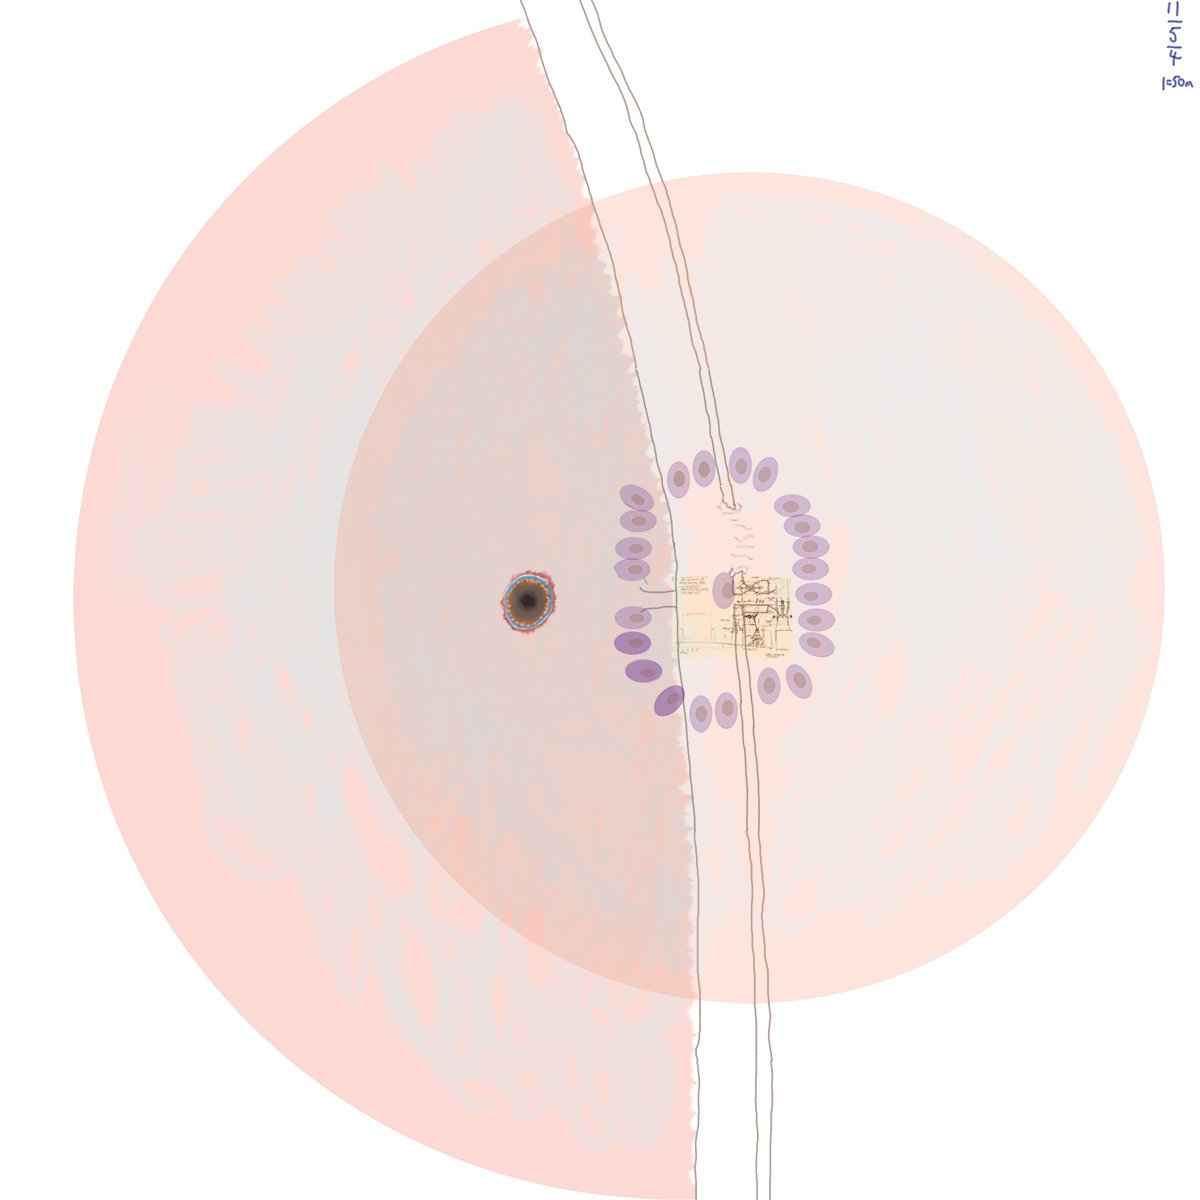
This is a rough sketch of Osidian’s military camp around Watch-Tower Sun-Ninety-Three—but it could be the camp formed around any watchtower
The raised-road crosses the picture from south to north. The pink areas show the extent of the camp. The circular feature is the sinkhole at Sun-Ninety-Three from which all water is drawn. At the centre is the watchtower itself. Note the break in the leftway—the narrow ‘tramlines’ running up the right of the road—that allows movement across the road between the halves of the camp
The darker ovals are dragons forming a wall around the tower. The beast alongside the leftway is Heart-of-Thunder. Note the ramp near him leading off the road
the hollow crescent tactic
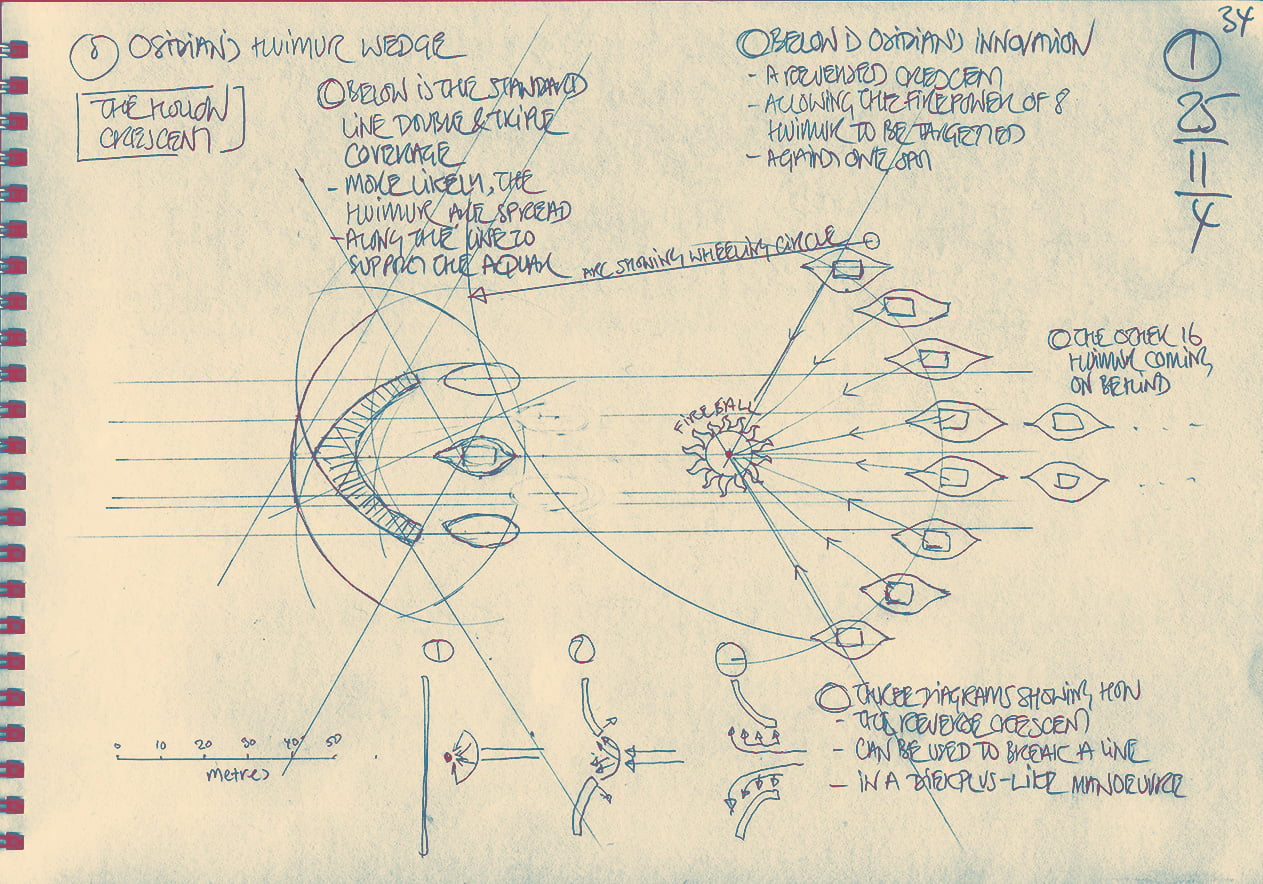
The diagram above has three parts—all movement is from right to left
The first is the top left and shows the way that the flamepipe arcs of dragons—when they advance in line—can be overlapped to produce combined fire (the shaded arc)
The second is the top right, a depiction of Osidian’s ‘hollow crescent’—in which 8 dragons combine their fire to form a fireball at the focus of their crescent
The third lies along the bottom and shows how the hollow crescent, when confronted by a standard dragon line, bursts through it and rolls the enemy line up towards either flank by firing their flamepipes at their rear
the Battle of Makar
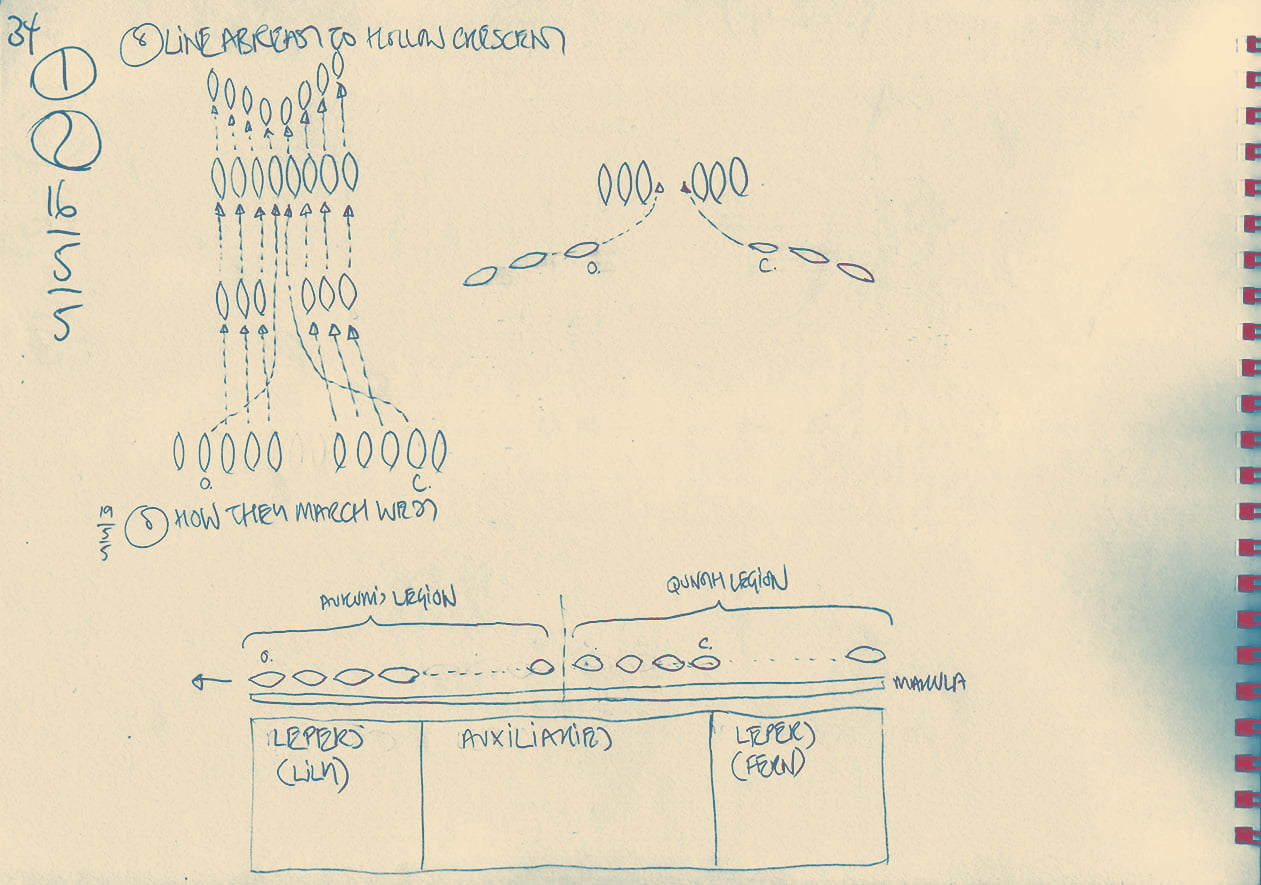
In the diagram above, the lowest portion shows how Osidian and Carnelian march their forces west. Their positions in the line are shown. Taking advantage of the wind blowing from the south-west, they cover their advance with the clouds of dust the dragons raise. The rest of their forces are protected by marching up wind of the dragons—the positions of their various contingents are shown.Where “Fern” is marked, read “Blue”
The top right diagram shows how Carnelian and Osidian—once Osidian has brought Heart-of-Thunder back to the centre of their line—feed their wings into the centre of the proto-crescent so that they end up at its centre, at the head of two columns of dragons
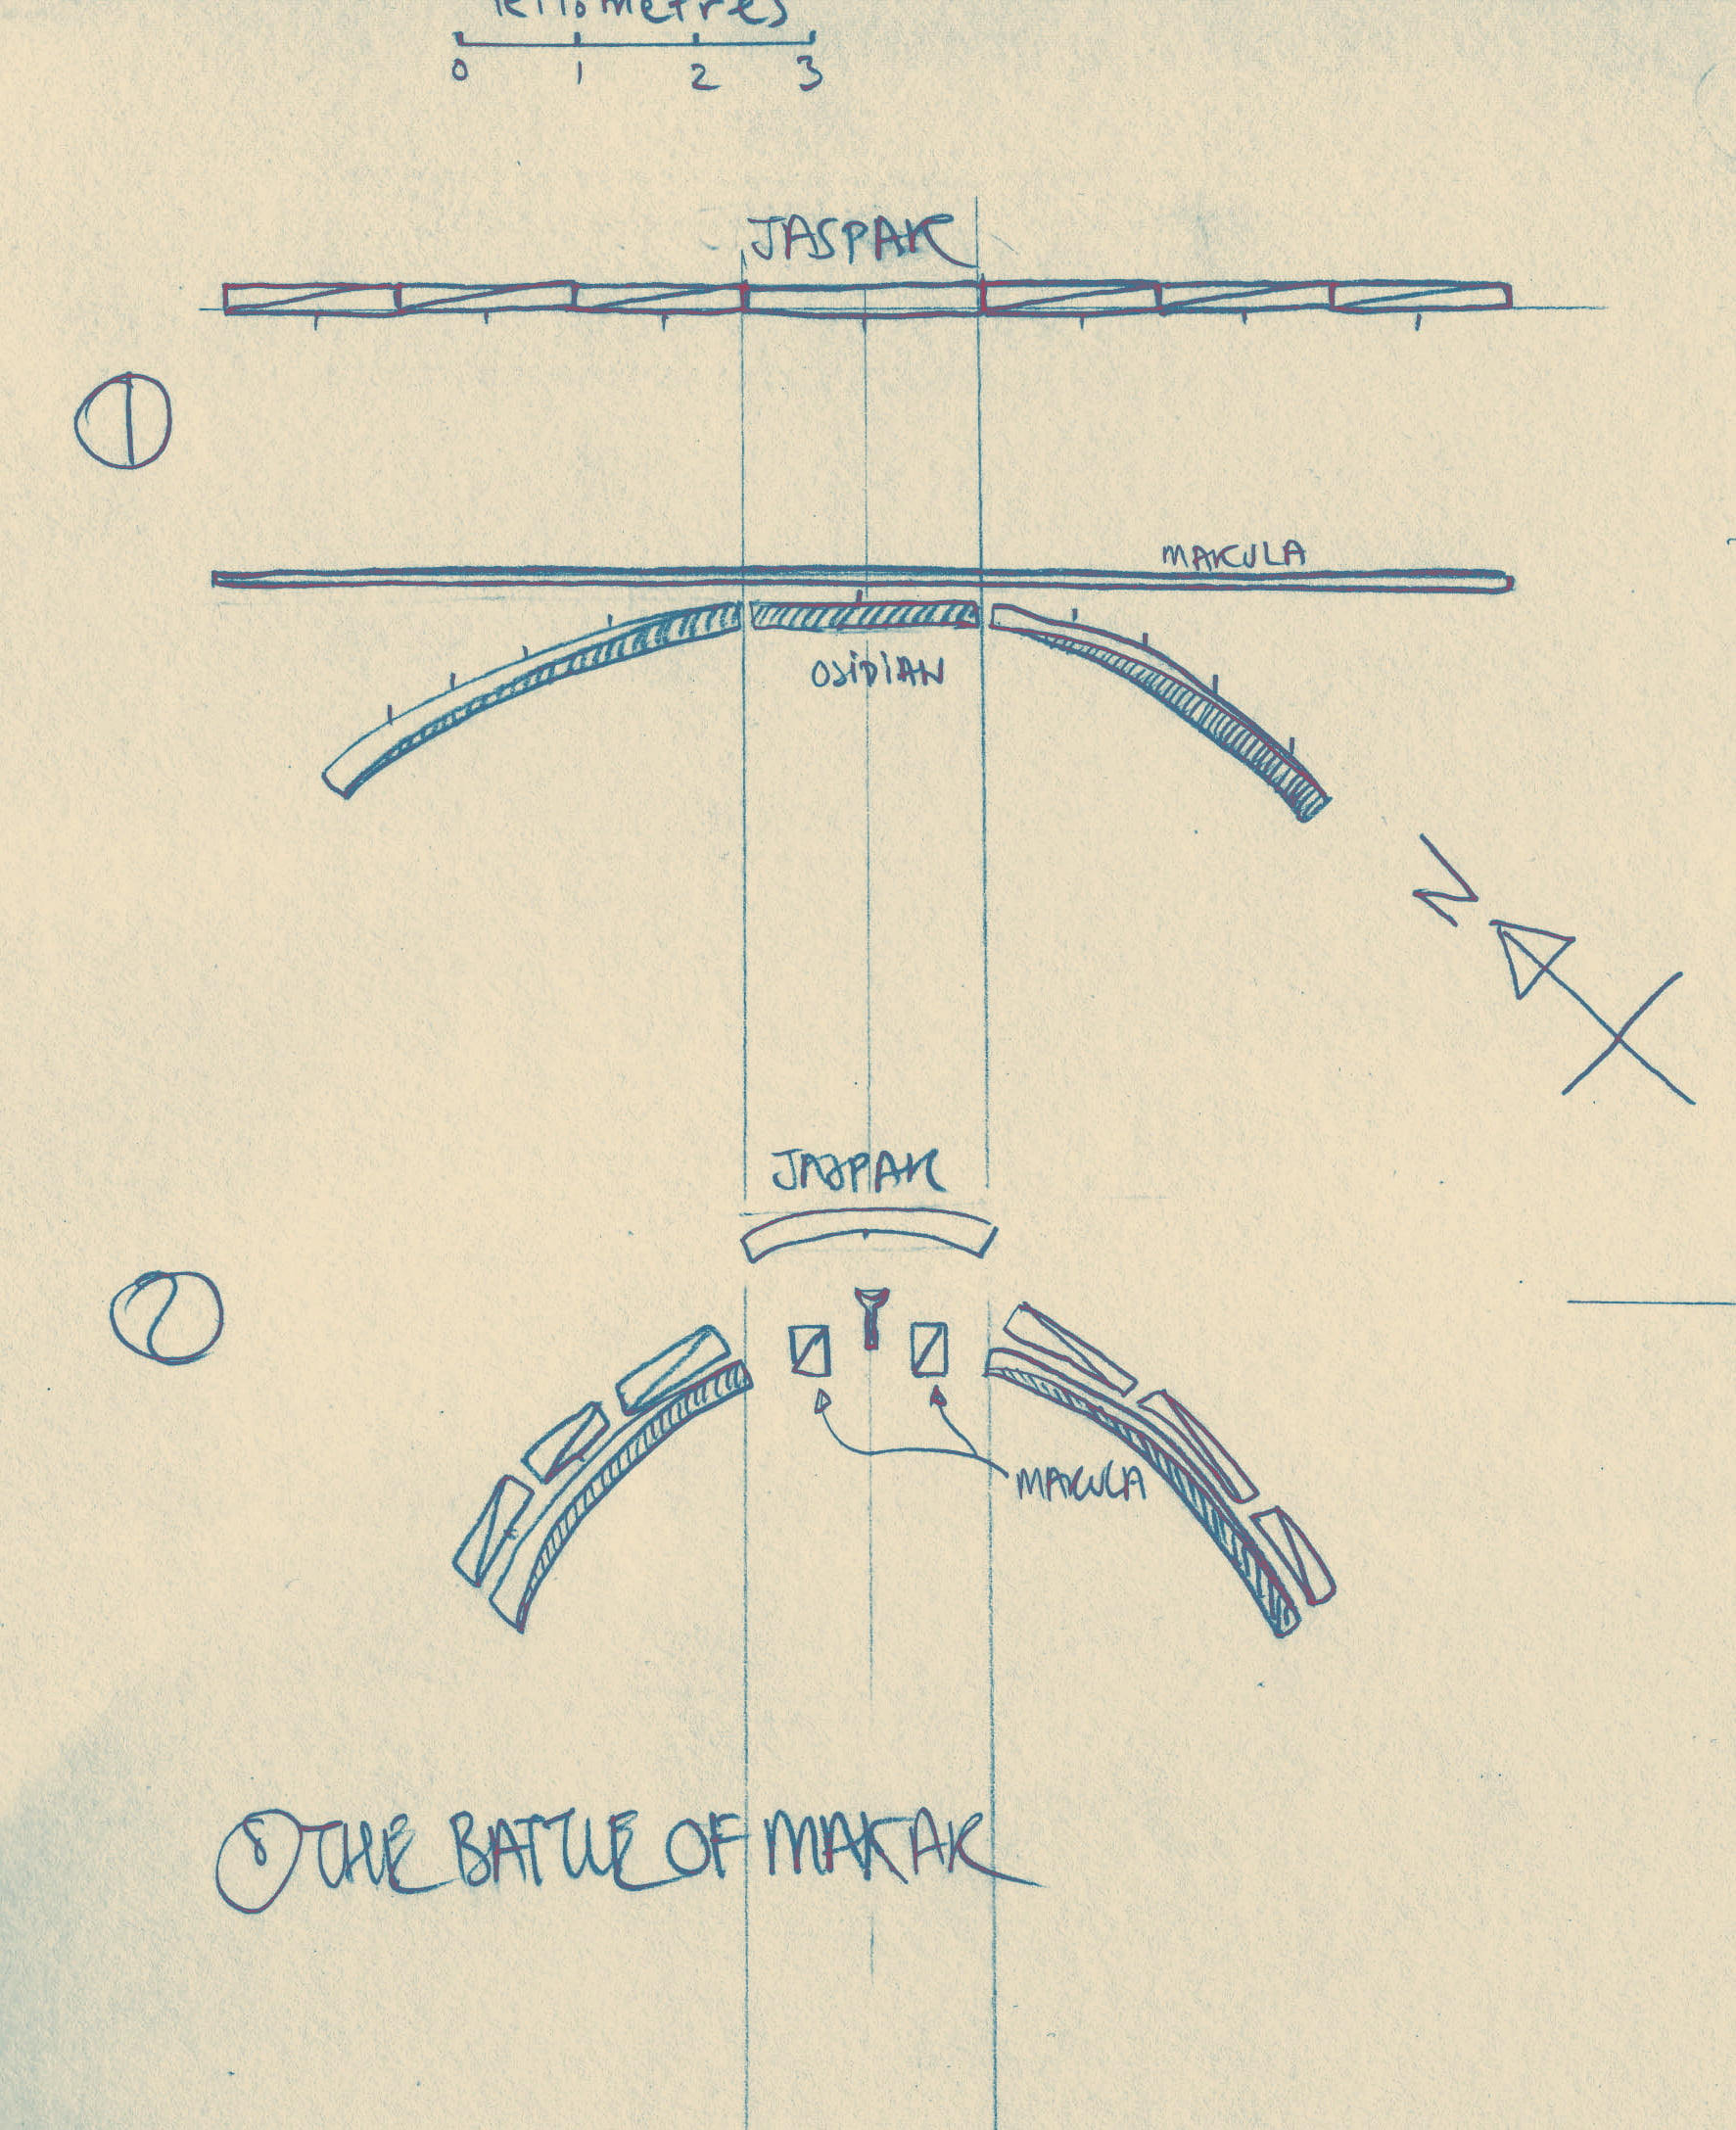

The second diagram shows the initial phases of the battle (blocks with diagonal lines through them indicate aquar mounted forces—only partially so in the case of the Lepers)
Osidian advances his Marula as a screen to conceal his refused flanks. Jaspar’s mounted troops—auxiliaries—charge forward to engage Osidian’s flanks. Meanwhile, Carnelian and Osidian advance their dragons in the hollow crescent formation
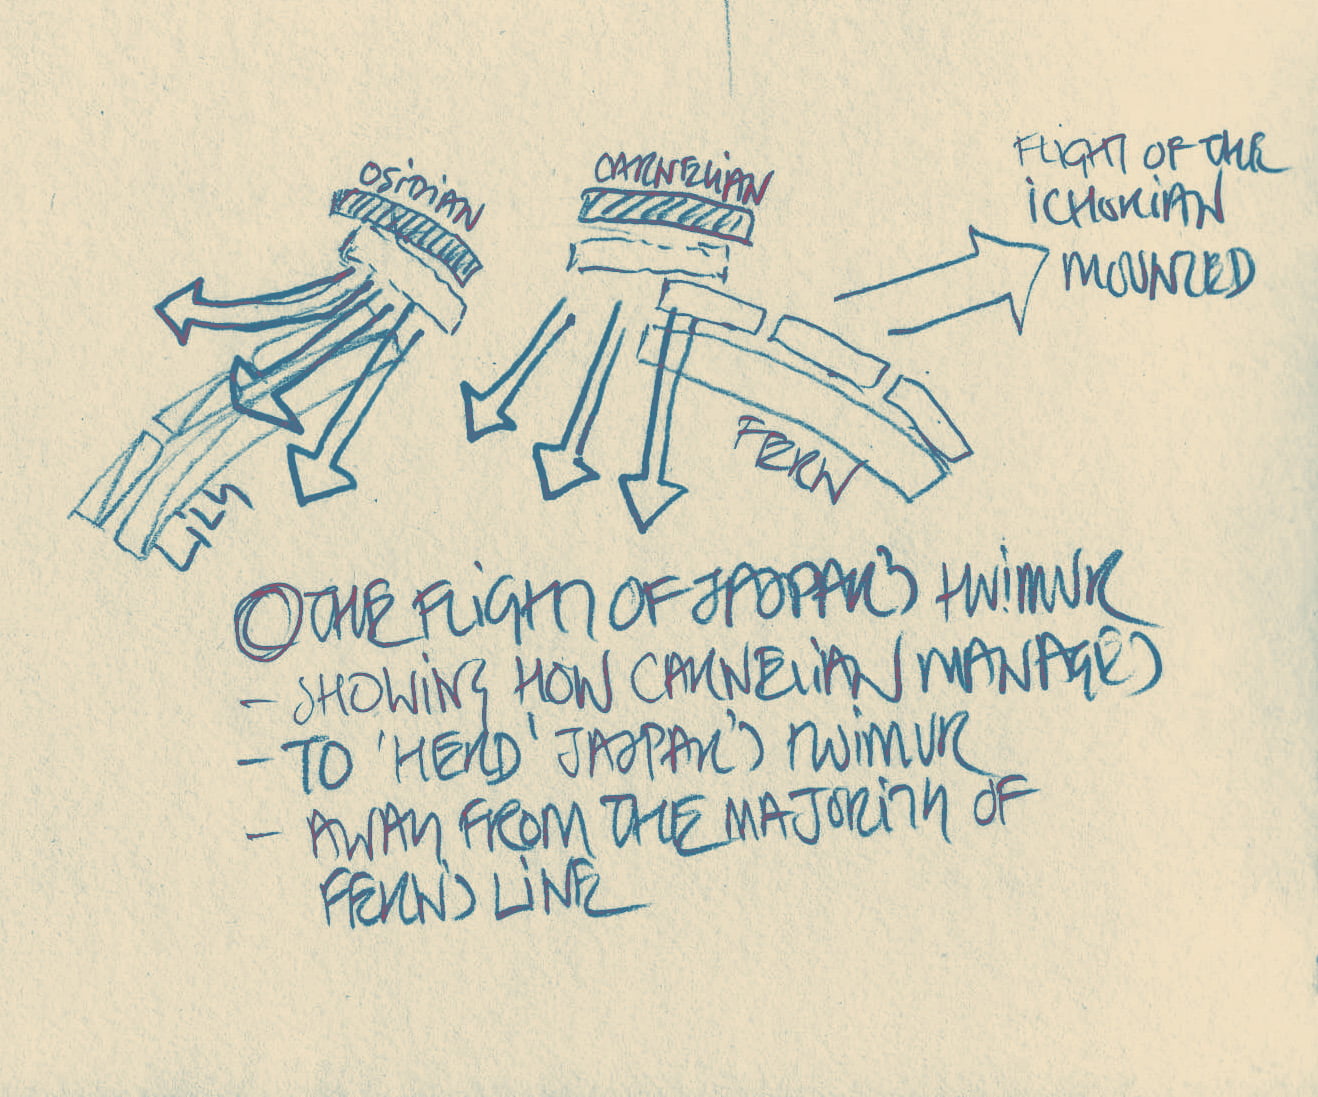
The third diagram shows—in 3 phases—the situation once the dragons have engaged. Carnelian and Osidian’s hollow crescent punctures the centre of Jaspar’s dragon line. The two ‘horns’ of the crescent force open the breach, and Carnelian’s and Osidian’s columns break through. Running right and left behind Jaspar’s line, they pour fire onto the flanks of Jaspar’s dragons, who break
The last diagram shows how, just in time, Carnelian sees that Jaspar’s fleeing dragons are going to stampede over Blue’s Lepers, and so he herds them away into the now open centre. Osidian, however, drives the dragons he is pursuing directly into Lily’s line