Information relevant to the 2nd chapter of The Mirror Breaks
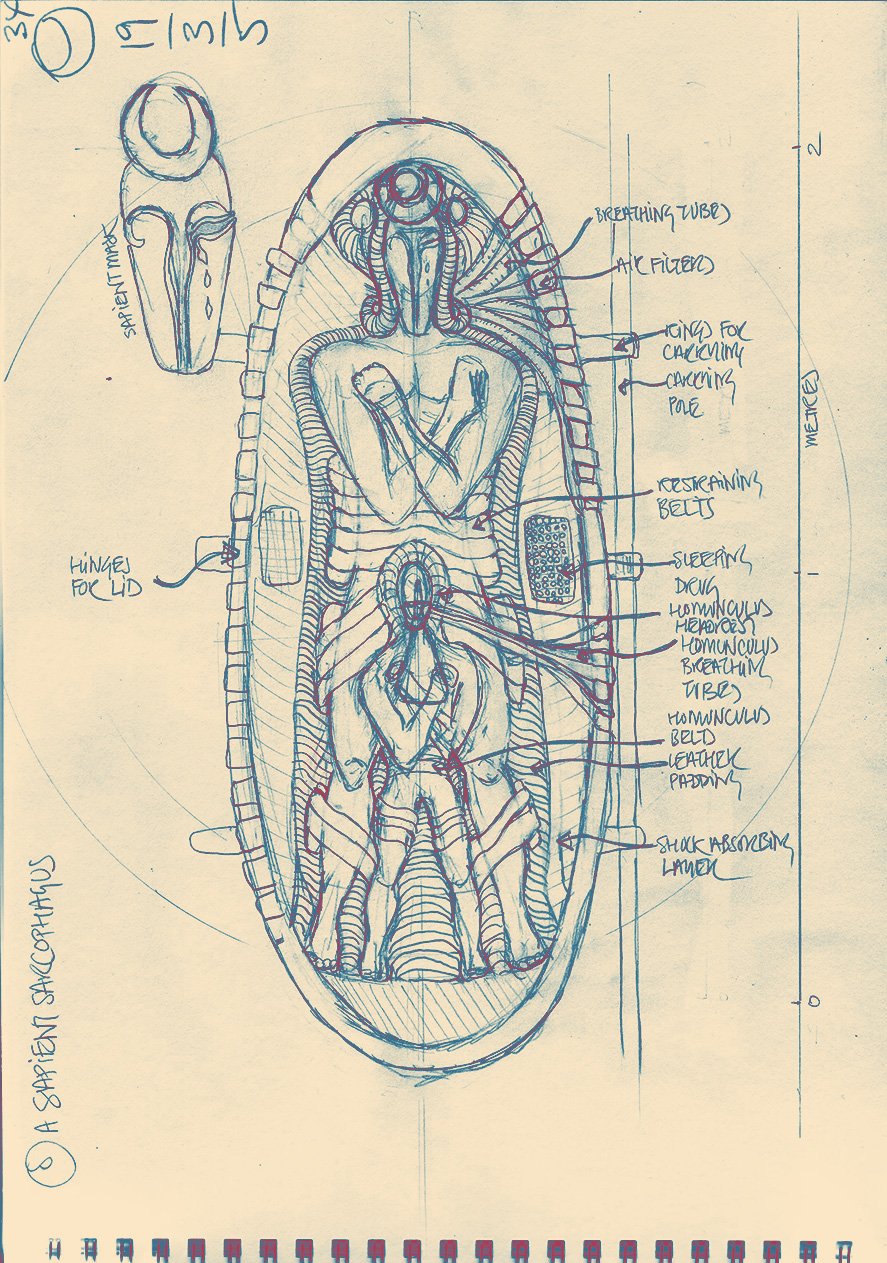
Sapient capsules
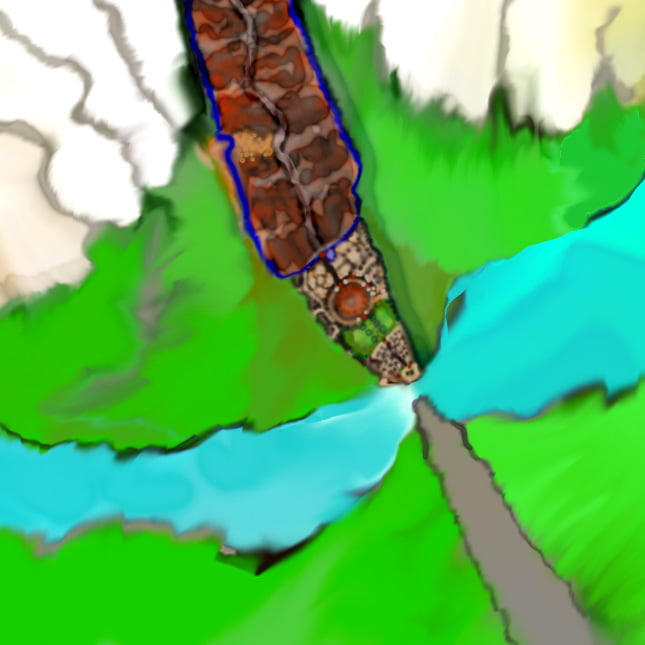
an open Sapient capsule
A sapient capsule is shown set vertically and open. Within it a Sapient ‘stands’ with his homunculus between his legs. Both are ‘stowed’ for transit—held in place by many leather straps. Note the hollow they are in is padded to absorb shocks as the capsule is moved from one place to another. The Sapient is wearing a standard sapient mask to which breathing tubes are connected (coming into the capsule from the right). Note the rectangular repositories for the elixir ‘pearls’
Information relevant to the 1st chapter of The Mirror Breaks
Sapient capsules
an open Sapient capsule
A sapient capsule is shown set vertically and open. Within it a Sapient ‘stands’ with his homunculus between his legs. Both are ‘stowed’ for transit—held in place by many leather straps. Note the hollow they are in is padded to absorb shocks as the capsule is moved from one place to another. The Sapient is wearing a standard sapient mask to which breathing tubes are connected (coming into the capsule from the right). Note the rectangular repositories for the elixir ‘pearls’
Information relevant to the 13th chapter of Dragon Fire
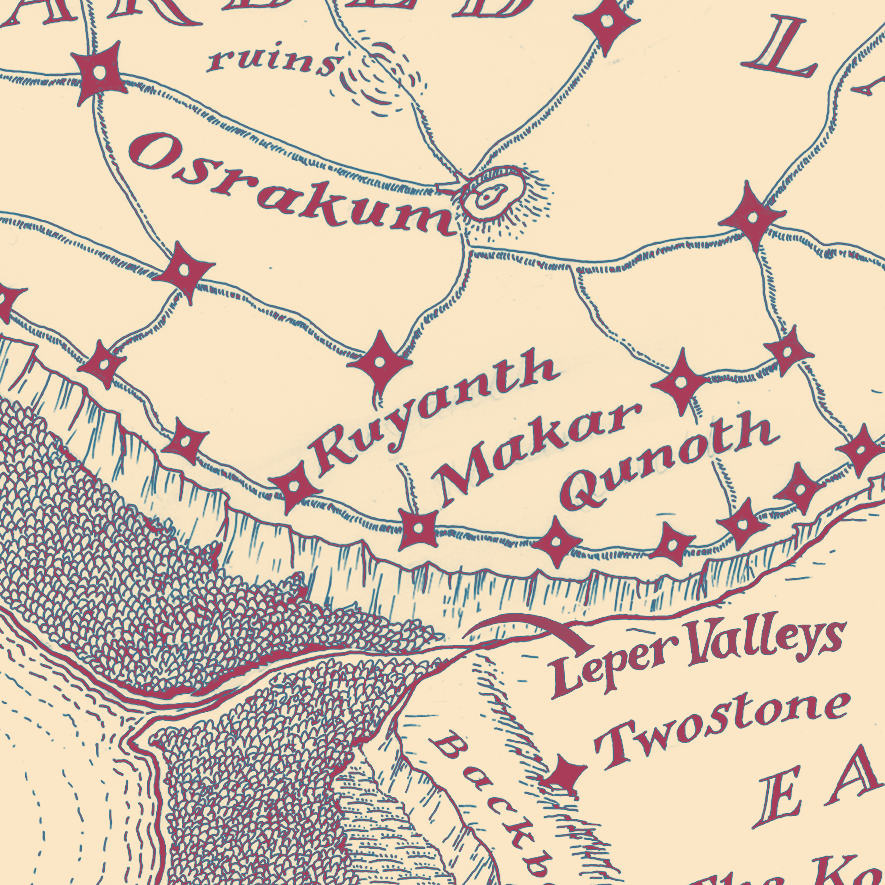
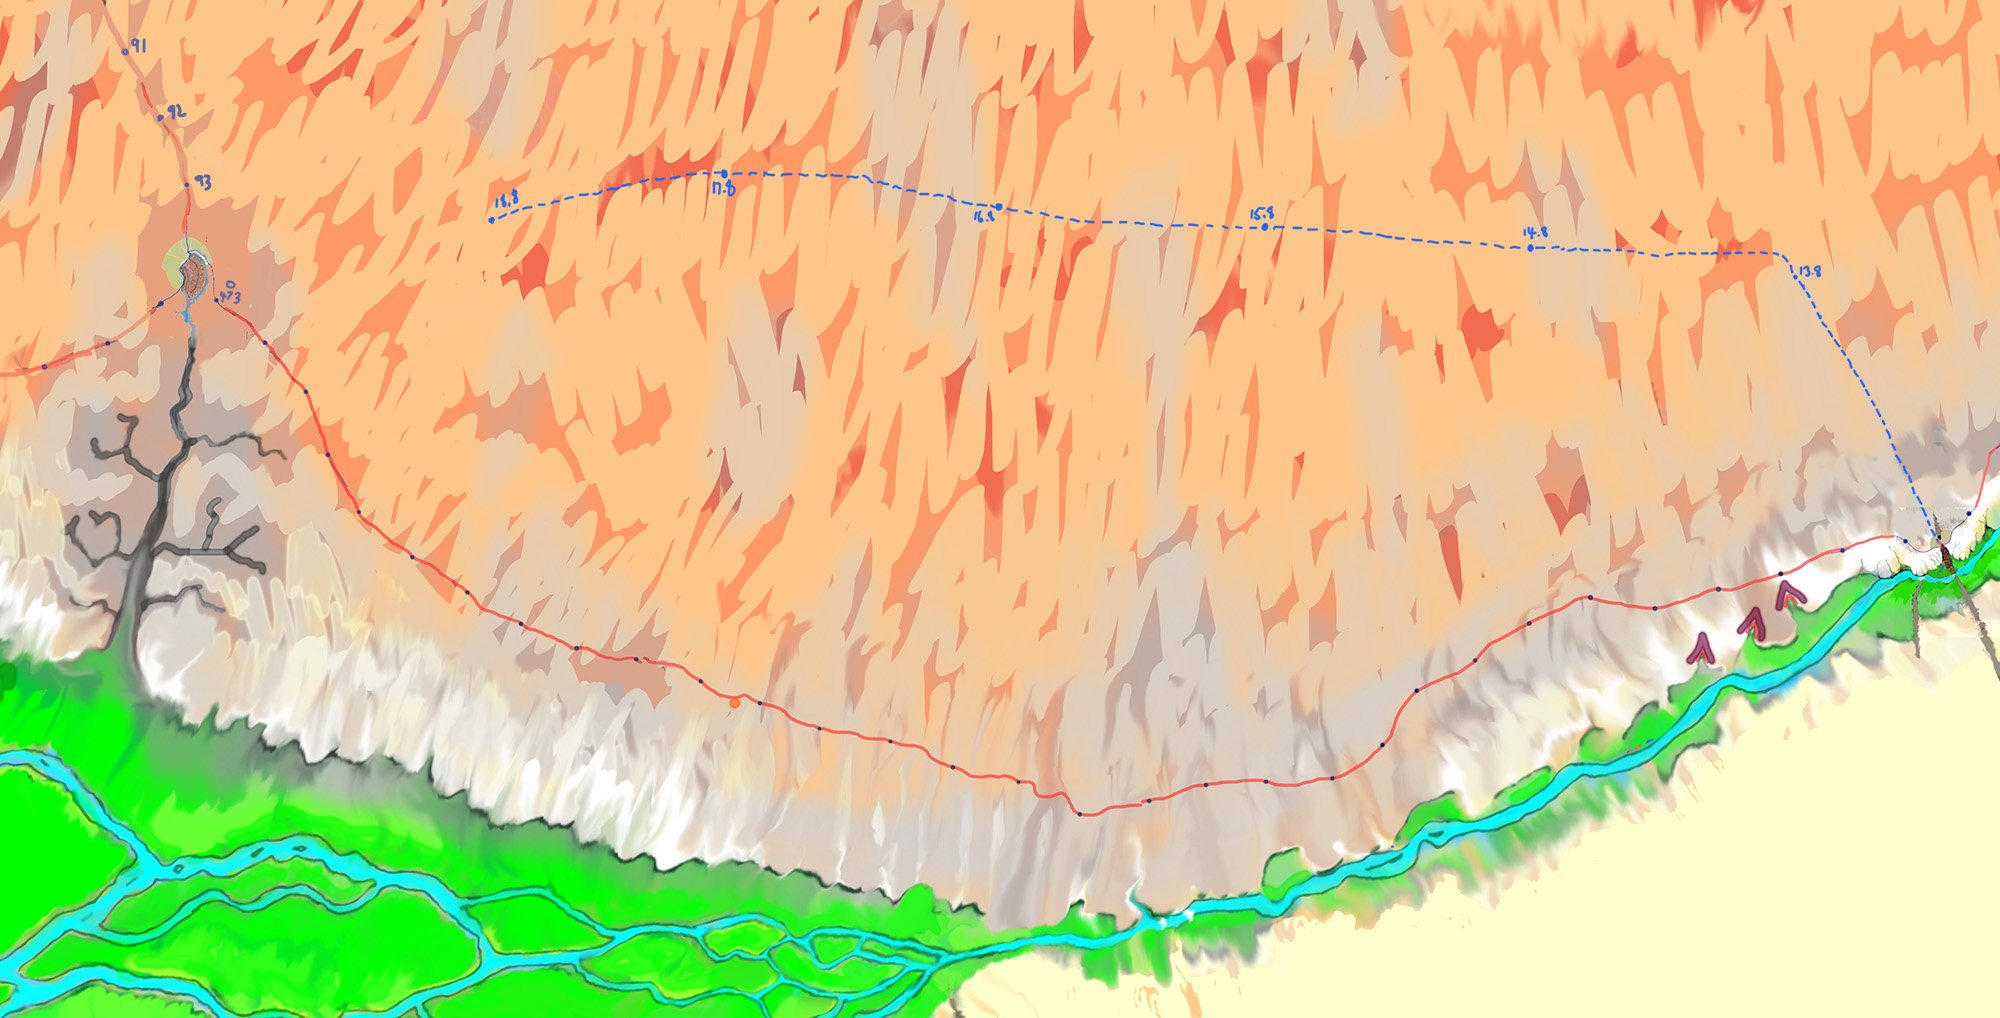
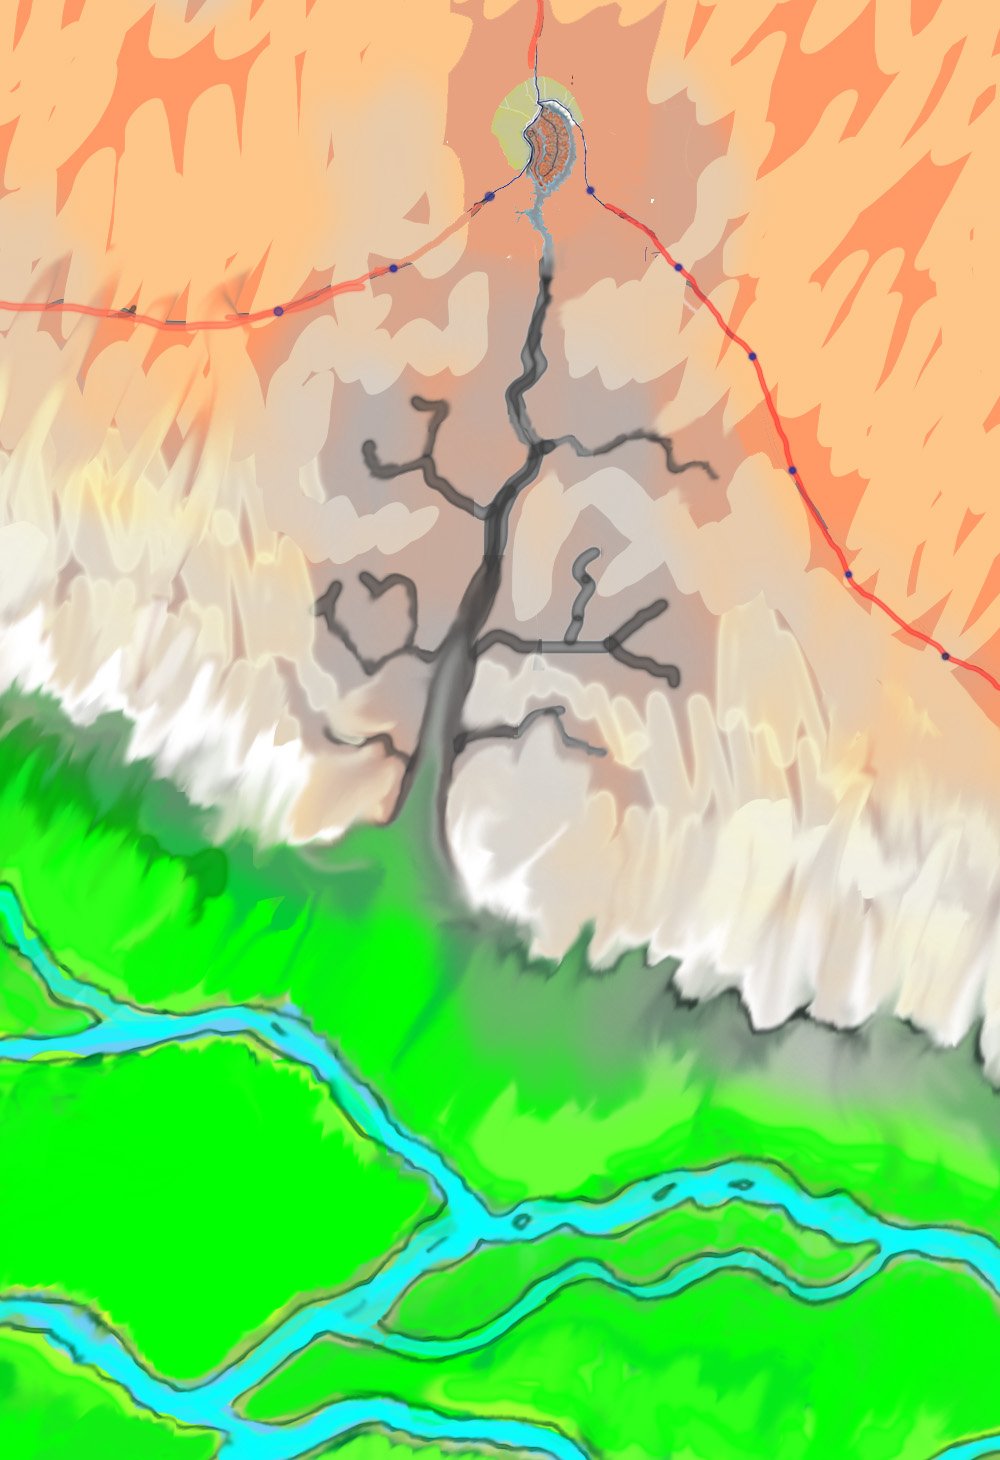
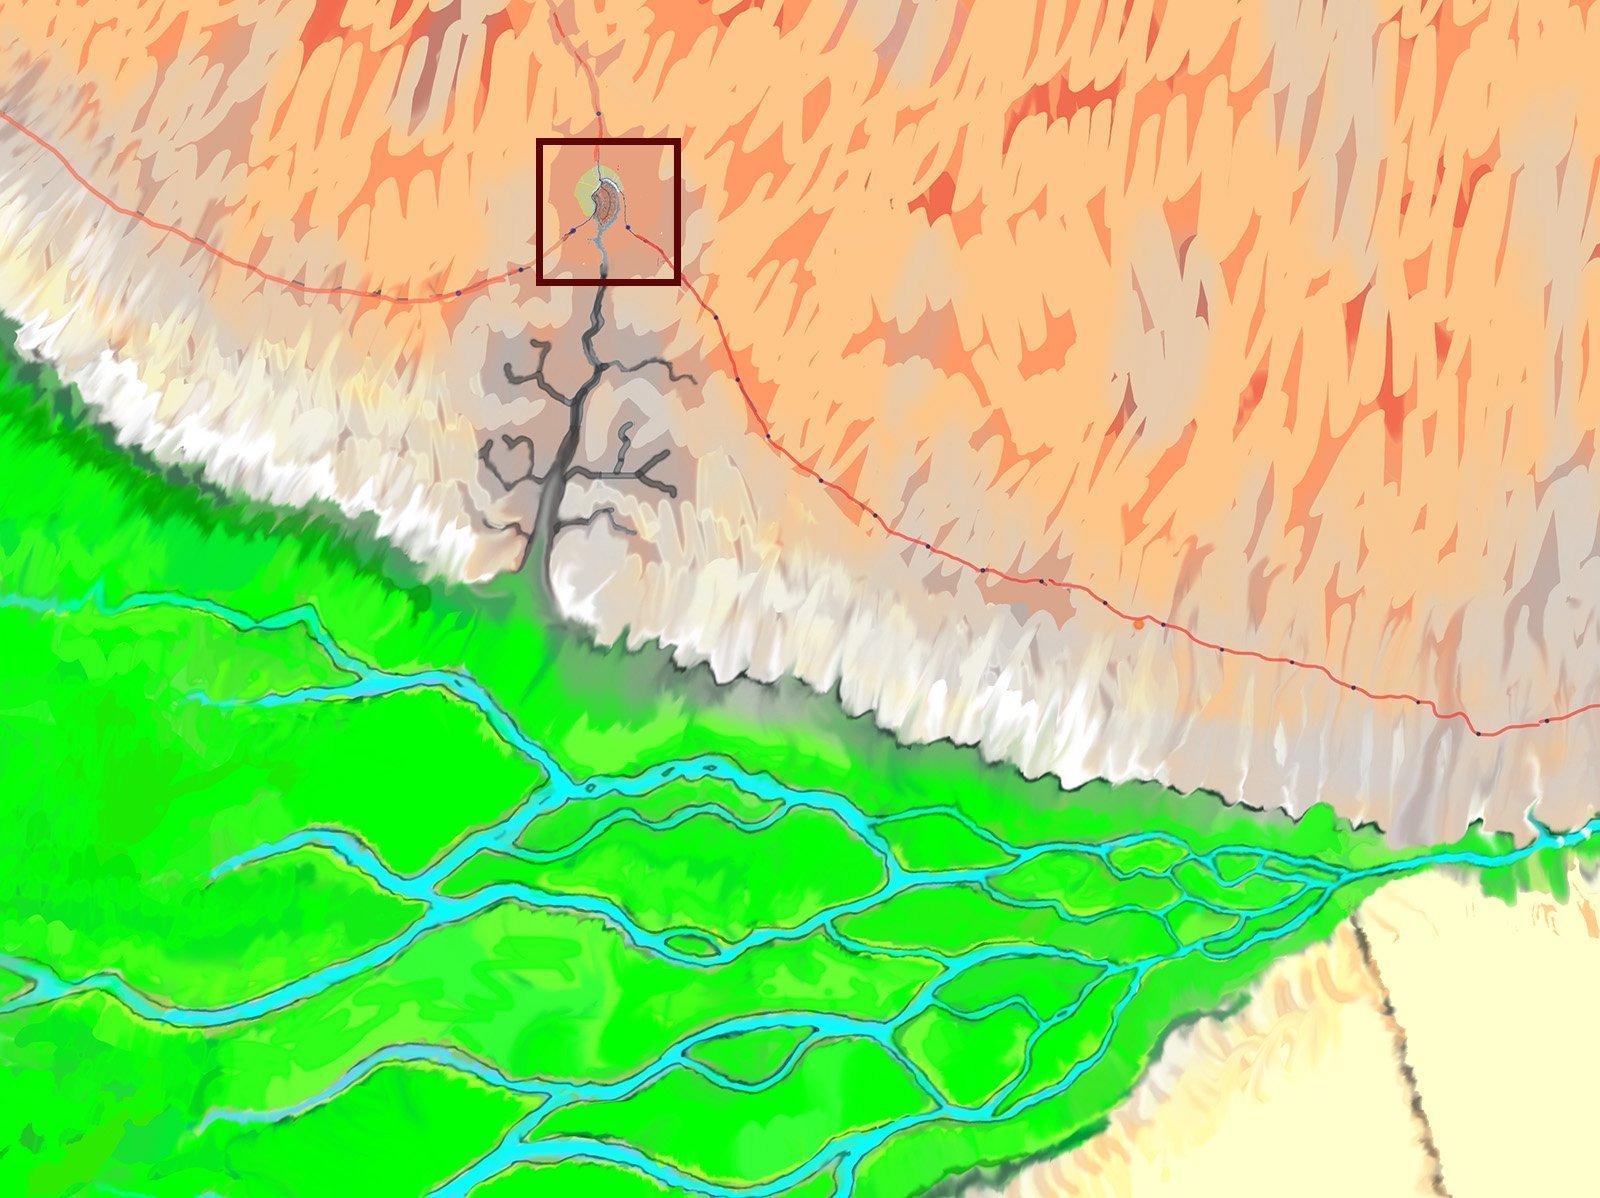
the southern Guarded Land
the southern Guarded Land
hinterland
the southern margin of the Guarded Land
The map above shows the southern margin of the Guarded Land with Qunoth on the right edge of the map, and Makar in its upper left corner. The raised road (a section of the Ringwall) connecting Qunoth to Makar is shown as a solid red line with regular dots along it showing its watchtowers. The dotted red line show’s Carnelian’s route, and has each camp he makes marked and with an associated date
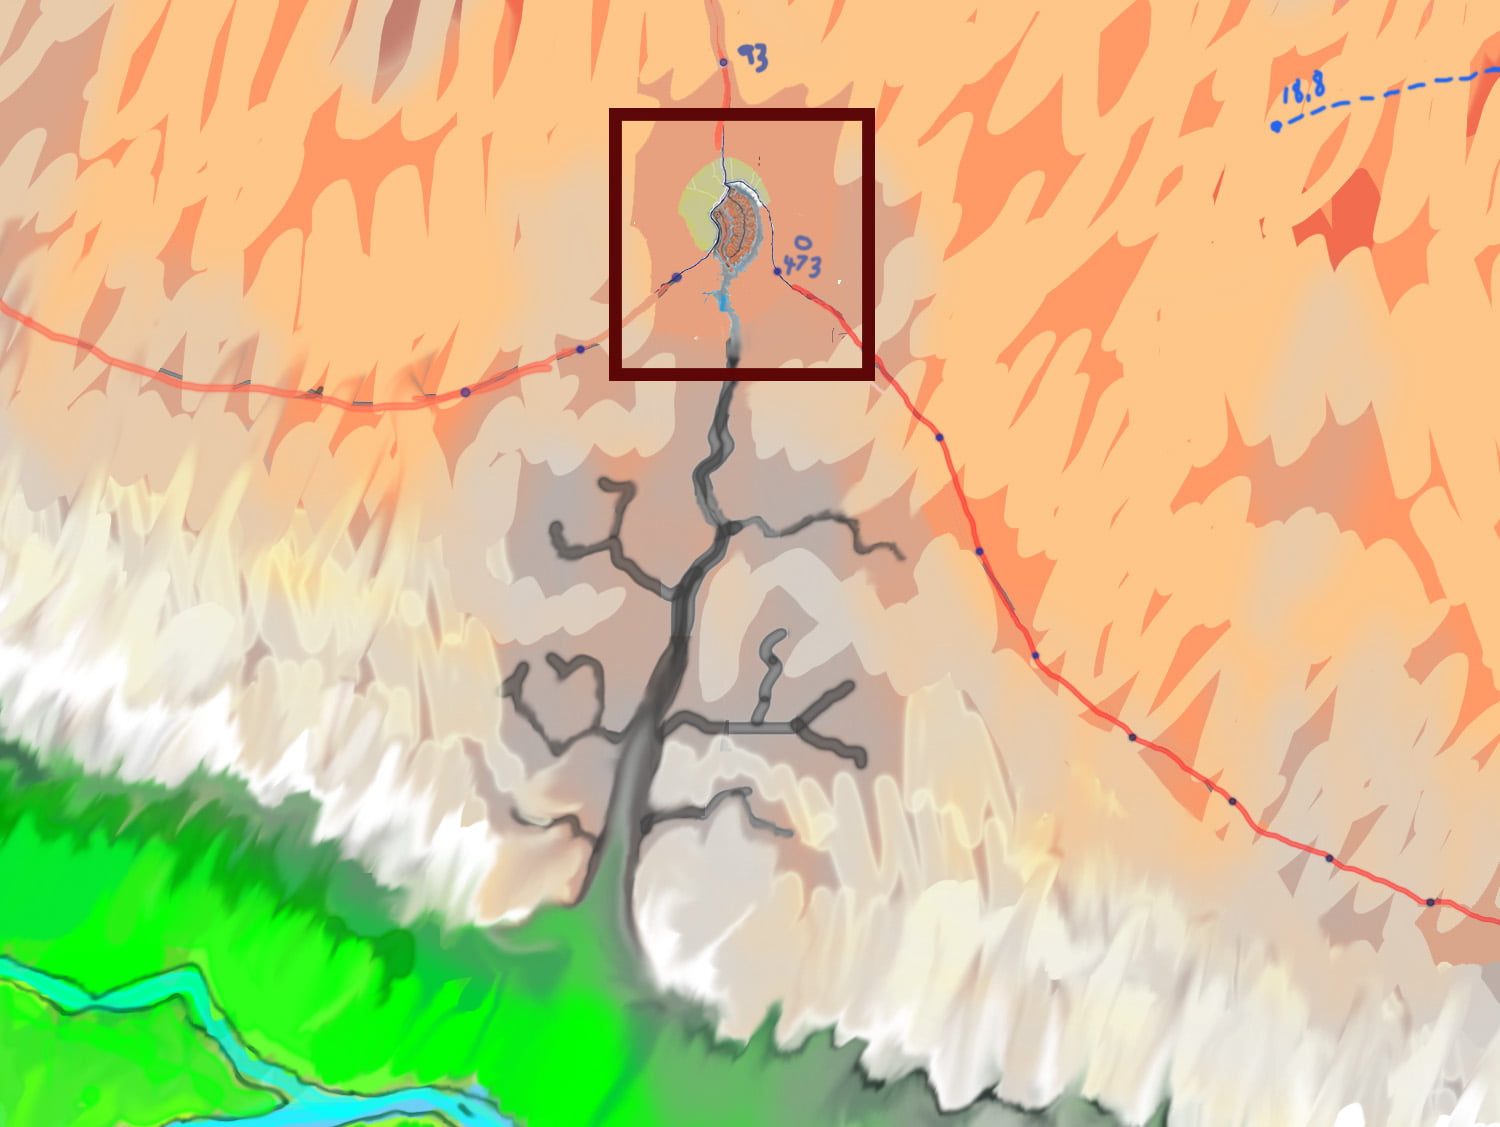
approaching Makar
The second map enlarges the area around Makar, showing the city at the convergence of three roads and the Pass. Watchtower Ring 473 is shown as well as the three watch-towers on the Great South Road, Sun 91 – 93. These are the towers variously that are mentioned in the story. Carnelian can be seen approaching from the east—his last position marked being where he is on the 18th day of the 8th month
watchtower
a watchtower of the Guarded Land
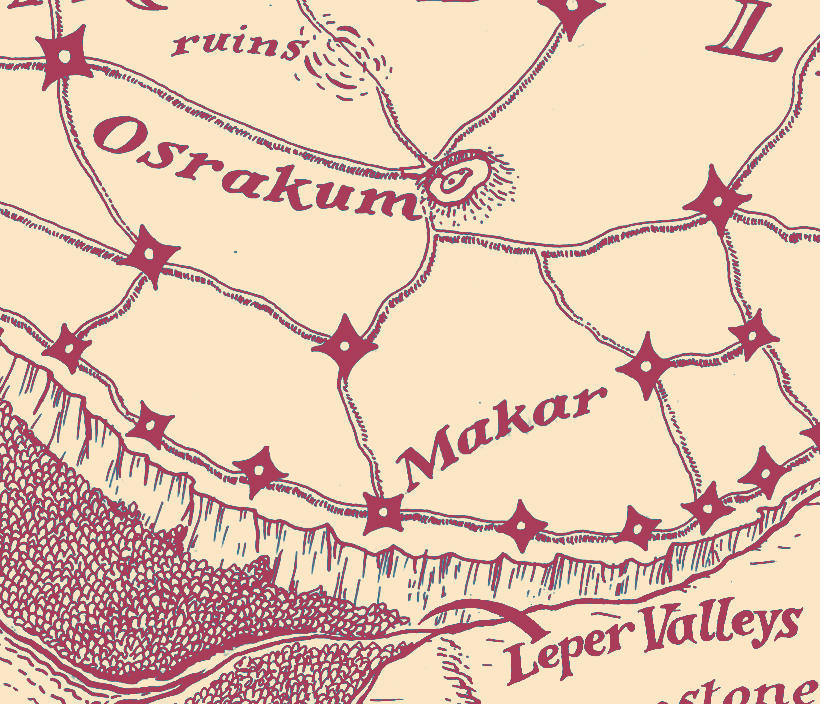
the city of Makar
Makar at the top of its pass
The map above shows the location of Makar, near the southern edge of the Guarded Land, and at the head of a canyon system that runs down to the Leper Valleys. It is the terminus of the Great South Road from Osrakum
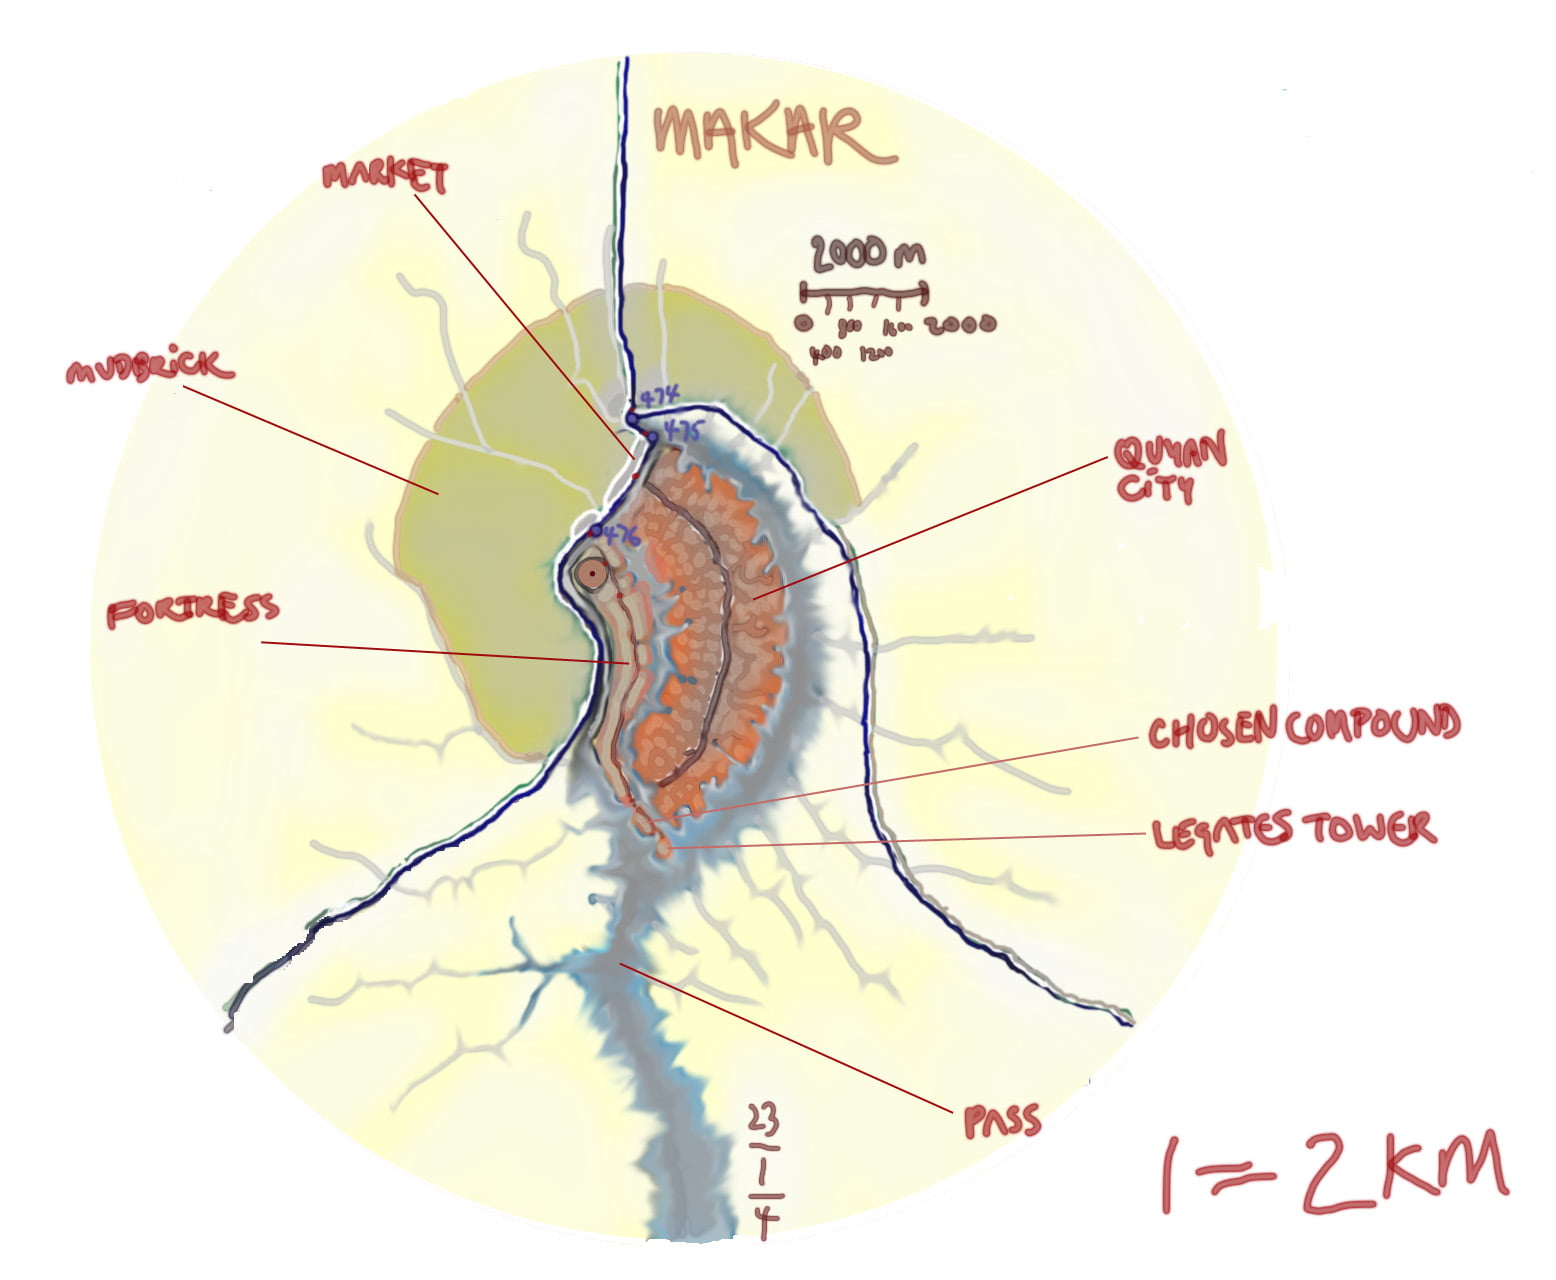
a map of the city of Makar
The second map shows Makar in some detail. The city proper is the curving red element that is shaped a little like the body of a peeled prawn. This part is ancient and is a sort of peninsular surrounded by canyons that are the beginning of the system of canyons running down to the Leper Valleys. Alongside the Old City, running down its western side, is a much narrower peninsular upon which is built the legionary fortress of Makar. Makar’s ‘red eye’ is its cothon
The large yellow-green swelling to the north of the city is an area dense with hovels, within a boundary ditch. The indigo lines show the raised roads of the Ringwall and the Great South Road. Three watch-towers—shown as violet spots—lie on or near the junction of these roads. The most northern stands at the junction. The other, nearby, stands guard over a gate that gives access to the Pass and, thus, controls the route down to the Leper Valleys. The third guard the gate of the legionary fortress. When Carnelian enters the city from the north, he passes each of these towers in turn
Note the road that runs through the fortress from its entrance by the watchtower all the way to the ‘island’ at its southern tip—that is reached by means of another ‘island’ (the sanctum) and two bridges. This last tear drop, looking down the Pass, is the tower of the Legate of Makar
the sanctum and the tower of the legate of Makar
The third diagram is a sketch showing the most southern part of the legionary fortress. The first ‘island’ is the sanctum and is divided into domains for the use of the Masters who command the dragons of the legion and for their households. The most southern ‘island’ of all is where are located the halls of the Legate of Makar.
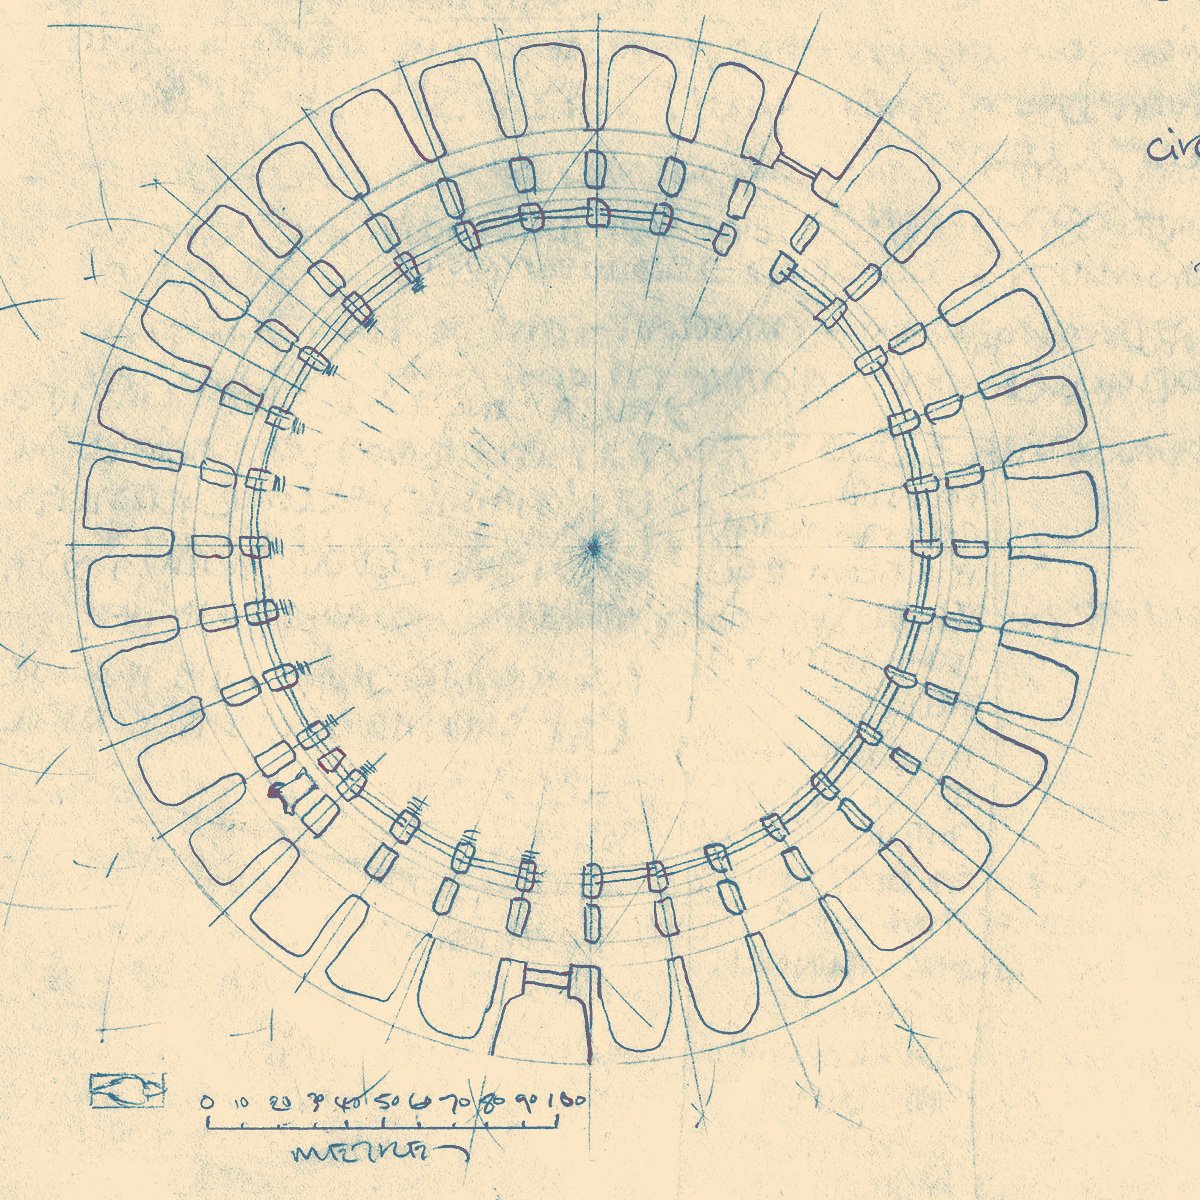
the cothon
plan of a legionary cothon
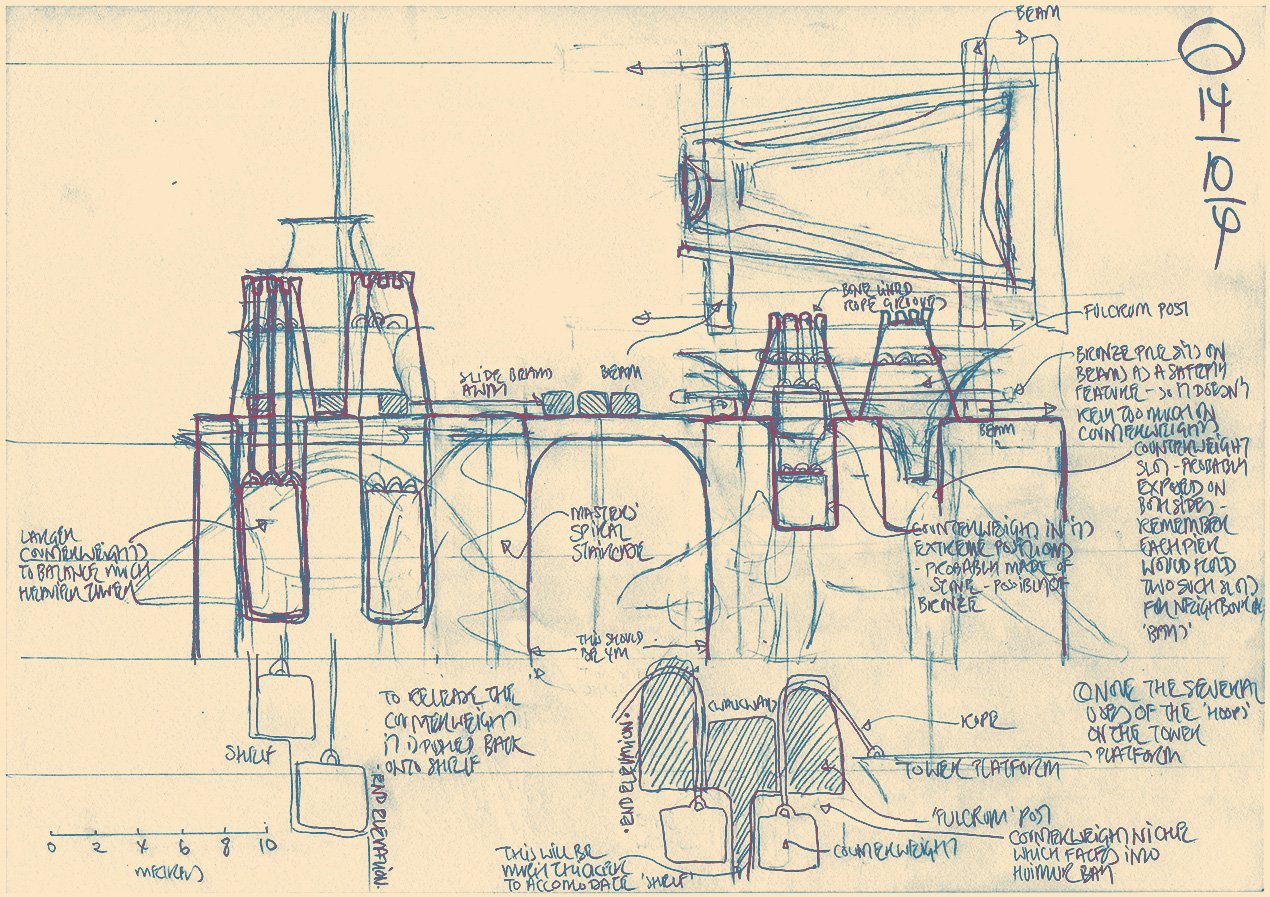
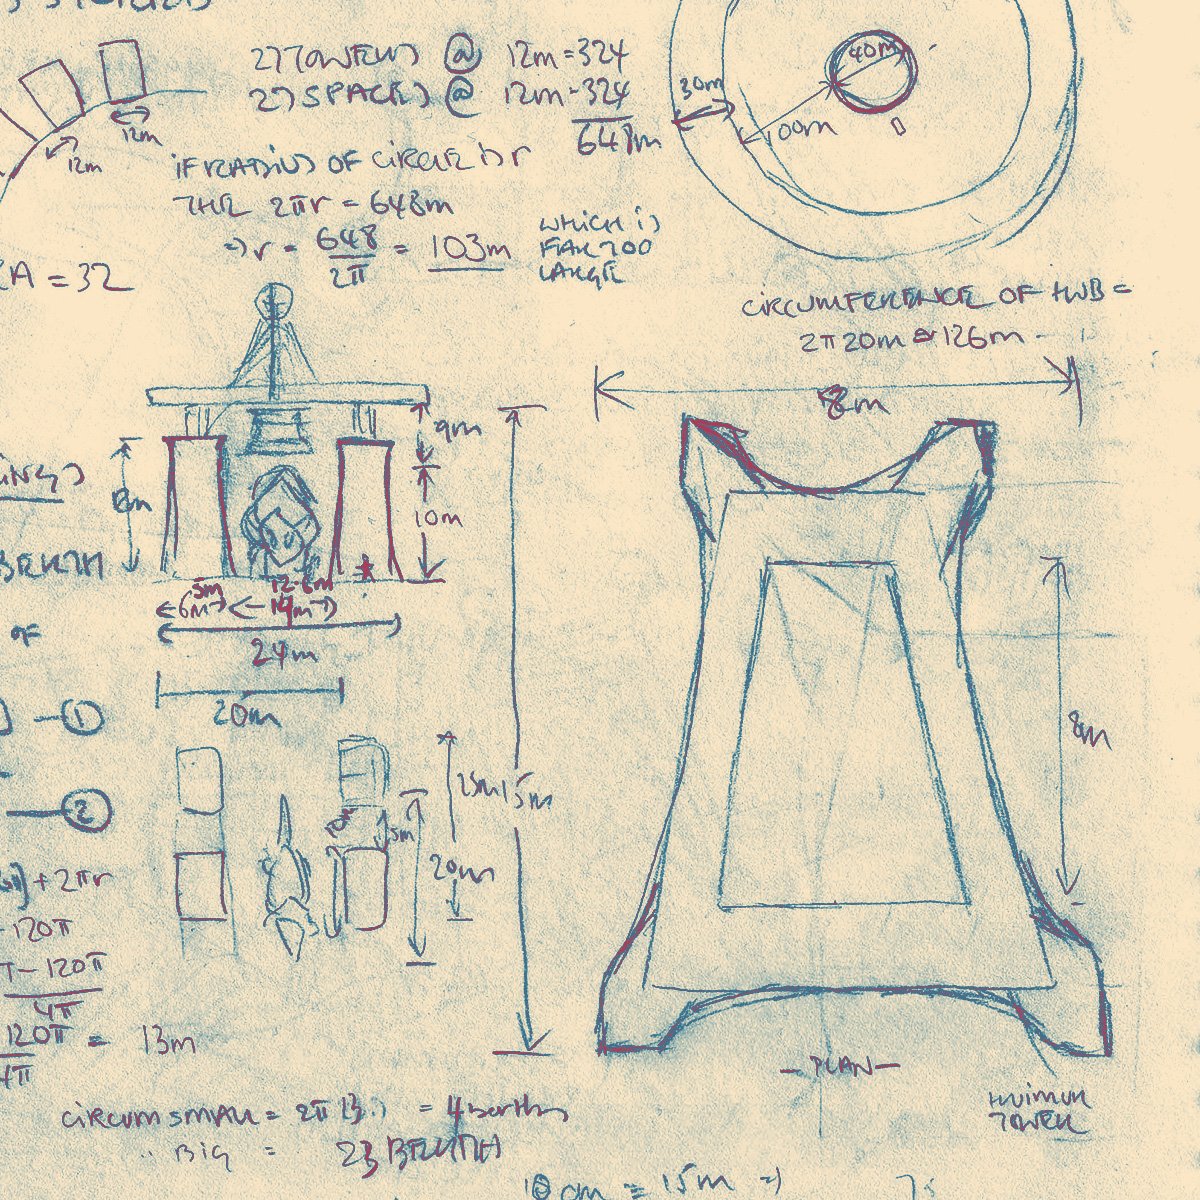
The first diagram shows a plan of a typical cothon. Around its edge are the deep vaults in which the dragon ruhuimur are stabled. Within this are two further rings, of piers. The innermost one is where the dragon towers proper are stored. The ring between this and that of the vaults is where the tower bases are stored. The two major components of each tower are suspended upon beams and rigging above the gaps in between the piers, to allow a dragon—moving from its vault towards the centre of the cothon—to pass beneath each tower component. As the dragon does so, the tower components are lowered on to it and, as the monster’s strength returns after its period of sleep, its tower is assembled on its back
detail of structures and mechanisms around the edge of a cothon
The diagram above is of a pair of piers as viewed from the side (with the centre of the cothon to the left, vaults to the right). The rough outline of a dragon can be seen standing beside the right pier; it is waiting for the tower base shown above (and in plan in the expanded version of the diagram) to be lowered first onto its back. Later it will move towards the left, beside the second pier, where the truncated pyramid of its tower proper will be lowered and joined to the tower base
my initial exploration of cothon mechanisms
The final diagram shows my initial exploration of the cothon mechanisms. The shape on the right is a tower base seen from above, tapering towards its front. The top left shows a pair of piers with a dragon between them facing us, a tower ‘pyramid’ suspended above it. The bottom left shows the same dragon from above between the two inner piers
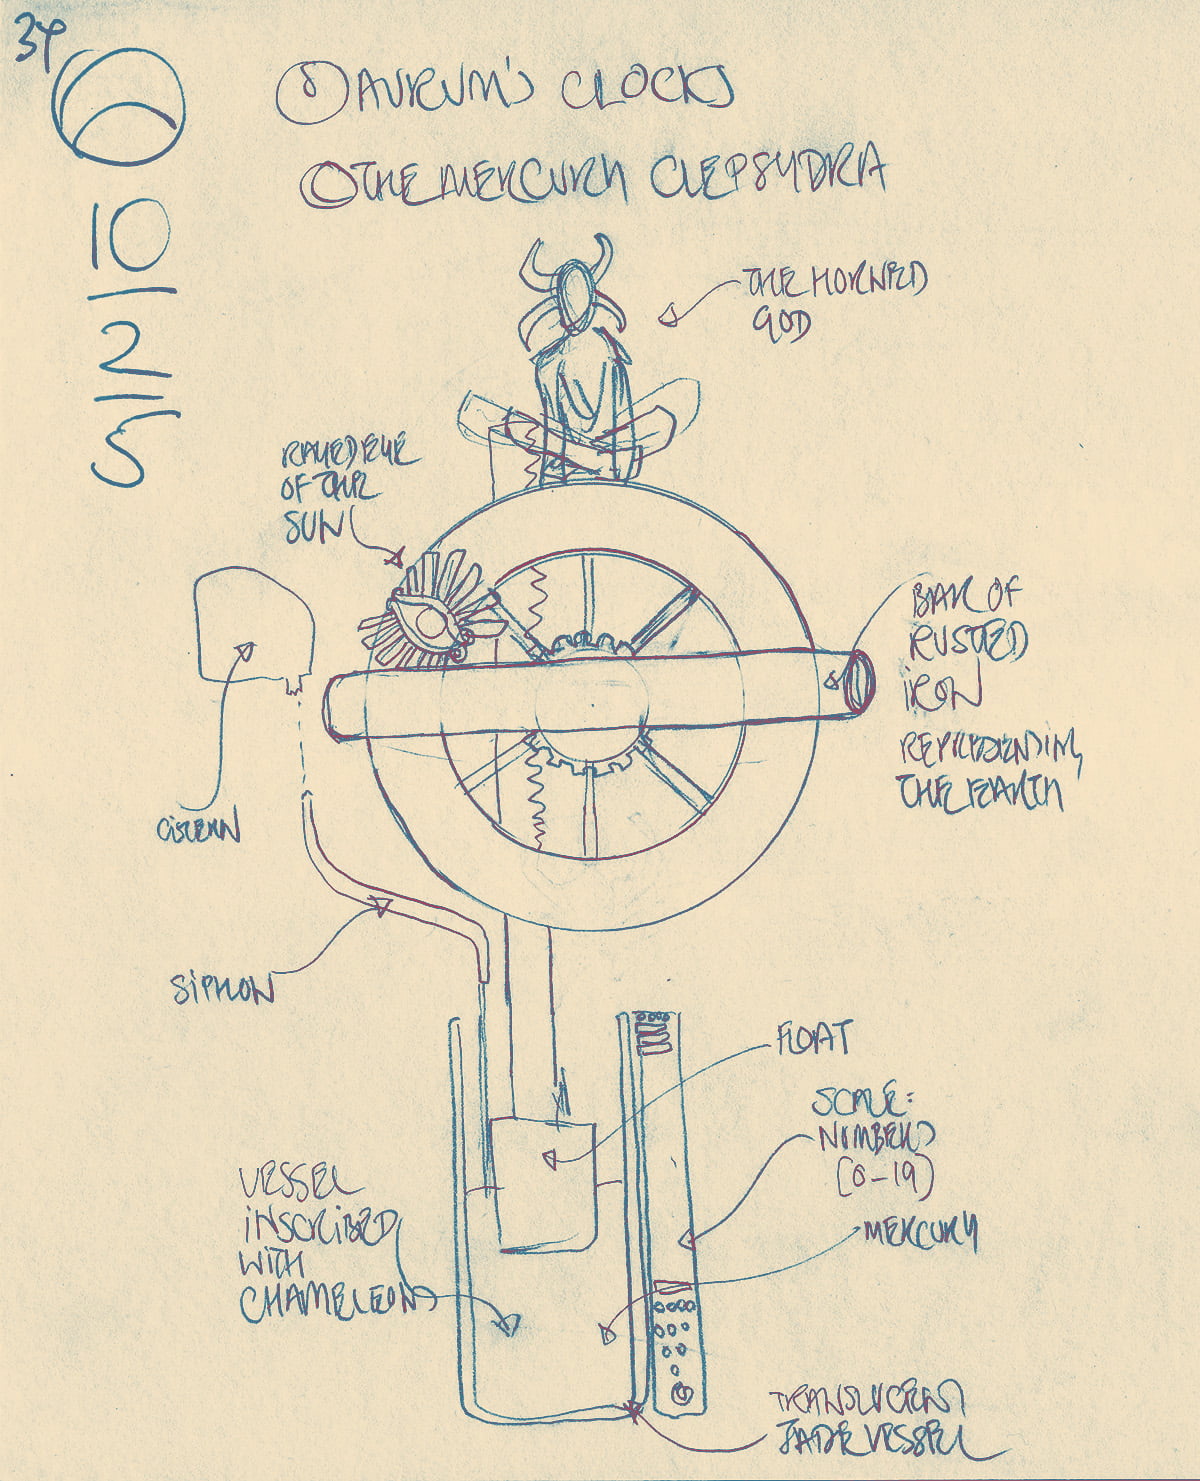
Aurum’s clock
Aurum’s clock—a mercury clypsedra
I drew this diagram of Aurum’s clock so that I could understand how it worked. His clocks have various kinds of significance, some of which I am not entirely sure of myself
The particular one depicted here is a clypsedra, or water clock, though in this case the fluid that powers it is not water, but mercury
the cocoon
an open Sapient capsule
A sapient capsule is shown set vertically and open. Within it a Sapient ‘stands’ with his homunculus between his legs. Both are ‘stowed’ for transit—held in place by many leather straps. Note the hollow they are in is padded to absorb shocks as the capsule is moved from one place to another. The Sapient is wearing a standard sapient mask to which breathing tubes are connected (coming into the capsule from the right). Note the rectangular repositories for the elixir ‘pearls’
Information relevant to the 12th chapter of Dragon Fire
hinterland
the southern margin of the Guarded Land
The map above shows the southern margin of the Guarded Land with Qunoth on the right edge of the map, and Makar in its upper left corner. The raised road (a section of the Ringwall) connecting Qunoth to Makar is shown as a solid red line with regular dots along it showing its watchtowers. The dotted red line show’s Carnelian’s route, and has each camp he makes marked and with an associated date.
approaching Makar
The second map enlarges the area around Makar, showing the city at the convergence of three roads and the Pass. Watchtower Ring 473 is shown as well as the three watch-towers on the Great South Road, Sun 91 – 93. These are the towers variously that are mentioned in the story. Carnelian can be seen approaching from the east – his last position marked being where he is on the 18th day of the 8th month.
the southern Guarded Land
the southern Guarded Land
sartlar kraals
the sartlar kraals of the Guarded Land
There are countless sartlar kraals across the Guarded Land, each constructed to the specifications of the Wise. These kraal form a grid spreading out on either side of a raised road. In the diagram above, a part of this grid is shown and running along its right edge is just such a raised road. Note how the watchtowers, along with the transverse tracks they stand guard upon, form the corners and edges of large squares in the kraal grid
Information relevant to the 11th chapter of Dragon Fire
the cothon
plan of a legionary cothon
The first diagram shows a plan of a typical cothon. Around its edge are the deep vaults in which the dragon ruhuimur are stabled. Within this are two further rings, of piers. The innermost one is where the dragon towers proper are stored. The ring between this and that of the vaults is where the tower bases are stored. The two major components of each tower are suspended upon beams and rigging above the gaps in between the piers, to allow a dragon—moving from its vault towards the centre of the cothon—to pass beneath each tower component. As the dragon does so, the tower components are lowered on to it and, as the monster’s strength returns after its period of sleep, its tower is assembled on its back
detail of structures and mechanisms around the edge of a cothon
The diagram above is of a pair of piers as viewed from the side (with the centre of the cothon to the left, vaults to the right). The rough outline of a dragon can be seen standing beside the right pier; it is waiting for the tower base shown above (and in plan in the expanded version of the diagram) to be lowered first onto its back. Later it will move towards the left, beside the second pier, where the truncated pyramid of its tower proper will be lowered and joined to the tower base
my initial exploration of cothon mechanisms
The final diagram shows my initial exploration of the cothon mechanisms. The shape on the right is a tower base seen from above, tapering towards its front. The top left shows a pair of piers with a dragon between them facing us, a tower ‘pyramid’ suspended above it. The bottom left shows the same dragon from above between the two inner piers
Qunoth
the Leper Valleys showing the location of Qunoth
Qunoth – coming originally from Quyan keyu meaning ‘seven’ and noth meaning ‘ladder’ – refers to its position controlling the seven passes marked on the map above as purple chevrons. (The square frame marks the area depicted in the expanded version of the 2nd image)
Qunoth, a city on the edge of the Guarded Land
The second map shows Qunoth (the long red structure)—looking a little like a cuttlefish – extending as a blade of rock from the Guarded Land plateau – its fissured limestone being shown in white. The Qunoth rock is part of a vast basalt dyke (that can be seen better on the expanded image) that the Gorge river breaks through far below —the floor of the Gorge is shown in green. The Ringwall road is the pale brown thread passing across the northern edge of the city. Its leftway—shown in blue—separates from it, does a circuit of the city, and returns to join the road. Top left, on the other side of the raised road, are the shanties spreading off into the interior
the southern part of the city of Qunoth
The third diagram shows the part of Qunoth that extends out high above the land below. The orange region (towards the top left) is the Midden. The dark red areas are the tenements of the city, the pale threads are roads. Fort Street runs down the spine of the city towards the gate—shown as a red dot—of Qunoth’s legionary fortress. Southwards, beyond this, are the paler legionary barracks and stables. The ‘red eye of the cuttlefish’ is the cothon. The green region beyond is parkland and the pale triangle on the other side is the sanctum. The pale tip is the tower of the Legate of Qunoth that stands above the white threshing falls far below
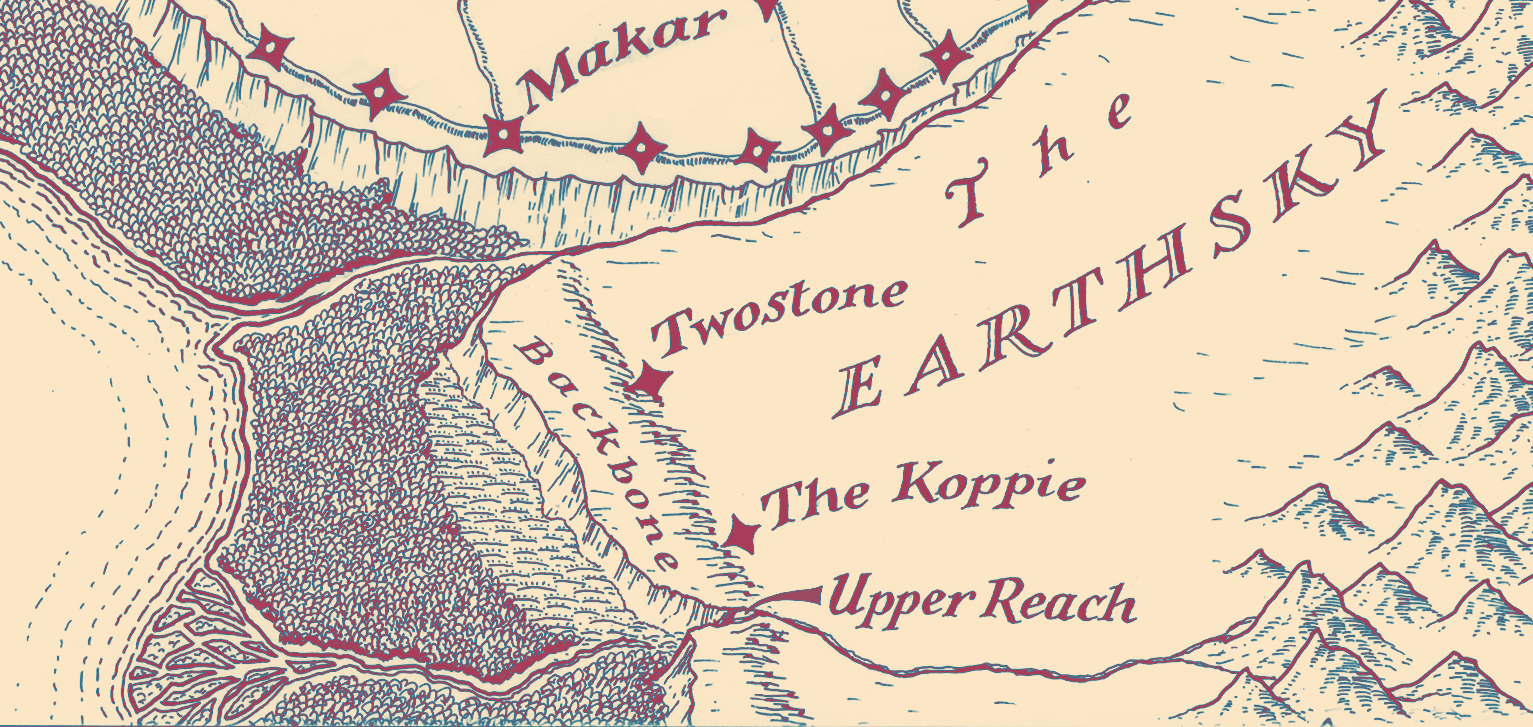
the Earthsky
the Earthsky and the Upper Reach
This detail from the Three Lands map shows the position of the Upper Reach. Note the river flowing west from it alongs whose banks is located the Lower Reach
Information relevant to the 10th chapter of Dragon Fire
the cothon
plan of a legionary cothon
The first diagram shows a plan of a typical cothon. Around its edge are the deep vaults in which the dragon ruhuimur are stabled. Within this are two further rings, of piers. The innermost one is where the dragon towers proper are stored. The ring between this and that of the vaults is where the tower bases are stored. The two major components of each tower are suspended upon beams and rigging above the gaps in between the piers, to allow a dragon—moving from its vault towards the centre of the cothon—to pass beneath each tower component. As the dragon does so, the tower components are lowered on to it and, as the monster’s strength returns after its period of sleep, its tower is assembled on its back
detail of structures and mechanisms around the edge of a cothon
The diagram above is of a pair of piers as viewed from the side (with the centre of the cothon to the left, vaults to the right). The rough outline of a dragon can be seen standing beside the right pier; it is waiting for the tower base shown above (and in plan in the expanded version of the diagram) to be lowered first onto its back. Later it will move towards the left, beside the second pier, where the truncated pyramid of its tower proper will be lowered and joined to the tower base
my initial exploration of cothon mechanisms
The final diagram shows my initial exploration of the cothon mechanisms. The shape on the right is a tower base seen from above, tapering towards its front. The top left shows a pair of piers with a dragon between them facing us, a tower ‘pyramid’ suspended above it. The bottom left shows the same dragon from above between the two inner piers
Qunoth
the Leper Valleys showing the location of Qunoth
Qunoth – coming originally from Quyan keyu meaning ‘seven’ and noth meaning ‘ladder’ – refers to its position controlling the seven passes marked on the map above as purple chevrons. (The square frame marks the area depicted in the expanded version of the 2nd image)
Qunoth, a city on the edge of the Guarded Land
The second map shows Qunoth (the long red structure)—looking a little like a cuttlefish – extending as a blade of rock from the Guarded Land plateau – its fissured limestone being shown in white. The Qunoth rock is part of a vast basalt dyke (that can be seen better on the expanded image) that the Gorge river breaks through far below —the floor of the Gorge is shown in green. The Ringwall road is the pale brown thread passing across the northern edge of the city. Its leftway—shown in blue—separates from it, does a circuit of the city, and returns to join the road. Top left, on the other side of the raised road, are the shanties spreading off into the interior
the southern part of the city of Qunoth
The third diagram shows the part of Qunoth that extends out high above the land below. The orange region (towards the top left) is the Midden. The dark red areas are the tenements of the city, the pale threads are roads. Fort Street runs down the spine of the city towards the gate—shown as a red dot—of Qunoth’s legionary fortress. Southwards, beyond this, are the paler legionary barracks and stables. The ‘red eye of the cuttlefish’ is the cothon. The green region beyond is parkland and the pale triangle on the other side is the sanctum. The pale tip is the tower of the Legate of Qunoth that stands above the white threshing falls far below
Information relevant to the 9th chapter of Dragon Fire
the southern Guarded Land
the southern Guarded Land
Leper’s Gorge
Carnelian’s route through Lepers’ Gorge
This map shows Carnelian’s journey up the Leper’s Gorge, from Lily’s cave (in the bottom left, up the tributary stream that joins the river just before the fork) all the way up to Qunoth (at the top right, at the end of the diagonal grey line—that is another basalt dyke like the Backbone). Note the many ‘valleys’ along the southern margin of the Guarded Land plateau—many of which hold Leper refuges. The purple chevrons are smaller ‘passes’ – negotiable ascents to the Guarded Land. The Ringwall is shown as an orange line snaking across the Guarded Land – the ‘dots’ along it show the position of watch-towers. Carnelian’s route is shown as a dotted orange line along with the dates and locations where he stops for the night.
the city of Qunoth
the Leper Valleys showing the location of Qunoth
Qunoth – coming originally from Quyan keyu meaning ‘seven’ and noth meaning ‘ladder’ – refers to its position controlling the seven passes marked on the map above as purple chevrons. (The square frame marks the area depicted in the expanded version of the 2nd image)
Qunoth, a city on the edge of the Guarded Land
The second map shows Qunoth (the long red structure)—looking a little like a cuttlefish – extending as a blade of rock from the Guarded Land plateau – its fissured limestone being shown in white. The Qunoth rock is part of a vast basalt dyke (that can be seen better on the expanded image) that the Gorge river breaks through far below —the floor of the Gorge is shown in green. The Ringwall road is the pale brown thread passing across the northern edge of the city. Its leftway—shown in blue—separates from it, does a circuit of the city, and returns to join the road. Top left, on the other side of the raised road, are the shanties spreading off into the interior
the southern part of the city of Qunoth
The third diagram shows the part of Qunoth that extends out high above the land below. The orange region (towards the top left) is the Midden. The dark red areas are the tenements of the city, the pale threads are roads. Fort Street runs down the spine of the city towards the gate—shown as a red dot—of Qunoth’s legionary fortress. Southwards, beyond this, are the paler legionary barracks and stables. The ‘red eye of the cuttlefish’ is the cothon. The green region beyond is parkland and the pale triangle on the other side is the sanctum. The pale tip is the tower of the Legate of Qunoth that stands above the white threshing falls far below
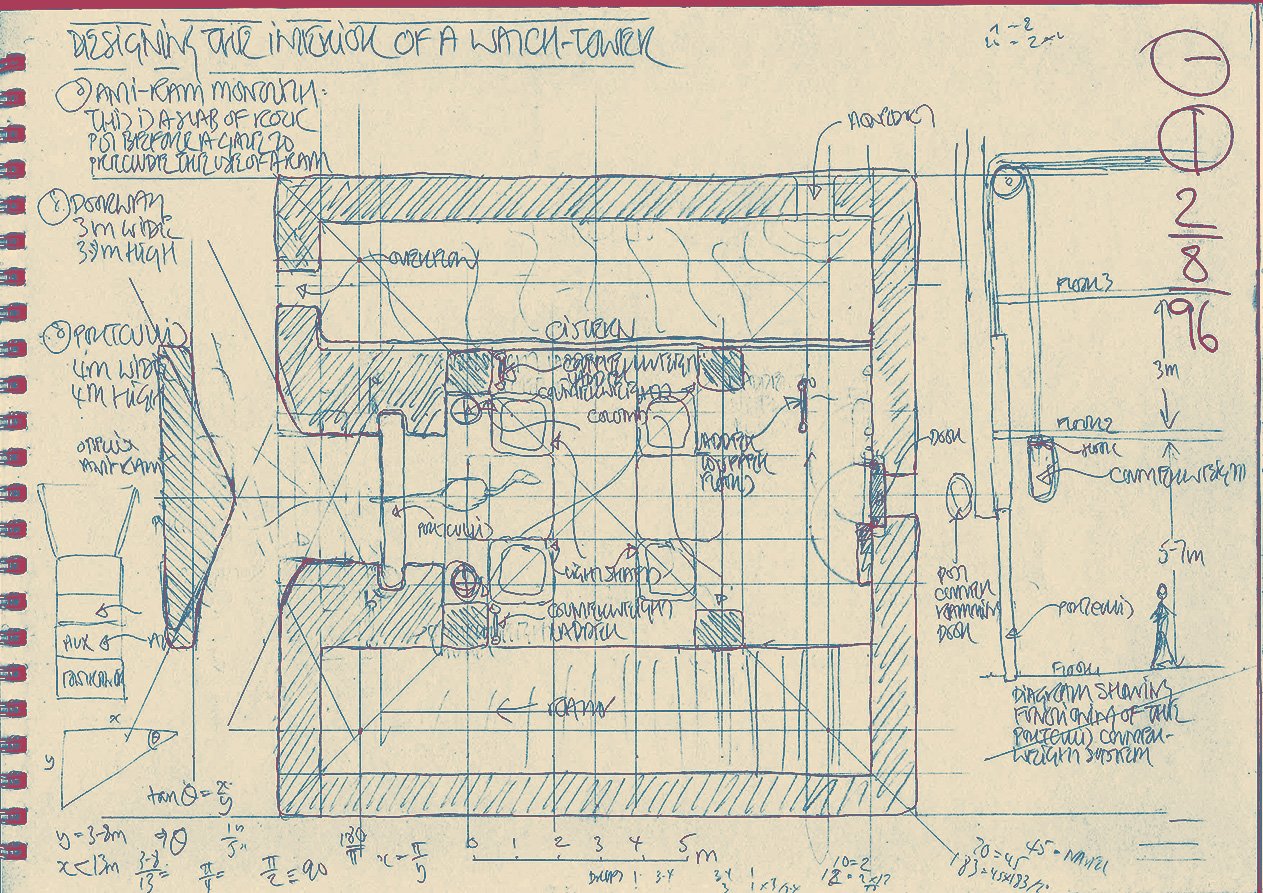
watchtowers
raised road with a watchtower rising beside it
The diagram above shows side views and a view from above of a standard watchtower. Each such tower stands guard on a gate controlling passage from one province into another through the wall that carries a leftway. Note the drawbridge that carries the leftway over the gateway below
Watchtowers are set at regular intervals along the raised roads of the Guarded Land. These towers and the high road—the leftway—that runs under their gaze, form not only the primary communications systems of the Commonwealth, but also provide the Wise with a ‘sensory grid’ with which they ‘see’ much of what goes on in the Guarded Land. In addition, each tower is garrisoned with enough auxiliaries to defend the gate over which each tower stands guard
The communication system has two distinct aspects. Messages can be carried as sealed despatches at furious speed along the leftway by couriers who obtain fresh aquar at each tower. Couriers, and what they carry, are protected by stringent codicils of the Law-that-must-be-obeyed.
Shorter and more critical messages are jumped from tower to tower by means of the heliographs during the day or, more slowly, by naphtha flares at night
A watchtower is often at the centre of an extensive stopping place, where the throngs travelling on the road below can make camp for the night
Watchtowers play an important part in the Stone Dance, and it was because of this that I felt the need to understand their exteriors and interiors so well
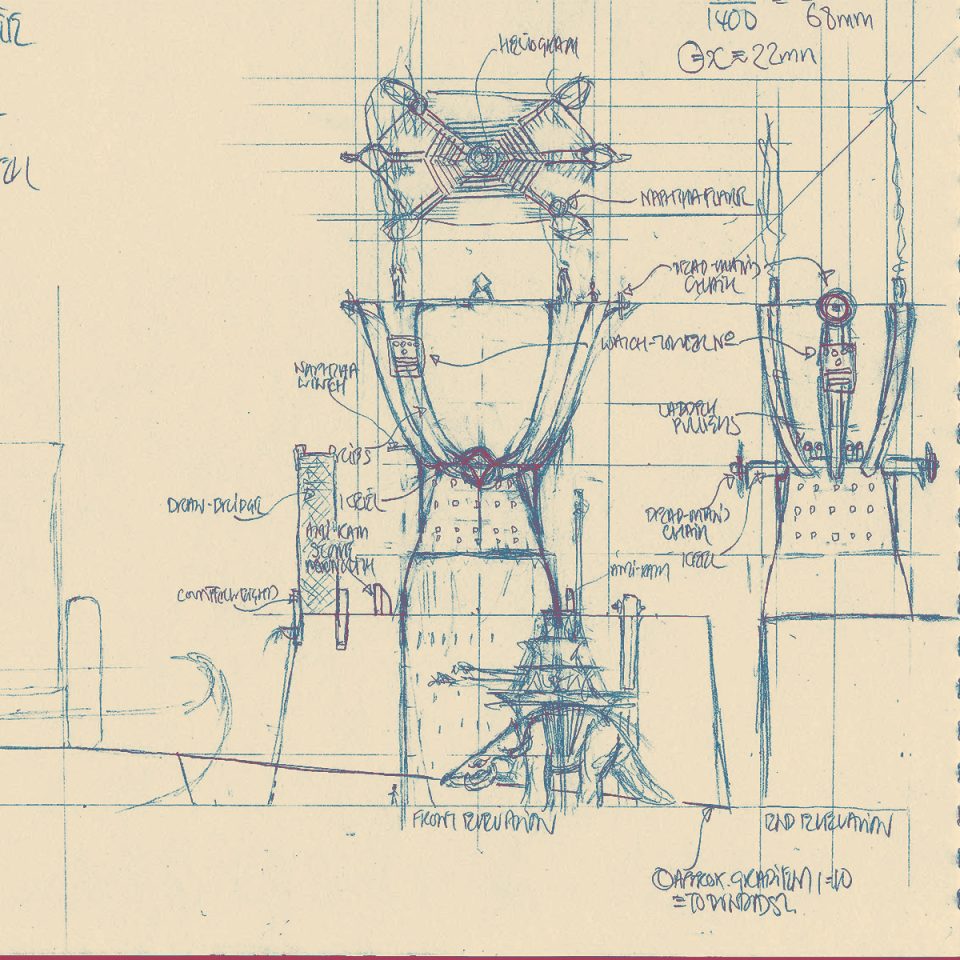
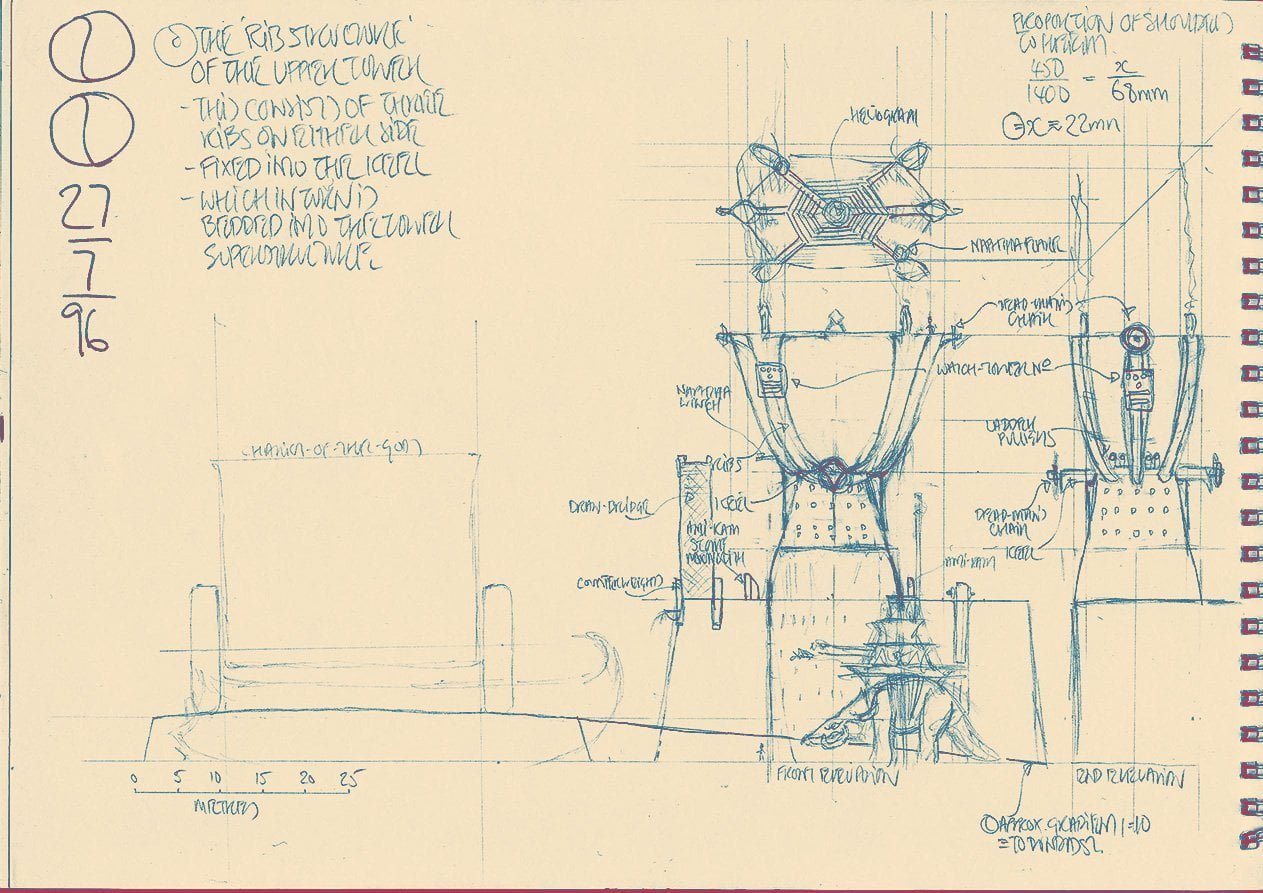
top storey and watchtower roof and ribs
From the summit of a watchtower, six ribs curve up to hold aloft a platform at the centre of which is located a heliograph device. Naphtha, piped up the ribs, burns in flares to transmit signals at night when the heliograph cannot operate. The ribs branch up from either side of a keel beam. At the ends of the keel beam are two of the tower’s four deadman chairs: the other two hang from the upper ends of the middle ribs. Lookouts sitting in these chairs maintain an unsleeping scrutiny of the Guarded Land and the road below. The keel beam is embedded in the superstructure of the tower that consists of a number of floors: those above the level of the leftway are connected by ladders that can be raised by means of counterweights. Those below the level of the leftway are connected by ramps
Note the trapdoor in the roof that gives access down into the uppermost storey. Note also the staples climbing up the rib in the lower left (of the right hand plan) that gives access to a naphtha flare and to the heliograph platform. The left hand diagram shows the upper storey that provides accommodation for the staff of ammonites who operate the heliograph. It is these chambers that Carnelian, his father and the other Masters occupy each night on their journey to Osrakum
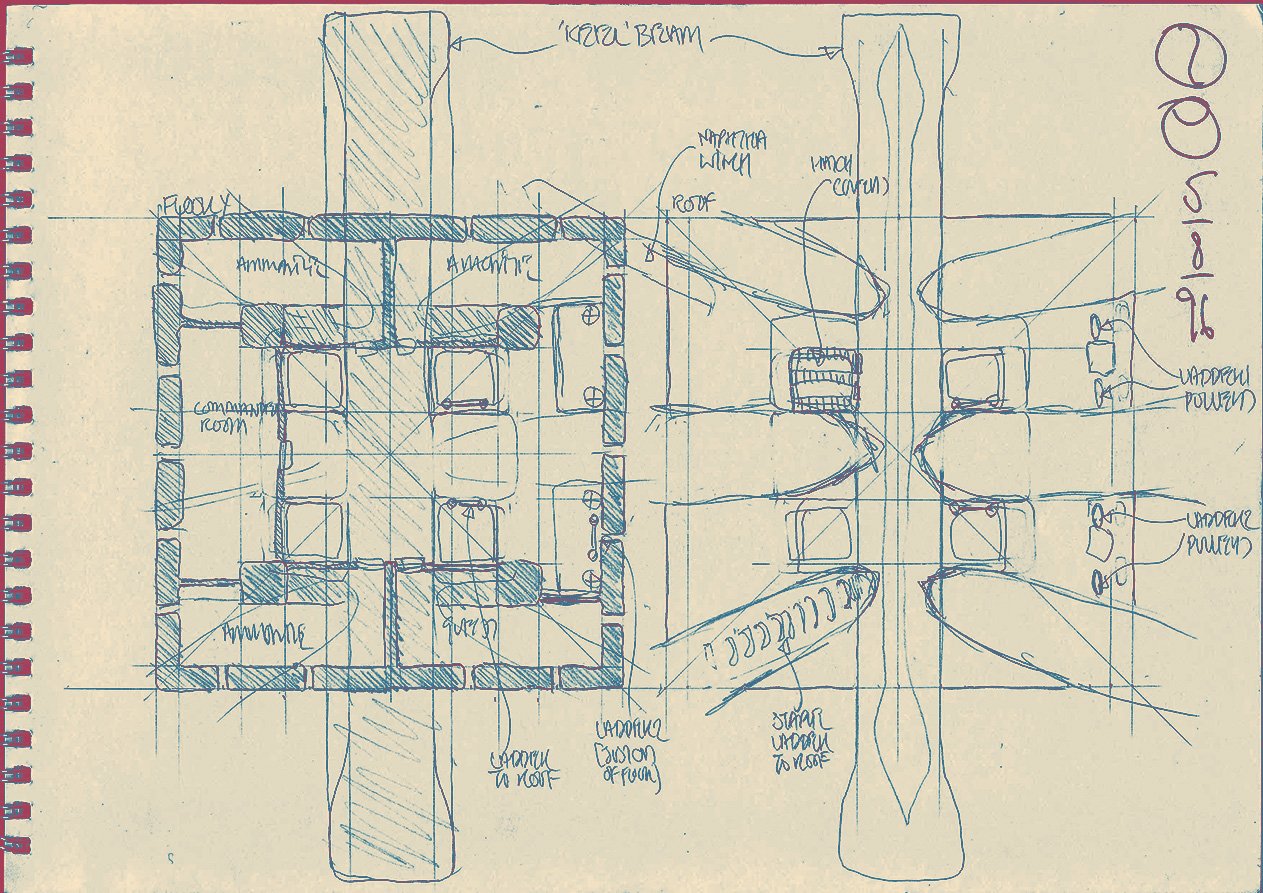
barracks storeys for watchtower garrison
This second page of floor plans shows the two storeys that are the barracks of the tower garrison
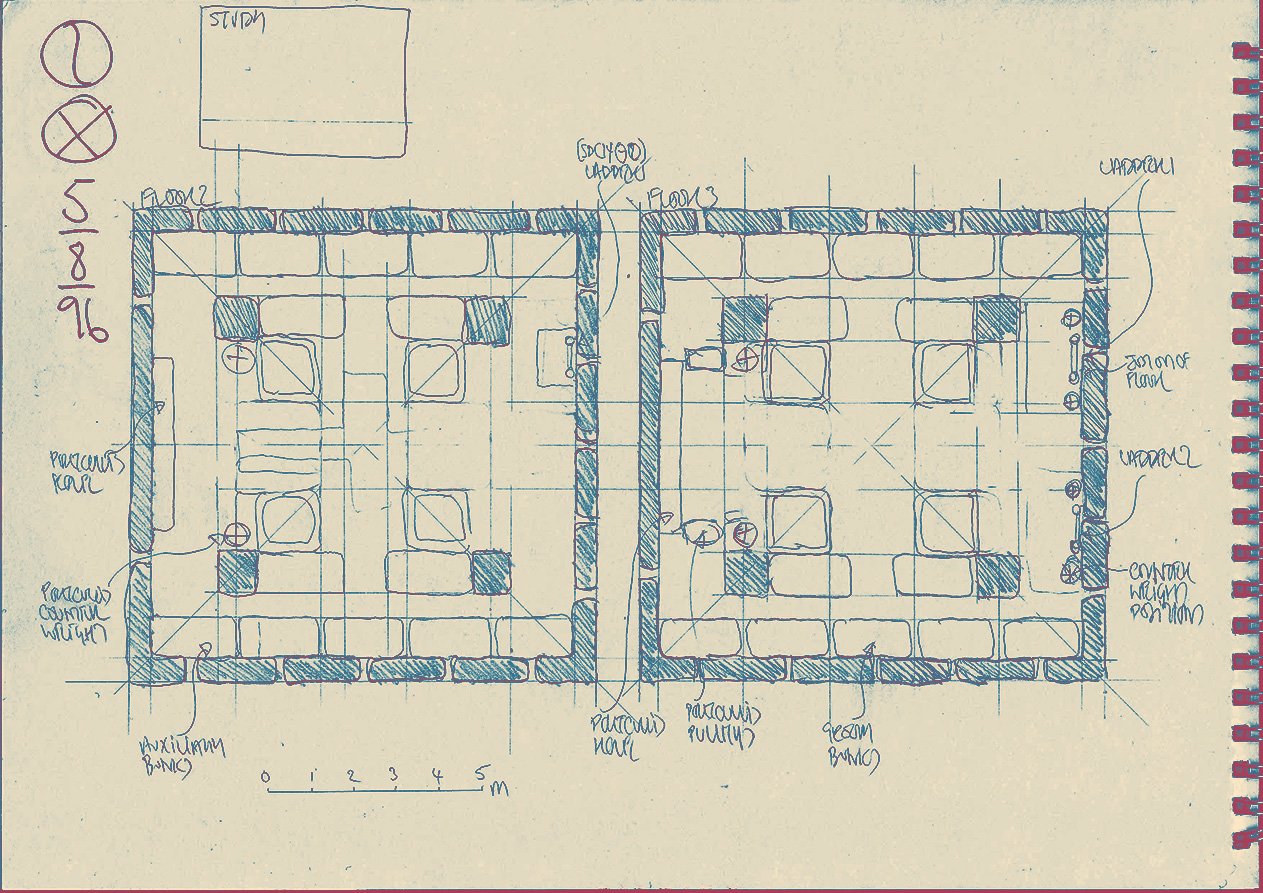
watchtower entry from the leftway
The third page of floor plans shows the storey of the tower that is level with the leftway. In the upper part of the diagram is a cistern. Corresponding to this—in the lower part of the diagram—is the ramp that leads down into the stables. A portcullis seals the entry from the leftway. Standing before this entrance is a monolith, the purpose of which is to make it impossible to use a battering ram against the portcullis. To the right of the portcullis you might be able to make out the faint sketch of an aquar as seen from above. I put this in so as to be able to more easily imagine what it would be like leading an aquar into this space. A small diagram on the right hand side of this page is a side view showing how the portcullis and its counterweights work. It also includes measurements for the heights of some of the storeys.
two of a watchtower’s stable levels
The fourth and final page of floor plans shows two of the three stable levels that are linked by ramps to the upper entrance—from the leftway. Various other mechanisms are lodged here that have to do with the operation of the portcullis, etc in the levels above. The lowest level of all is the uppermost diagram. Note that it too has a portcullis and a monolith set facing it. This gives direct access to the main carriageway of the raised road that runs along the foot of the wall carrying the leftway
Information relevant to the 8th chapter of Dragon Fire
the southern Guarded Land
the southern Guarded Land
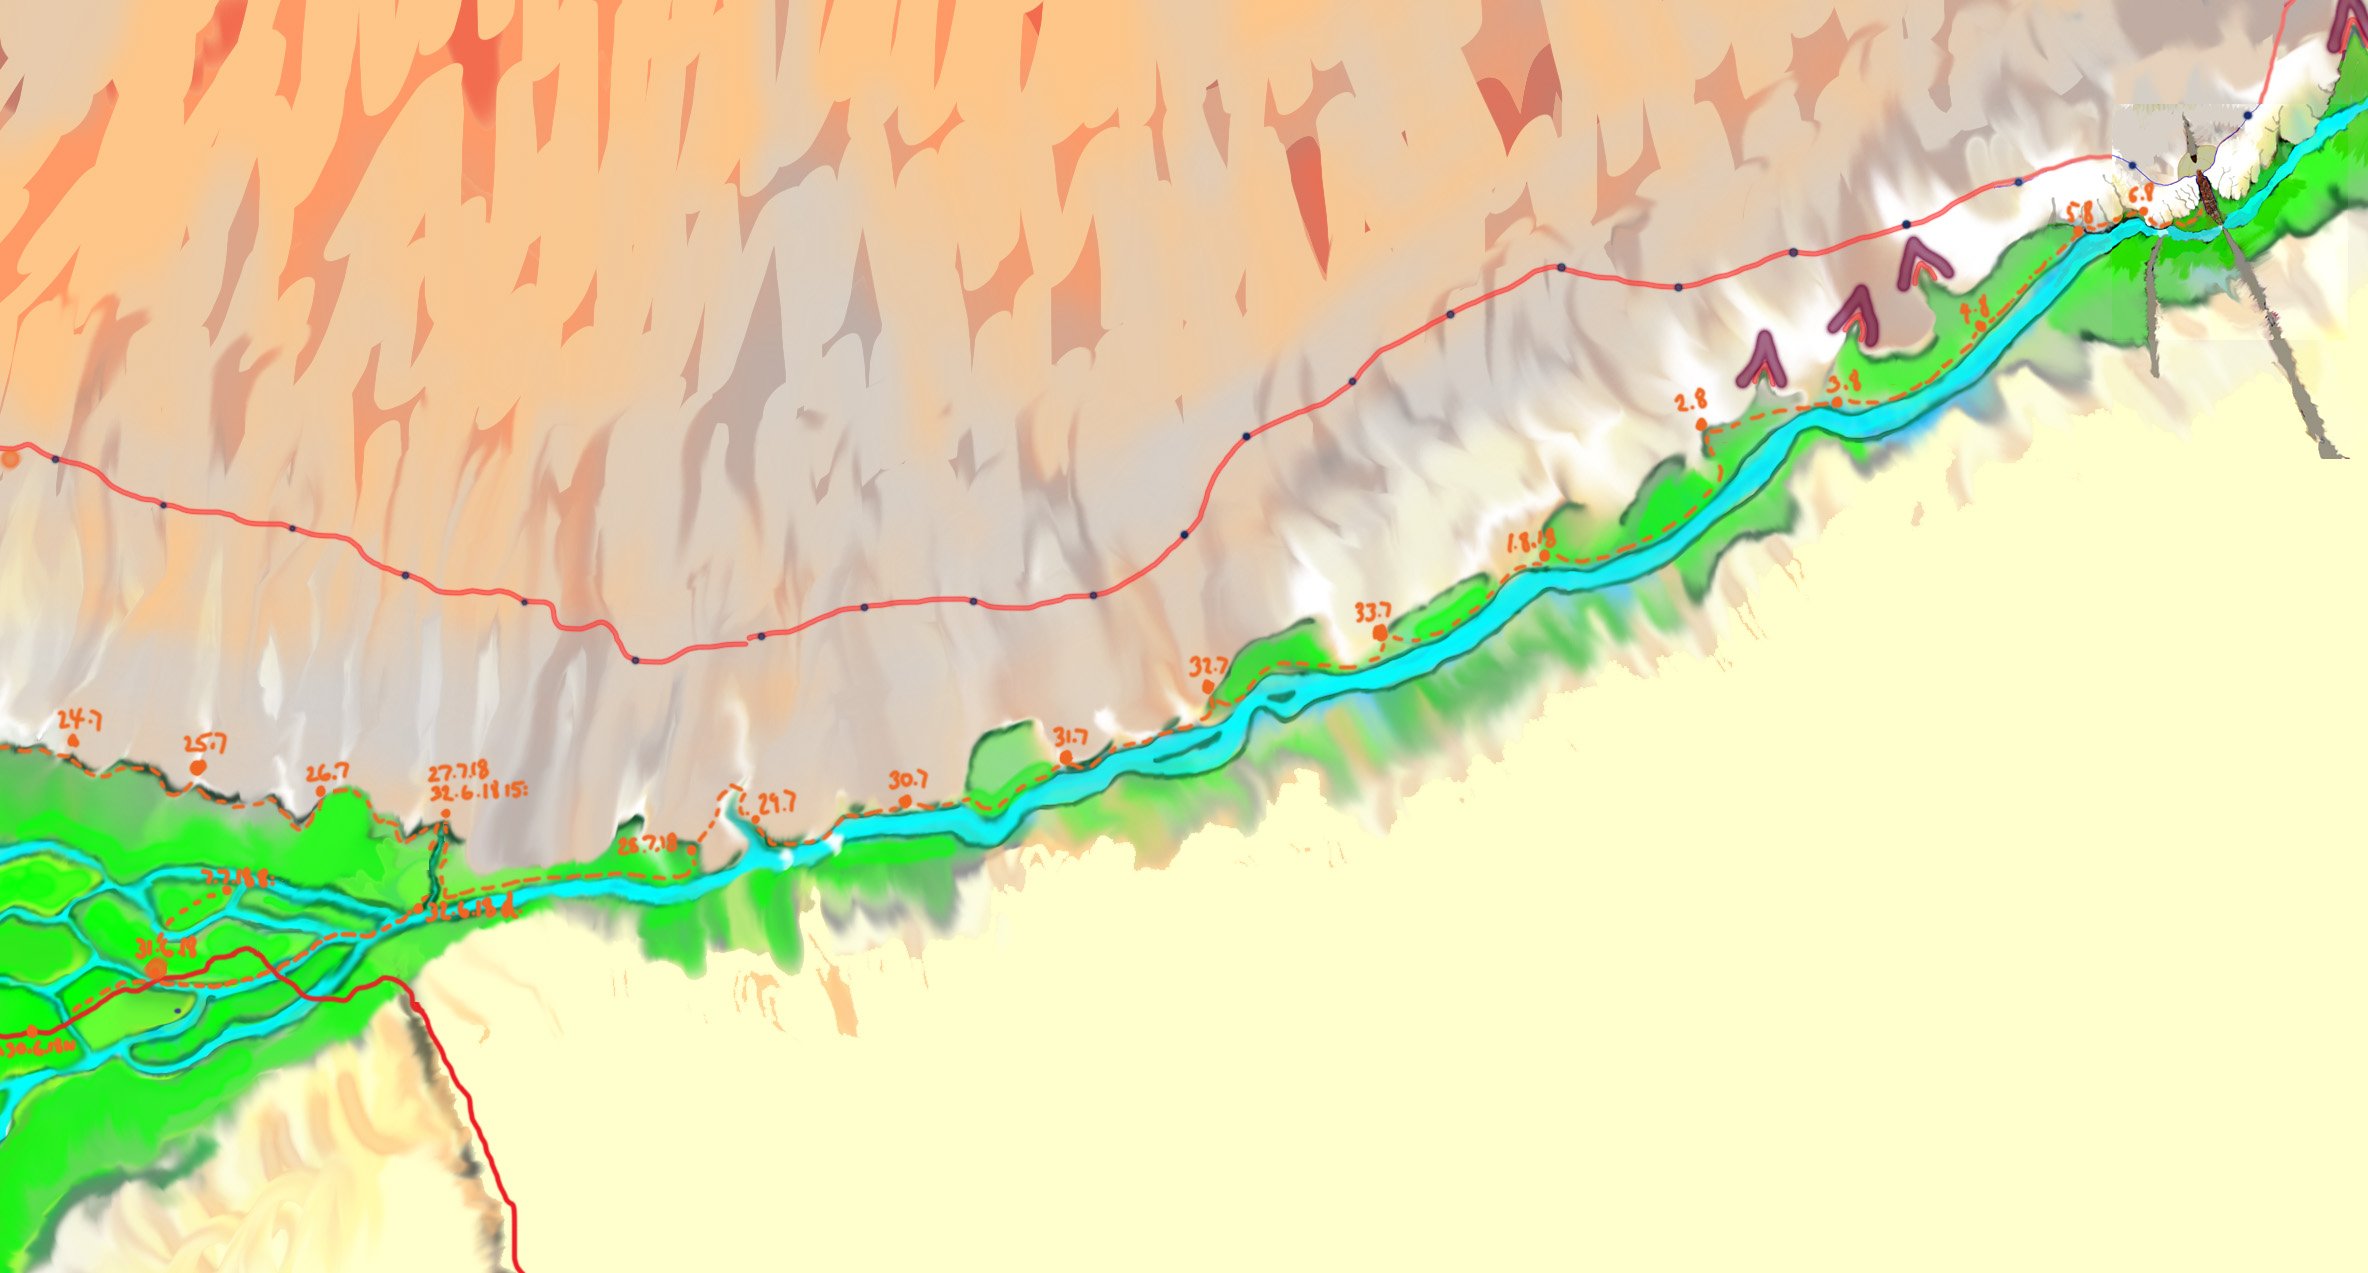
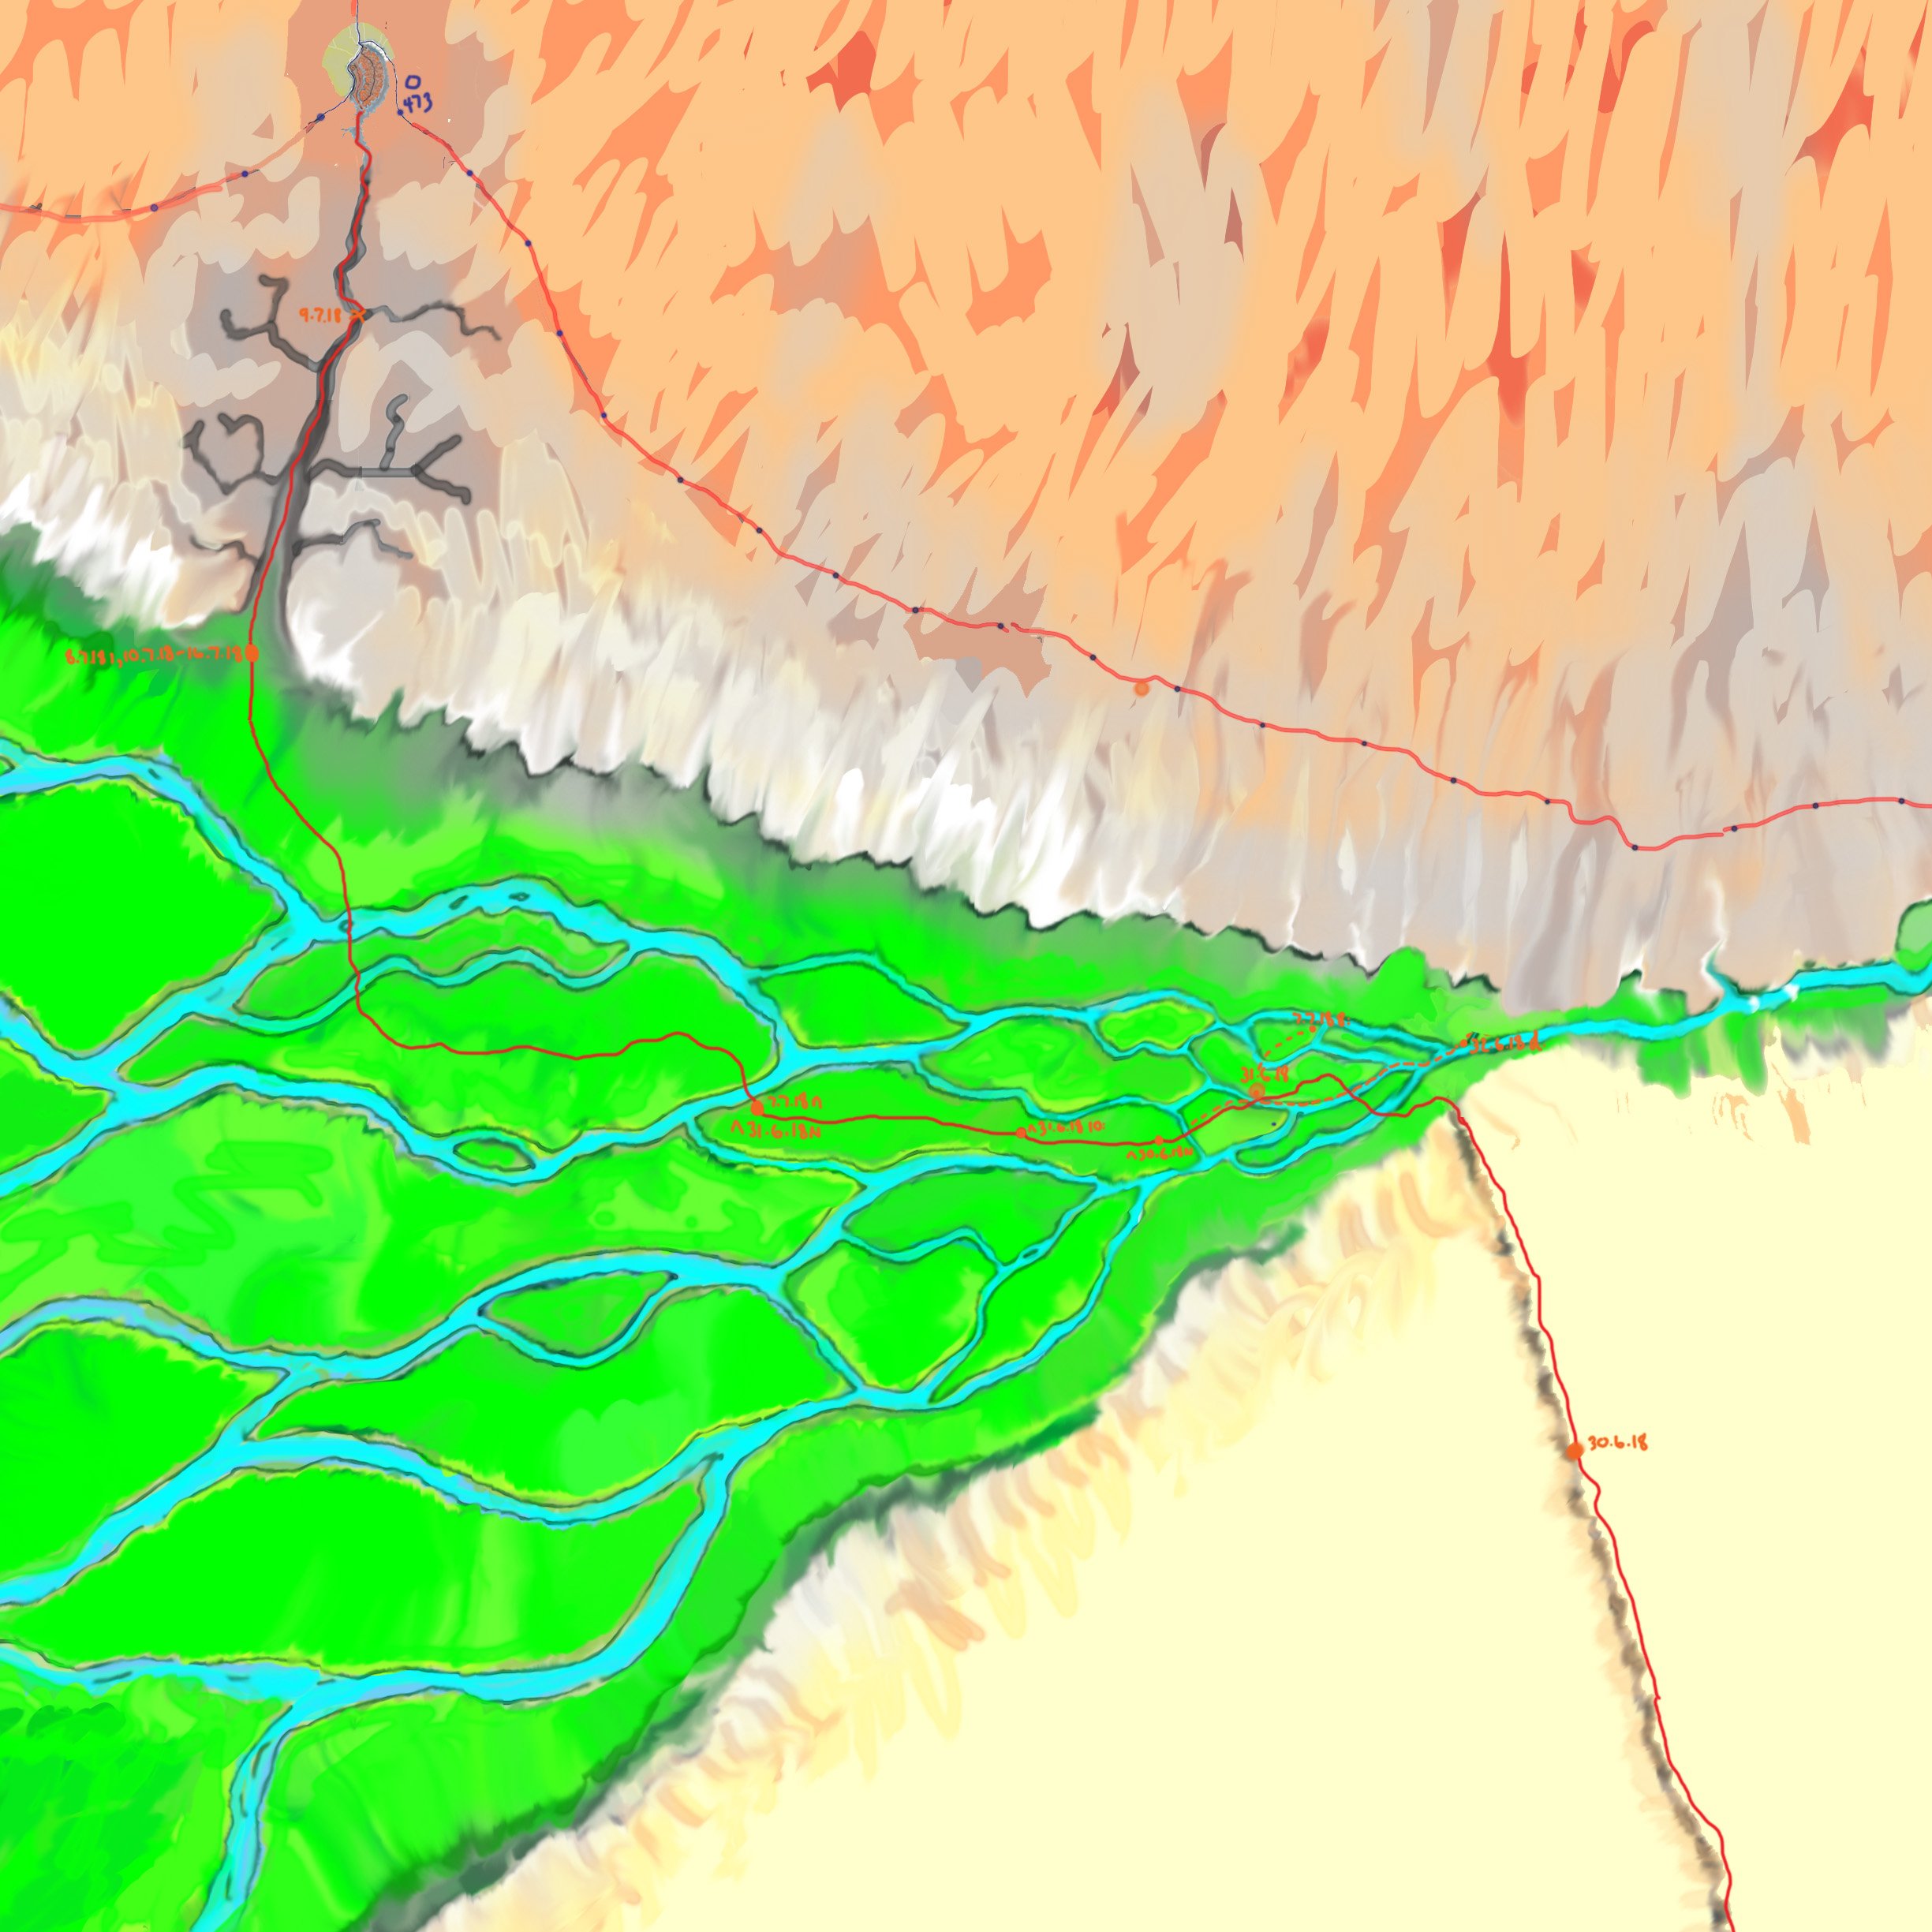
the Pass
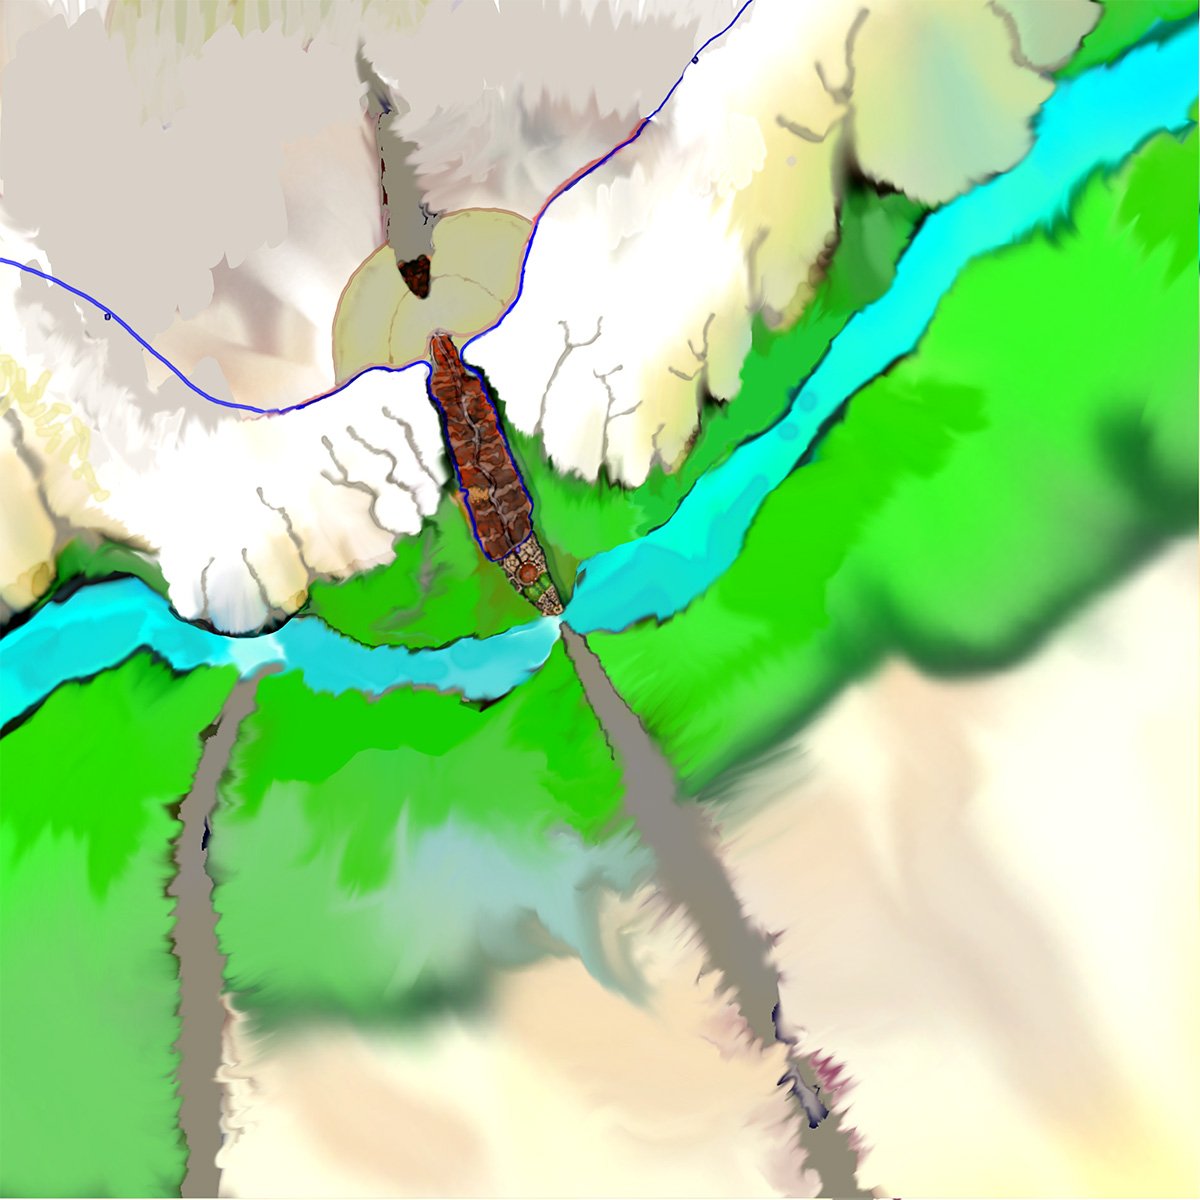
the Pass to Makar
This map of the Pass to Makar shows the system of vast erosional canyons descending from Makar—shown at the junction of the three roads towards the top of the map—down to the green sward of the Leper Valleys.
The Pass is by far the greatest indentation in the southern margin of the Guarded Land and provides the primary link between the Guarded Land and the Earthsky, as well as other southern lands. The Pass is the reason for the siting of Makar, explaining why it is the most important city in the South, as well as why it was chosen as the terminus for the Great South Road from Osrakum. These factors also explain why this is the route most favoured by Plainsmen travelling from the Earthsky to the Guarded Land
The Lepers who control the valleys and hills between the Pass and the Earthsky exploit this and other traffic through trade and by extracting tolls
Information relevant to the 7th chapter of Dragon Fire
the southern Guarded Land
the southern Guarded Land
through the Leper Valleys
crossing the Leper Valleys
This map shows not only the Leper Valleys, but also Carnelian’s route through them. Shown are places, with associated dates, where he and Osidian make military camps
the Pass of Makar
the Pass to Makar
This map of the Pass to Makar shows the system of vast erosional canyons descending from Makar—shown at the junction of the three roads towards the top of the map—down to the green sward of the Leper Valleys.
The Pass is by far the greatest indentation in the southern margin of the Guarded Land and provides the primary link between the Guarded Land and the Earthsky, as well as other southern lands. The Pass is the reason for the siting of Makar, explaining why it is the most important city in the South, as well as why it was chosen as the terminus for the Great South Road from Osrakum. These factors also explain why this is the route most favoured by Plainsmen travelling from the Earthsky to the Guarded Land
The Lepers who control the valleys and hills between the Pass and the Earthsky exploit this and other traffic through trade and by extracting tolls
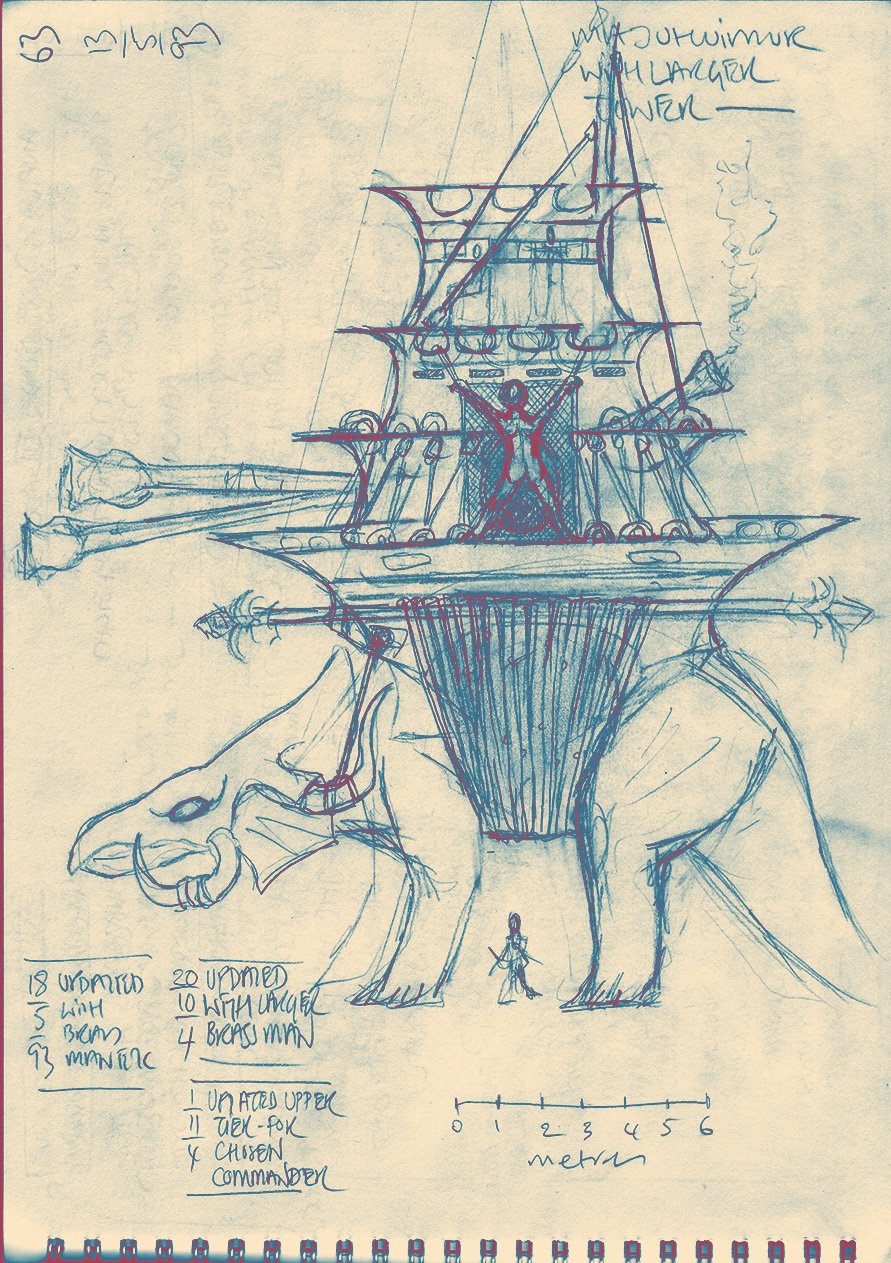
‘dragons’
a dragon huimur with its tower
A ruhuimur or dragon of the legions of the Masters, with its tower and its flamepipes
Information relevant to the 6th chapter of Dragon Fire
the southern Guarded Land
the southern Guarded Land
the Leper Valleys
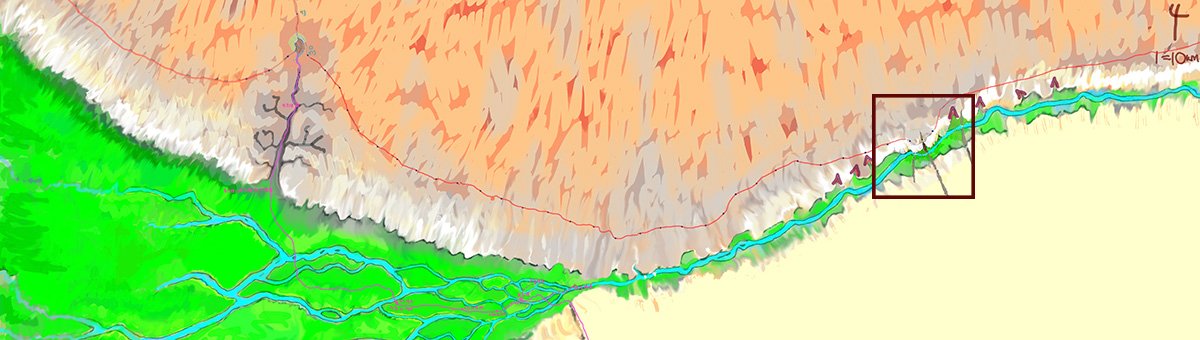
wild lands south of the Guarded Land
this shows the southern edge of the Guarded Land plateau and the wild swampland that lies below. The square indicates the location of the city of Makar. The red line running east / west is the raised roads of the Ringwall—the small dots are some of the watchtowers that secure the perimeter of the Guarded Land. The land beyond the Ringwall is the karst landscape of eroded limestone. The river channels in the swampland are only a vague indication of what is a fluid, ever-changing landscape. The Leper Valleys are the narrower part of the swampland