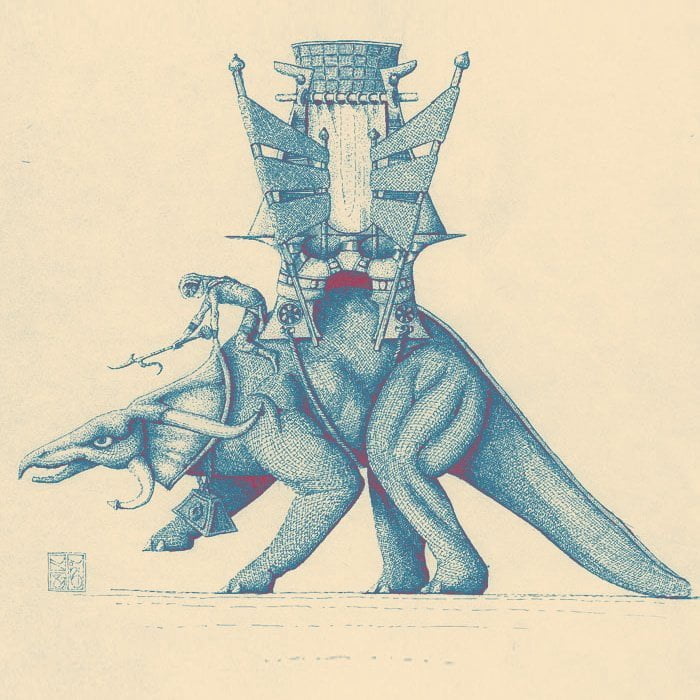
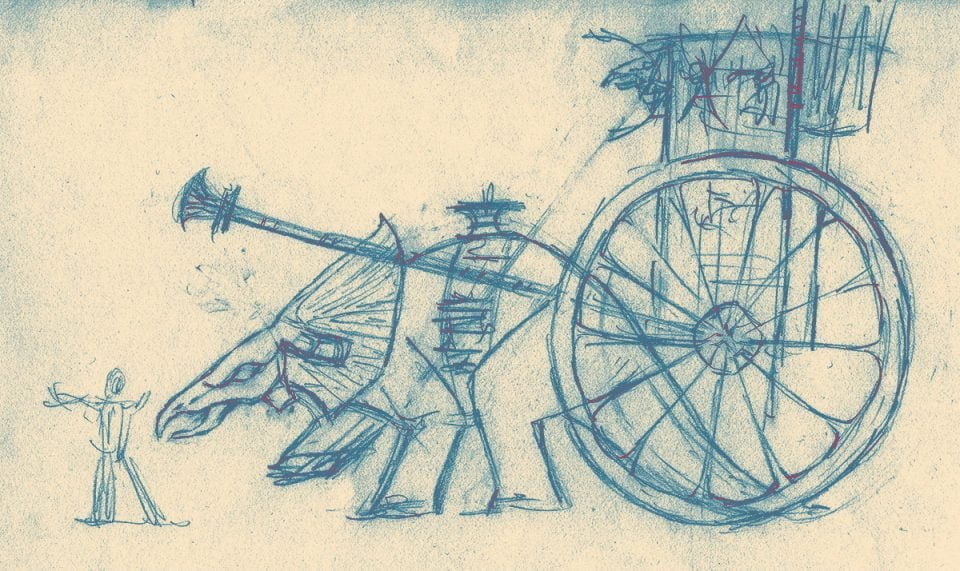
Dragon Ruhuimur

a dragon huimur with its tower
early huimur © 1982 Ricardo Pinto

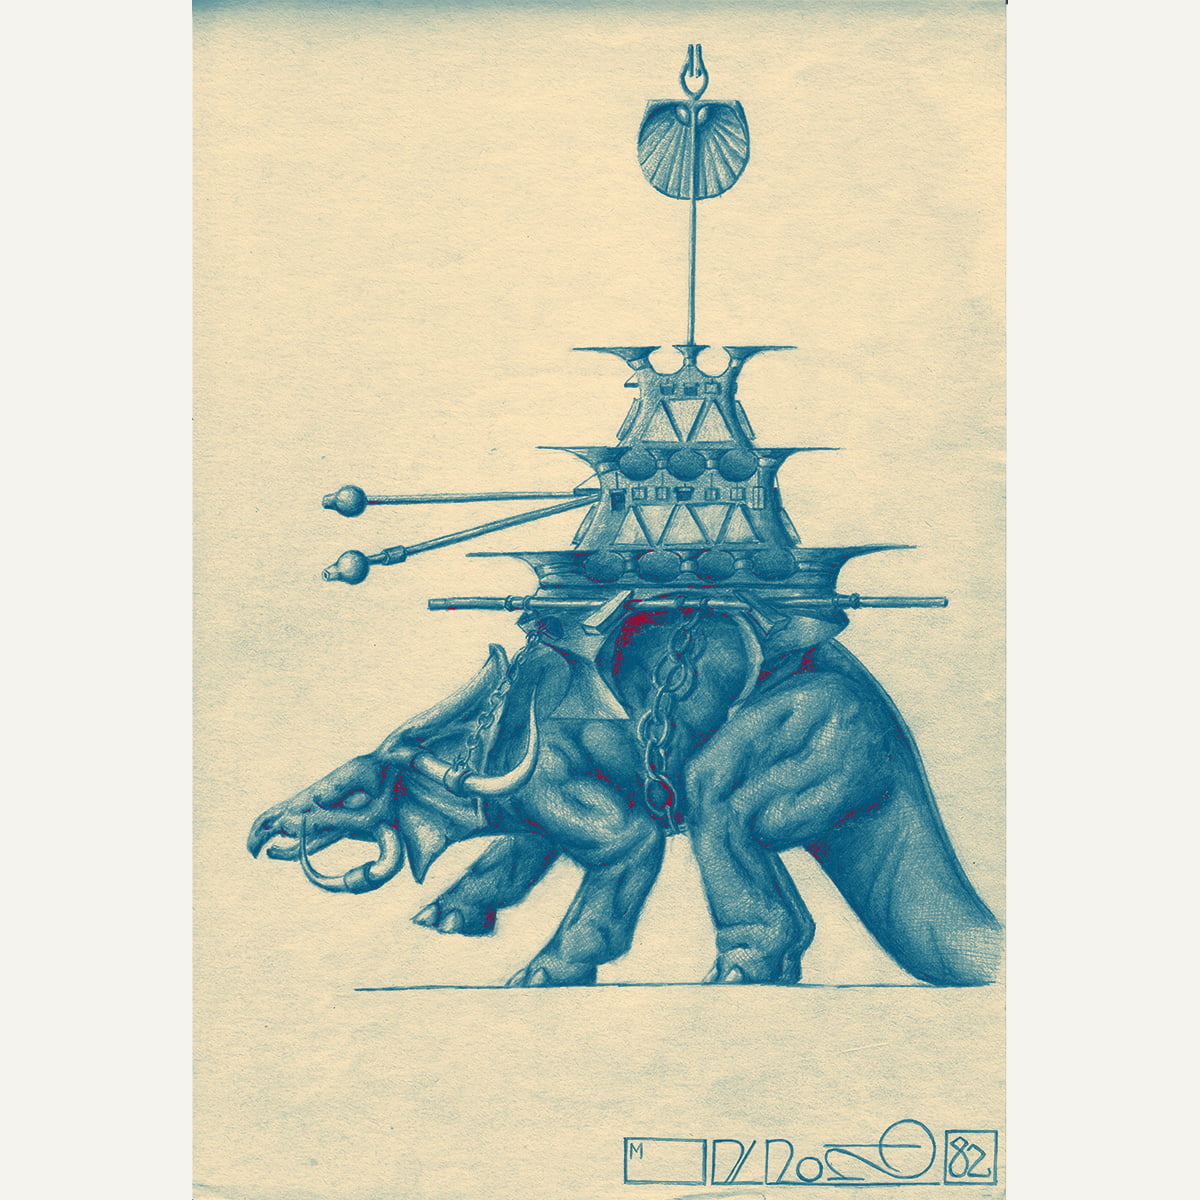
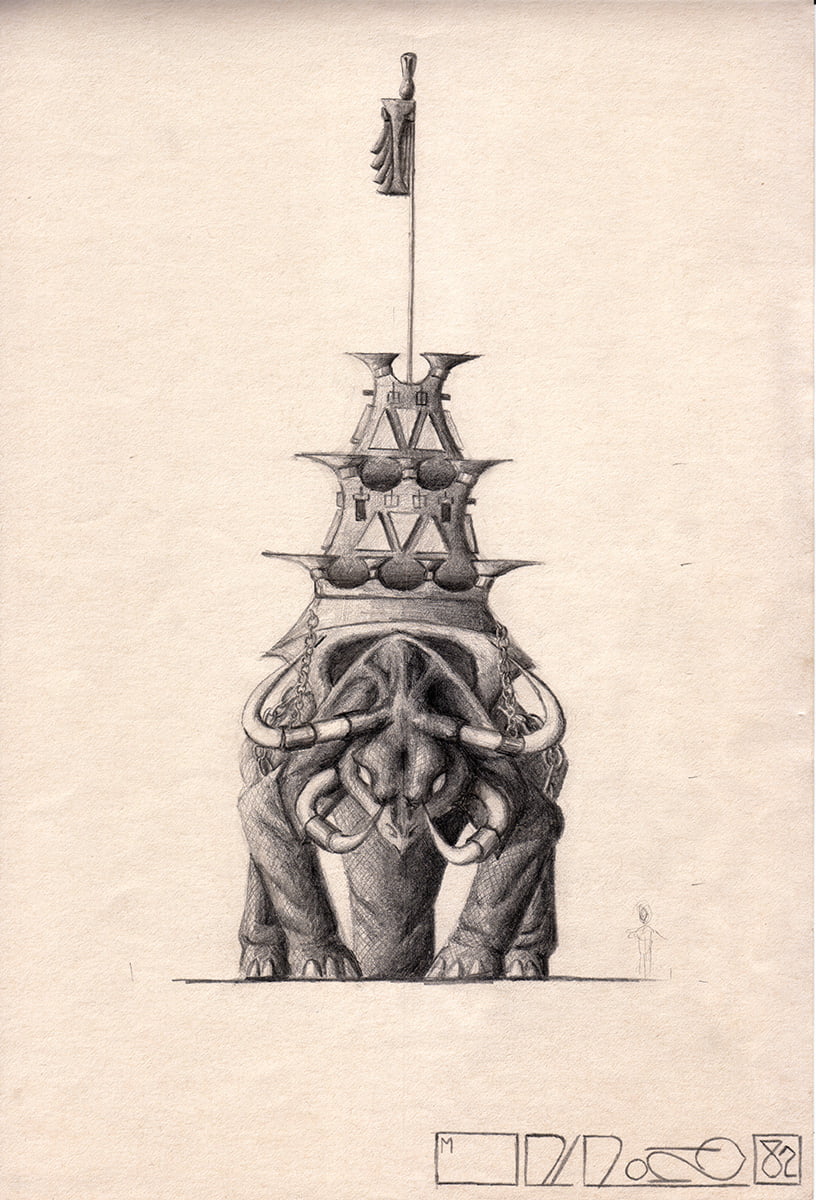
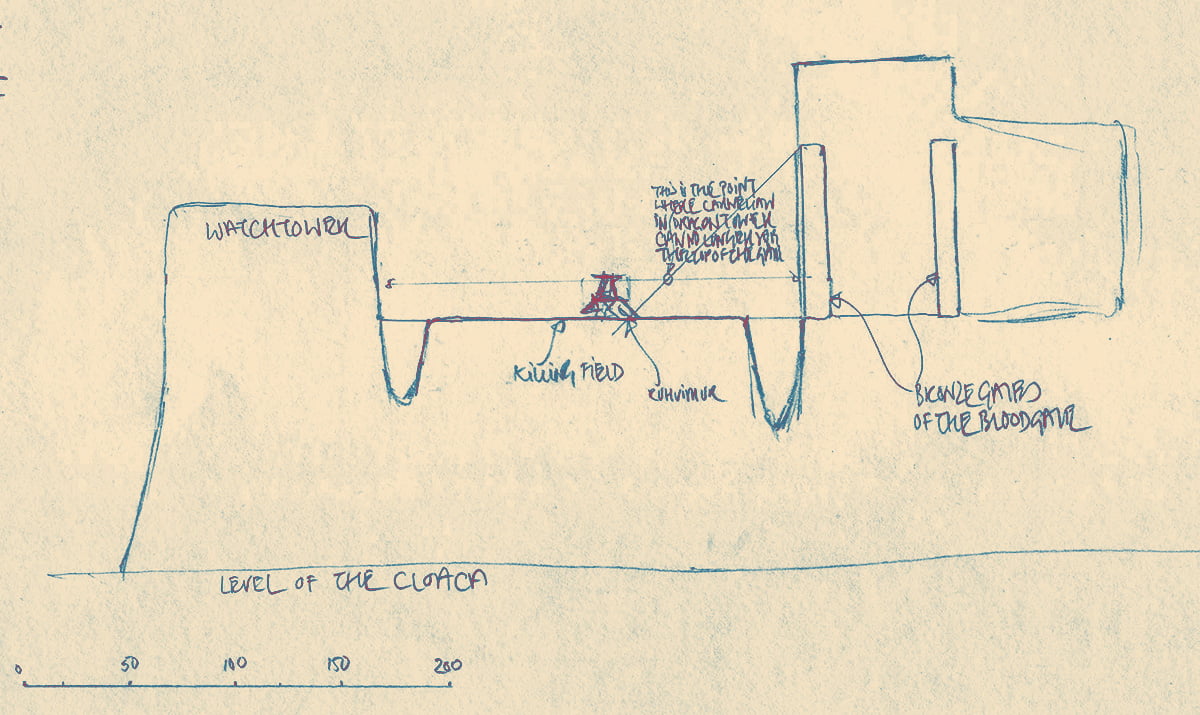
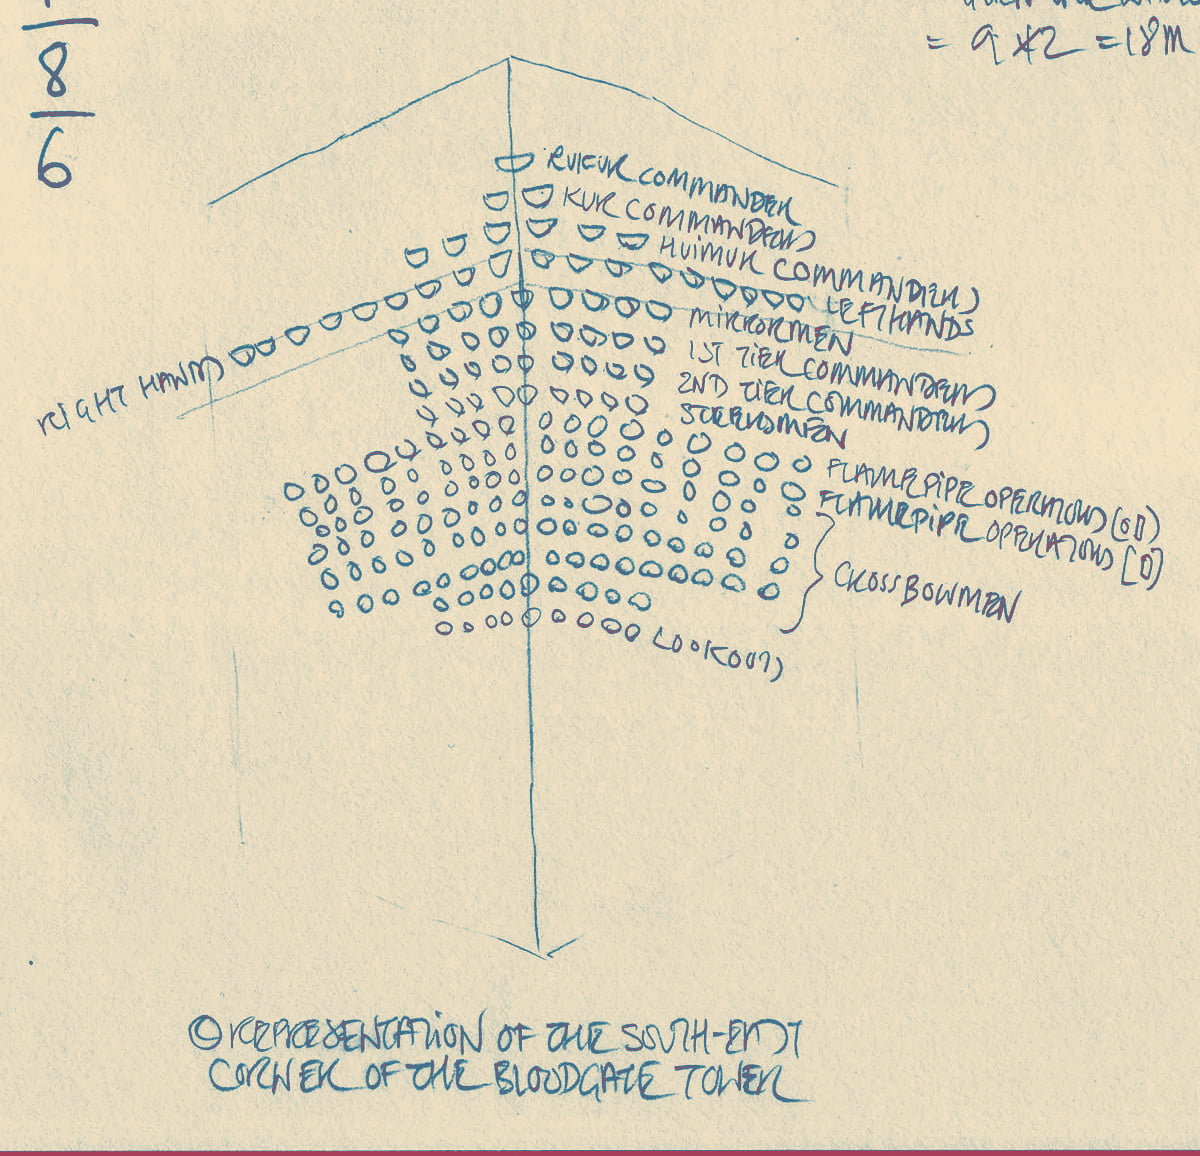
I drew the second and third drawings in 1982; they predate the writing of the Stone Dance by decades—showing just how long I had been brooding ideas for the books

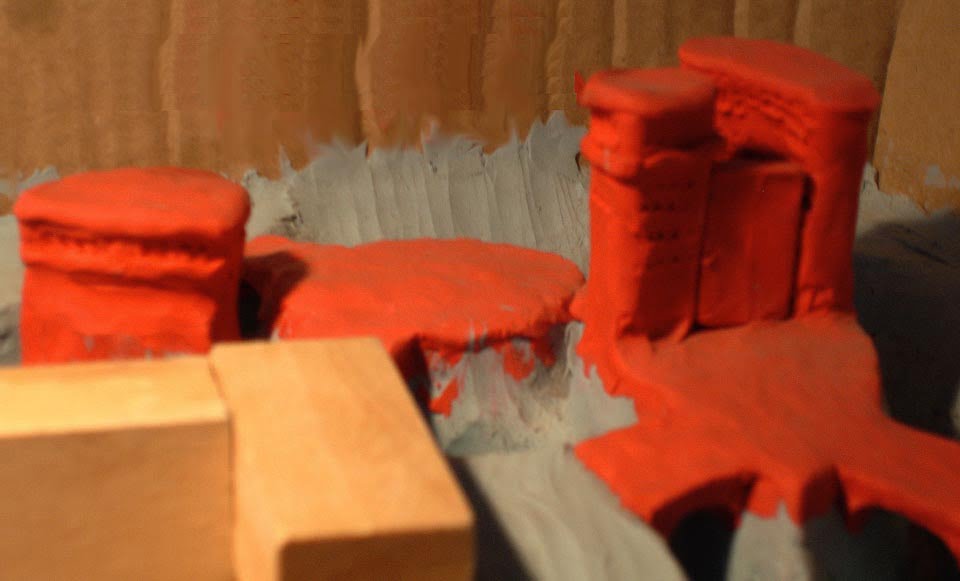
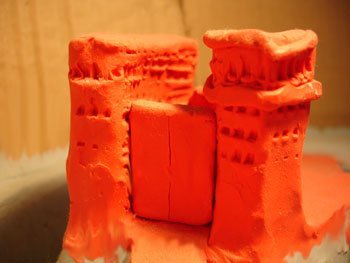
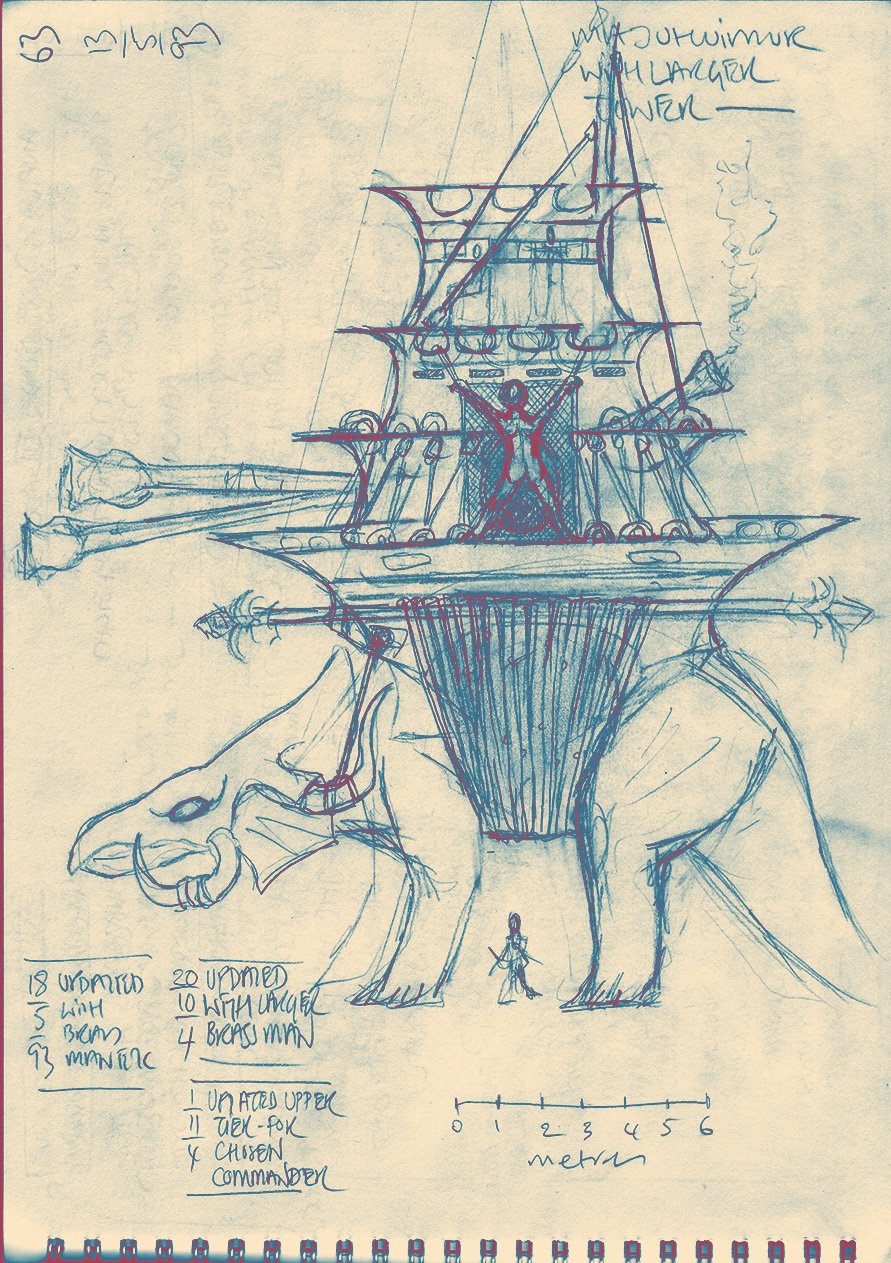
The first drawing shows the final form that a dragon and its tower took. The original image was produced in 1993, but was constantly modified during the writing of the First Edition of The Third God as I came to more fully understand how everything worked. The tower grew in size, requiring calculations of its weight, how much naphtha it could carry and the bearing capacity of a ruhuimur. To give some sense of scale, there is a small human figure depicted on the ground. Note the rigging that binds the upper part of the tower to its base, the two flamepipes projecting forward, the brassman closed over the oval doorway into the tower, the chimneys out of the back and the horizontal pole to which the ropes of the ‘girdle’ are bound

Jim Burn’s concepts and cover
cover for the First Edition of The Third God © Jim Burn
ruhuimur dragon concept ©Jim Burns
ruhuimur dragons concept ©Jim Burns

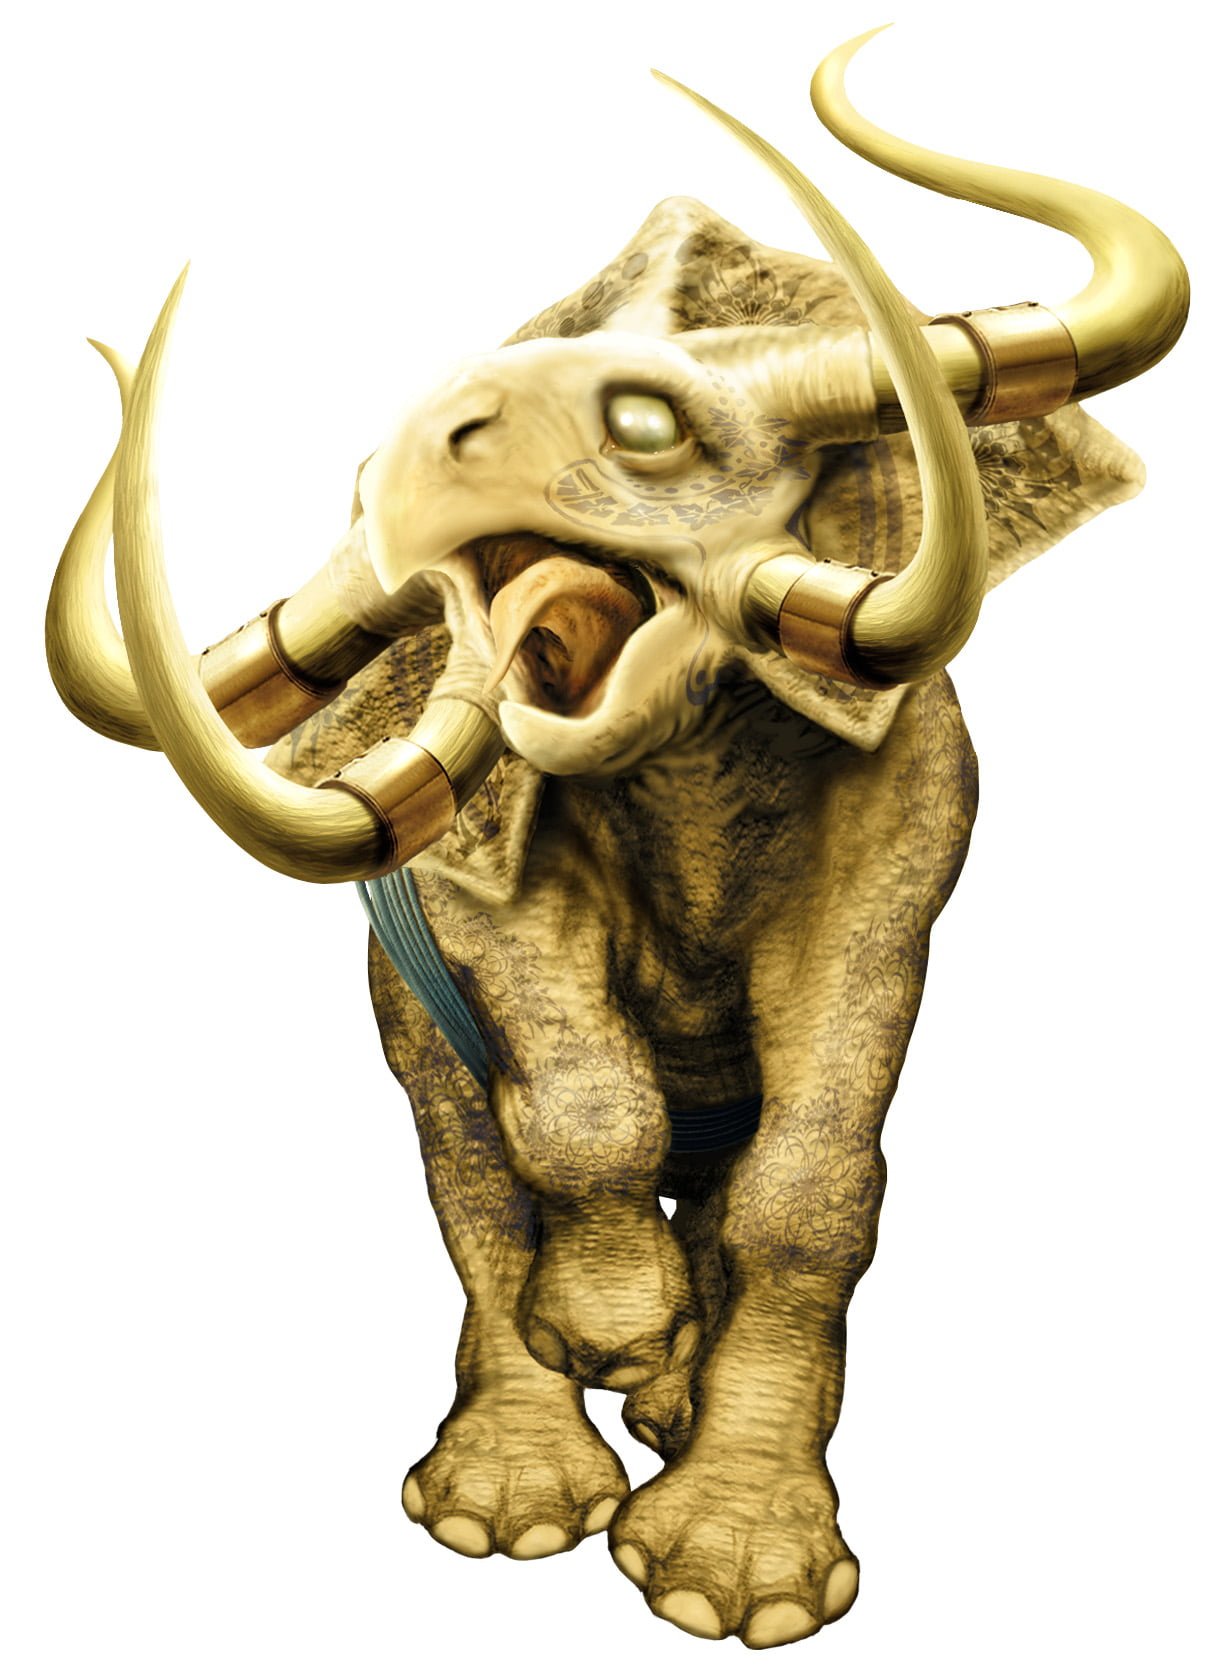
This is the wonderful artwork that Jim Burns produced for the First Edition of The Third God (that then included the 5th, 6th and 7th volumes of this Second Edition)

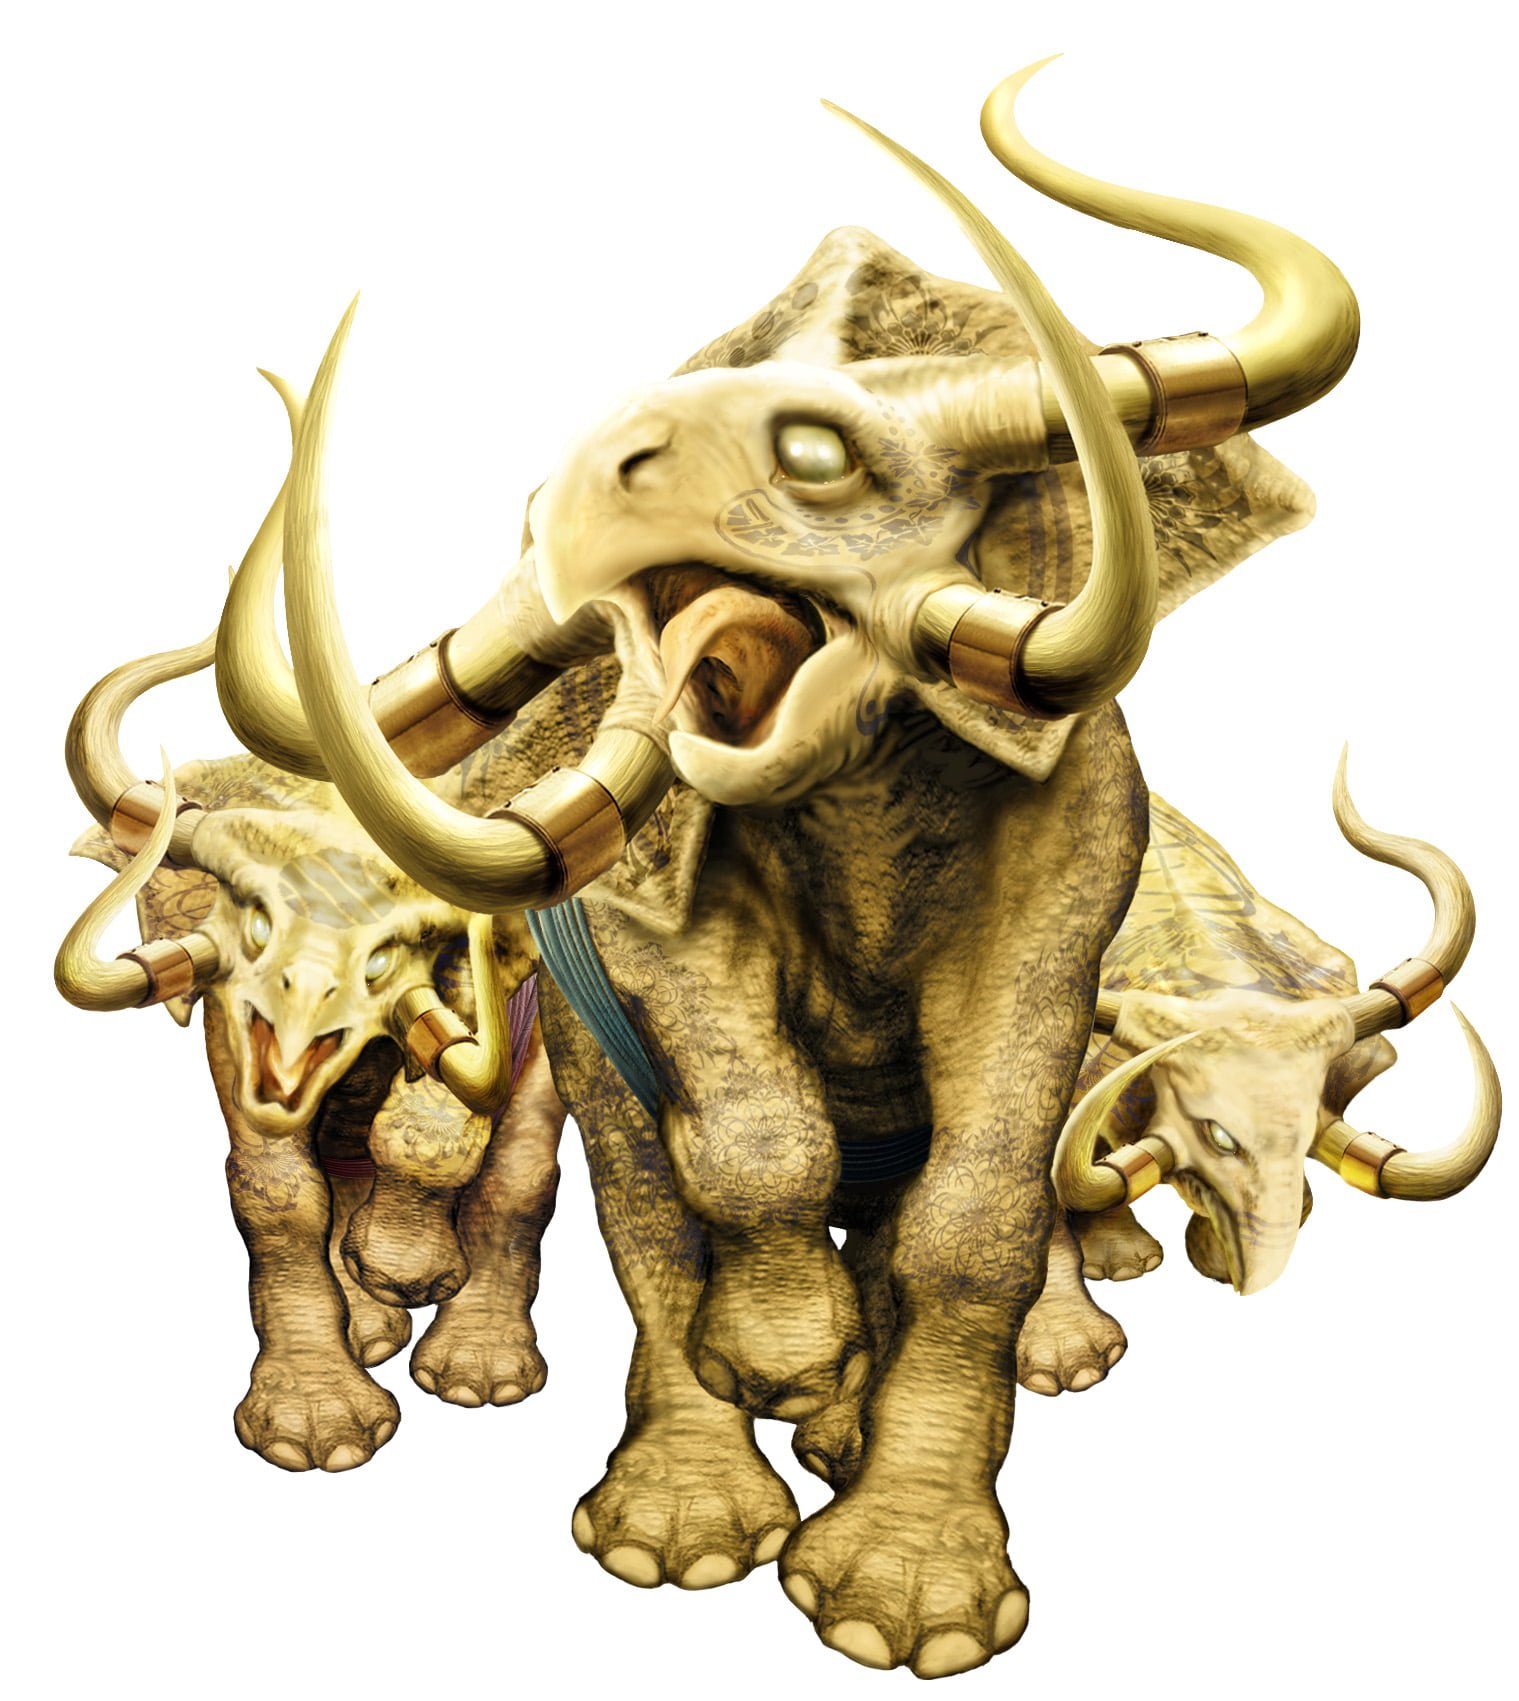
I am including this here, not only so that you can enjoy it, but because it demonstrates a flaw in the way that I have represented ruhuimur dragons from the very beginning—their bent legs. This is a long-standing issue: when I first drew these leviathans, I still had some notion lodged in my brain of ‘dinosaurs as lizards’—thus the legs bent out on either side. Of course, this is not how dinosaurs were built, nor could it be—such vast weight could only be supported on ‘straight, column legs’, which is why Jim, of course, depicted ruhuimur with the physiology of an elephant or rhinocerous

Note how Jim’s ruhuimur are painted with glyphs, as described in the books

Rank and Insignia

Ichorian, legionary and auxiliary ranks and insignia
early work on legionary ranks and insignia

There are many categories of military personnel maintained by the Masters throughout the Commonwealth, but all of them wear metal service collars that carry sliders. One of the functions of these sliders is to indicate rank.

The second diagram shows some of the work that culminated in the tables displayed in the first diagram. These tables show the ranks and insignia for the Ichorians, for legionaries and auxiliaries. Those displayed cover ruhuimur (or dragon) crews and auxiliary or other aquar-mounted forces. If you expand the image it will extend to cover legionary support staff.

The insignia are shown in two columns: the first for the Ichorian legion, the second for the other legions.

Note how insignia varies between the columns. This is a reflection of caste differences within the services. While the Ichorian double legion is recruited from the flesh tithe, all other legions have Masters from the Lesser Chosen as commanders; marumaga as the majority of the huimur crews and salt-paid, mercenary barbarians for the rest. The insignia thus reinforce racial caste differences. Among other things, it ensures that a Master can never be outranked by one of the Unchosen.

Insignia are based on Quyan numbers. Thus the sliders take the form of the broken or zero ring, [0], the ‘5’ bar [I], and a ‘spot’ rings [o]. The insignia thus code for a number. The higher the number, the higher the rank.

For example, a Legate’s four zero rings is the equivalent of 8000; a Righthand = 300; an aquar centurion for the Ichorians = 100; for a normal legion = 5.

The Legions

a ‘dragon’ or ruhuimur of the legions © 1983 Ricardo Pinto

Excluding the double Ichorian legion, there are 46 others distributed around the Guarded Land. Theoretically each consists of 27 dragons or ruhuimur, each accompanied by a squadron of 400 aquar-mounted auxiliaries. The dragon, with its tower and flamepipes, is the ultimate, terrifying expression of the power of the Masters.

Huimur

a lesser huimur, a common beast of burden

Huimur are the most common beasts of burden of the Commonwealth, and are found everywhere on the raised roads, carrying goods, howdahs, pulling chariots or wagons.

Huimur are characterised by their four horns and the bony crests that flare back from their heads.

a huimur pulling a chariot or waggon

Cone Trees

What are called ‘cone trees’ in the Stone Dance are trees similar to the araucaria araucana or monkey puzzle tree…

Chapter: Blood Gate

Information relevant to the 9th chapter of The Third God

the Blood Gate

Here are contained the various studies that I made to help me understand the Blood Gate. I even resorted to making a model—fro some particularly complex landforms and structures, drawings are not enough

diagram of the Blood Gate from the book
the Blood Gate
the Blood Gate

I produced this diagram for inclusion in the Second Edition of The Third God, attempting to somewhat emulate the style of the Neil Gower originals

the Blood Gate as viewed from the Black Gate
the Blood Gate as seen from the Black Gate

This is what you see as you leave the crater of Osrakum, once you pass through the Black Gate—the Blood Gate sitting on its ‘island’ rock

Running up from the foreground, on the left, is the chasm of the Cloaca that divides on either side of the rock. Two bridges cross to the rock from either side of the canyon floor. Ahead rises the ‘homeward’ gates between the two immense towers that form the Blood Gate. Beyond, to the left, there is a glimpse of the Killing Field

The vast canyon walls rise up on either side

the Blood Gate as seen from above
plan of my Blood Gate model viewed from above

These two images show how, by making the model, I refined my understanding of the structure of the Blood Gate

From above, it can be seen how its structures all sit upon its ‘island’ rock—a portion of the Canyon floor left isolated by the branches of the Cloaca chasm (1) that pass it on either side. The Blood Gate proper (2) consists of two towers (one considerably larger than the other) linked together by two massive sets of double gates. Behind the Blood Gate is a large open field (5) that is joined to both sides of the inner Canyon floor by bridges (7). The front of the Blood Gate connects to the Killing Field (3) by means of a bridge over a ‘moat’ (8). The Killing Field connects to the two sides of the outer Canyon floor by means of two further bridges (6). Rising beyond is an immense tower-fortress called the Prow (4)—note that there is another ‘moat’ between the Prow and the Killing Field.

The tower in which Carnelian takes up residence is the smaller of the two (9).

Side view of the Blood Gate
side view of the Blood Gate
a side view of the Blood Gate defensive system

There are aspects of the Blood Gate that are best appreciated from the side. Specifically, note the ‘moats’ that isolate the fortress structures from the Killing Field. The Prow tower is wholly isolated and can only be accessed through tunnels, running deep under the Killing Field, that connect it with the Blood Gate proper. The Blood Gate is connected to the Killing Field but only by a relatively narrow bridge, and this is blocked by the vast bronze gates that are considered impervious to any attack

Note also how high the Killing Field is above the Cloaca. The dragon with its tower depicted in the second image gives some idea of scale

the Blood Gate towers
view of the main towers and gate of the Blood Gate
balconies up the corner edge of the South Tower
the South Tower as seen from the south-west

The Blood Gate defensive system consists of two sets of gates, a number of bridges to narrow and direct any attack and three towers. One of these, the Prow, is isolated on the other side of the Killing Field and thus behind any potential attacker. Like the other towers, it is provided with a great number of huge flame-pipes fed from vast naphtha tanks. The other two towers—one twice the volume of the other—stand on either side of both sets of doors. Both are armed in the same way as the Prow. All three towers have, besides their military engines, large residential quarters for its garrisons.

Focusing our attention on the Southern Tower—that is the one in which Carnelian and Blue take up residence—the 2nd and 3rd diagrams show the tower’s south-western (incorrectly identified as south-east in my notebook) corner. The patterning of balconies matches the military hierarchy of the Ichorian Legion. It also gives a notion of the scale of this tower and, thus, the whole of the Blood Gate complex.

View into Osrakum from the Blood Gate
looking back into Osrakum from the South Tower of the Blood Gate

I produced this sketch to give me an idea of what could be seen from the South Tower of the Blood Gate when looking back into Osrakum. If I had just ‘made it up’ I would not have imagined that this is what it would look like

It does make certain things clear. The first is just how massive the Canyon is—the Black Gate, though quite a large structure in its own right, looks like a low fence. Even from this distance, the Pillar of Heaven is still a dominating landmark—which I suppose is not entirely surprising, since it is 2km high. I was a little surprised, however, to find that the Sacred Wall on the far side of the Skymere is also visible

the Canyon of the Three Gates
the stretch of the Canyon from the Green to the Black Gates

The Canyon of the Three Gates is the only way in and out of the crater of Osrakum. It is a narrow defile, running between sheer, cliff walls. Three fortresses have been built along its length, the three ‘gates’: the Green Gate, the Red or Blood or Ichorian Gate, and the Black or Death Gate. The Cloaca—a channel cut anciently in the floor of the Canyon—allows excess water to be carried out of the lake that fills the crater of Osrakum

The diagram shows only the portion of the Canyon that lies between the Green and Black Gates and is not drawn to scale. The Red Caves lie between the Blood Gate and the Black Gate

the Green Gate
the western approach to the Green Gate

The Green Gate is the first of the Three Gates and is a curtain wall, running across the Canyon, the surface of which is covered in bronze spikes, so that the whole mass looks like an immense hedge. At the lower level, gates act as ‘airlocks’, where goods from the Outer World are transferred to the other side by Red Ichorians. Gates higher up, on either side, allow the leftway and the Lords’ Road to continue along the Canyon. The former allows messages to pass in and out of Osrakum: the latter is used by the Chosen.

The drawing also shows how the Cloaca passes under the Gate through grilles. A throng of people are shown for scale

a plan of the Green Gate fortress

The second drawing shows a plan of the Green Gate. Note the double set of gates—each consisting of three gates—that seal off, between them, two ‘airlocks’. It is by this means that ‘contamination’ from the outer world is kept out of Osrakum

down in the Cloaca and the Corpse Dam
side view of the Cloaca with corpse dams

This shows a side view of the Cloaca looking north-west towards the ‘island rock’ upon which the Blood Gate complex is built. The horizontal line at the top of the diagram shows the top of the rock—the Killing Field in the centre, to the left the bridge that connects that to the outer canyon—to the right, the ‘moat’ and then the base of the Blood Gate itself

But what this diagram is really about is the corpse mound (one of two—there is another in the other branch of the Cloaca on the other side of the ‘island rock’) that has built up from the corpses ‘bulldozed’ from in front of the Blood Gate by Carnelian with his dragons, that then tumbled down the ‘moat’ into the Cloaca. Tiny figures, one on top of the ‘dam’ and another in front of it, show the scale. The level of the water building up in the Cloaca behind the dam is also shown

Quyan Numbers

Quyan numbers 1 to 19

The Chosen use a number system inherited from the Quyans. It is a vigesimal, or base-20, system [that is, it has distinct numerals from 1-19] and is, further, positional, having a zero [so that there is a units position, a ’20s’, a ‘400s’, an ‘8000s’, a ‘160000s’ and so on…]

Having a passion for the Maya, I adopted their numbering system for my books. As far as I know, the Maya are the only people other than the Hindus to have developed the zero—an invention that is essential for a positional numbering system. The symbol used by the Quyans for zero differs from the Mayan in that it represents a broken cistern rather than a seashell. The broken cistern indicates emptiness—presumably that too was the rationale behind the Mayan use of a seashell.

2562262 expressed in Quyan numerals

The diagram above shows the number 2562264 written in Quyan numerals: 16, 0, 5, 13, 4 read from right to left.

0.8007075 expressed in Quyan numerals

The diagram above shows the number 0.8007075 written in Quyan fractions: 16, 0, 5, 13, 4 read from left to right.

Quyan numbers can be written vertically—with the units at the bottom.

Osrakum (model)

view from the east

I made this model to better understand the complex landform that resulted from the collaboration with Professor Ben Harte—alas, it was destroyed in a house fire

from the west showing the Canyon of the Three Gates

The crater of Osrakum contains the Skymere lake and has the Isle at its centre. On this island are the smaller cone and crater, that contains the Plain of Thrones, the Labyrinth, the Pillar of Heaven and the Forbidden Garden of the Yden

view from the west

The edge of the large, almost submerged crater is the Ydenrim, holding within its circle the Yden and the Pillar of Heaven. The ‘orange crescent’ within the Ydenrim is the region filled with shallow lagoons

The Sacred Wall of the crater, cut along its inner edge by the coombs of the Chosen, is only fully breached by the Canyon of the Three Gates that leads out to the City at the Gates

Osrakum

map of Osrakum © Neil Gower

Osrakum is a volcanic crater containing the Skymere and, in the midst of this lake, the Isle. On the Isle is the smaller crater containing the Plain of Thrones and, beyond that, the Labyrinth. The Yden forms the greater part of the Isle. From the heart of this rises the Pillar of Heaven, hollowed into the summit of which are the Halls of Thunder. Cut into the inner surface of the crater’s Sacred Wall are the coombs of the Chosen. The Sacred Wall is only fully breached by the Canyon of the Three Gates that leads out to the City at the Gates in the Outer World

my original map of Osrakum

This is my original map, produced on an ancient, black and white graphics application on my trusty Mac SE and printed out on a dot matrix printer. The artist Neil Gower turned this into the map that is used in the books

Wheelmaps

Wheelmap compass rose © Neil Gower

A wheelmap is a symbolic representation of the Three Lands: the Black Land of Osrakum, the Red or Guarded Land, and the Green Lands of the barbarians. Its is the symbol of the Commonwealth

The diagram shows a wheelmap as a compass rose aligned to the south west, from where the Rains come.

The system of raised roads is shown, with all the cities and with a ‘sea-wave-curl’ glyph indicating the sea lying to the north west.

Wheelmaps—representations of the Three Lands

Subscribe to my Newsletter